why cuttings rot in water

Why Your Cuttings Rot in Water (and How to Stop It)

Nearly half of household plant cuttings fail before roots form because jars lose oxygen fast. That makes stem tissues soft and prone to microbes.

Propagation looks simple: trim a shoot, place it in clear liquid, and watch roots appear. But stagnant conditions let oxygen drop. Low air and warm temperatures feed bacteria and fungus that harm the stem and emerging roots.

This short guide promises a simple, repeatable routine you can try at home. You’ll learn the real reasons rot happens, how to set up a clean jar, when to refresh the liquid, and what to do if a stem goes mushy.

Big themes: clean tools, clean container, correct node placement, steady airflow, and gentle light. Most failures come from a few fixable mistakes, not bad luck. We’ll also note which plants do better in soil than this method and give a quick checklist you can use today.

Table of Contents

Key Takeaways

  • Oxygen loss leads to tissue damage and microbial growth.
  • Keep jars clean and change liquid on a schedule.
  • Place nodes correctly so roots can form above the surface.
  • Provide bright, indirect light and avoid heat spikes.
  • Know which species suit propagation versus potting mix.

Why cuttings rot in water happens in the first place

When a jar goes still, oxygen drops quickly and fragile tissues start to fail. Low dissolved oxygen is the single, simple trigger that turns a clean propagation setup into a risky one.

A close-up view of water roots emerging from cuttings placed in a clear glass vase. In the foreground, the focus is on the delicate, translucent roots, showcasing their intricate structure and textures. The middle ground features vibrant green leaves sprouting from the cuttings above the water level, indicating healthy growth. In the background, soft, diffused natural light filters through a window, casting gentle reflections on the water’s surface, enhancing the visual appeal. The atmosphere is calm and serene, evoking a sense of nurturing and growth. The composition should maintain a clean, scientific aesthetic, making the connection between the water roots and their importance in plant propagation clear and engaging.

Low oxygen in stagnant water: the hidden trigger

Oxygen-starved nodes cannot breathe. Even though liquid surrounds them, cells need gas to stay firm and support early roots. Without that gas, tissues soften and die.

Bacteria and fungus thrive when conditions stay wet and airless

Cloudy jars, slimy stems, mushy nodes, and blackening roots are warning signs that biological pressure is rising. Abiotic oxygen loss and biotic attack often happen together.

Common culprits include Pythium, Phytophthora, Fusarium, and Rhizoctonia. These microbes multiply faster when jars are crowded, liquid is unchanged, or decaying leaves remain.

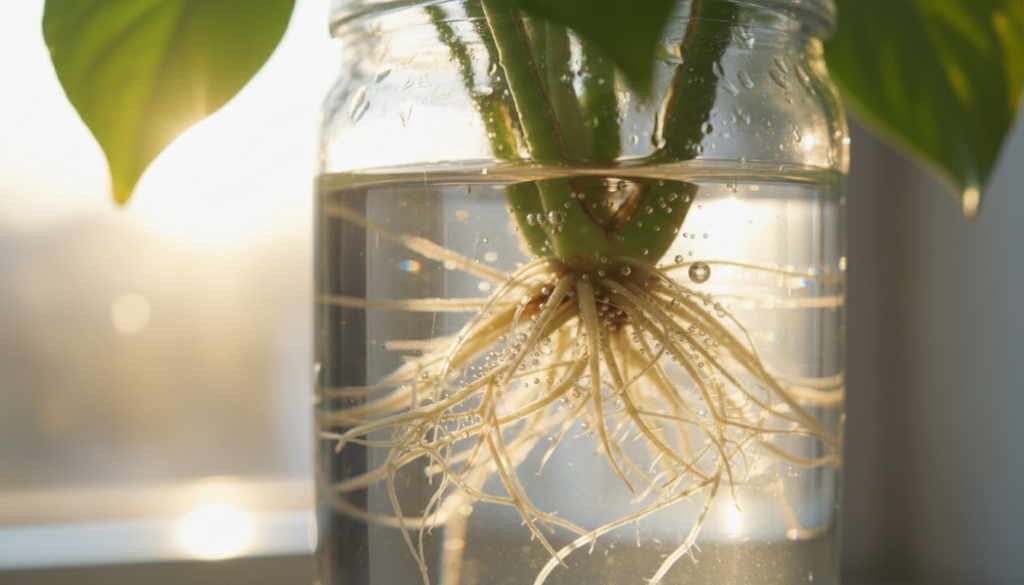
Water roots vs. soil roots: how adaptation changes risk

Water roots are thinner and hairier. They absorb oxygen from liquid but stay delicate. The longer a cutting spends in liquid, the more it adapts to that state and the harder a move to soil becomes.

Goal: keep liquid oxygenated, keep stems clean, and build a stable setup so roots grow without setbacks. For more related tips on indoor care, see indoor flower care tips.

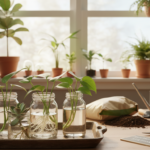
How to prevent rot from day one with a simple water-propagation setup

Begin with hygiene and the right container to give each cutting the best chance.

Sanitize tools

Wipe shears with rubbing alcohol before each use and between plants. Clean blades stop bacteria from entering fresh tissue. A quick wipe is enough when you move between stems.

Pick the right glass

Use a narrow glass or jar that holds the stem upright and keeps leaves above the rim. If the mouth is too wide, cover it with clear plastic wrap and poke a hole to hold the stem at the correct height.

Placement and water care

Keep one healthy node submerged while ensuring no leaves touch the liquid. Top up as needed and change water on a schedule: about weekly, or every 1–2 days when many stems share one jar. Avoid warm water to keep oxygen higher.

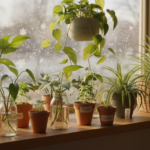
Space, separation, humidity, and light

Limit each glass to a couple of stems so air and oxygen last longer. Isolate new cuttings from older or struggling ones to prevent spread. Skip misting for these setups; poor ventilation raises bacterial pressure. Aim for bright, indirect light and avoid direct sun.

A well-organized water propagation setup for plant cuttings, featuring several glass containers filled with clear water, each holding healthy green stems, roots just beginning to form. In the foreground, a close-up of one container showcasing air bubbles rising around the cuttings. The middle ground includes a wooden windowsill with sunlight streaming through, casting soft shadows and highlighting the vibrant green of the leaves. In the background, a blurred garden scene with lush greenery, creating a peaceful and nurturing atmosphere. The lighting is bright and natural, suggesting a sunny day, while the overall mood inspires hope and growth, perfect for illustrating successful propagation techniques.

Action Why it matters Timing
Sanitize shears Stops bacteria transfer to fresh stems Before each cutting
Change water Restores oxygen and reduces buildup Weekly or every 1–2 days if crowded
Keep leaves dry Prevents mushy tissue that spoils the jar At all times

How to save a cutting that’s already rotting

Quick action helps most struggling stems. Start with a clear look: find mushy, black, or foul-smelling sections and slimy roots. These are active rot and must be removed.

Rescue step: trim the stem back to firm, healthy tissue. Don’t hesitate to shorten the piece; leaving damaged bits lets bacteria and fungus keep growing.

A close-up of a rotting plant cutting submerged in clear water, with delicate, wilting leaves and a slightly discolored stem. In the foreground, show small bubbles forming around the cutting, indicating the rotting process. In the middle ground, include a fresh, healthy cutting placed nearby in a separate vase, with vibrant green leaves and a strong stem, showcasing the contrast between the two states. The background should be softly blurred, featuring hints of an indoor garden with natural light streaming in, casting gentle shadows on a rustic wooden table. The atmosphere is educational and hopeful, emphasizing a sense of care and attention for plant health. Use soft, diffused lighting to highlight the textures of the leaves and water.

Isolate and reset

Place each sick specimen alone in a clean jar. Rinse the stem and container, then restart with fresh water. For stubborn cases, briefly rinse or spray with diluted hydrogen peroxide to lower microbial load.

Placement and recovery routine

Keep just one healthy node submerged, keep leaves dry, and stabilize the stem so it won’t bruise. Change the water daily while the cutting recovers and monitor for new roots.

Step Action Timing
Diagnose Remove mushy or black tissue Immediate
Disinfect Rinse with clean water or light hydrogen peroxide Before re-rooting
Isolate & refresh One specimen per jar; change water daily First few days to weeks

Expectations: recovery can take days to weeks depending on how much healthy stem remains. Clean water, oxygen, and correct nodes give the best chance for new roots to form. For more on preventing this problem, see root rot prevention.

Root growth timeline, transplant timing, and when water is the wrong method

Timing the move from jar to pot makes the difference between smooth transplanting and a stressed plant. Watch for multiple fine roots about 1–2 inches (≈5 cm) long that are just starting to branch. That stage shows the cutting has energy and is ready for soil.

A detailed root growth timeline illustrating the stages of root development for plant cuttings. In the foreground, emphasize three distinct root stages: tiny emerging roots, longer healthy roots, and mature roots ready for transplanting. The middle layer should showcase the cuttings in water, emphasizing clarity and cleanliness, highlighting the problematic aspect of water propagation. The background should feature a softly blurred garden setting with various plants, creating a tranquil and educational atmosphere. Use natural sunlight to illuminate the scene, casting gentle shadows for depth. Capture the image from a slightly elevated angle to allow a comprehensive view of the root development stages, fostering a sense of progression and growth. Aim for a natural and serene mood, perfect for conveying the importance of understanding root growth in cuttings.

How long to keep stems before potting

Keep a cutting until you see several roots and early branching. Moving it once branching starts reduces shock and speeds establishment.

When waiting hurts

Water roots are thin and fragile. The longer a specimen stays in liquid, the more energy it spends on hair-like growth. That makes the transfer to soil harder and raises transplant stress.

When to choose soil instead

Woody plants and some slow-rooting species do better with direct soil propagation. If a plant keeps failing in jars, switch methods and try a moist potting mix that supports stronger early roots.

Long-term water care and examples

For long-term water growth, refresh or top up weekly and consider a small air pump for oxygen. Pothos, heartleaf philodendron, and spider plant are fast examples that root at nodes and often adapt well to this method.

Conclusion

A still jar with poor air exchange is the single biggest hazard for new stems trying to form roots.

Quick screenshot checklist: sanitize tools, use the right glass, set nodes correctly, keep leaves above liquid, and change water on schedule.

Isolate any sick specimen at once. One infected piece can spread bacteria and spoil an entire jar.

Give bright, indirect light for steady growth. Low light slows progress, and direct sun stresses tender tissue.

Move to soil once several roots reach about 1–2 inches and show branching. For woody species, choose soil from the start. Long-term liquid growth works only with steady oxygen and strict cleaning.

Most failures come down to a few fixable things. Control oxygen, keep setups clean, and success rates rise fast.

FAQ

What causes stem tissue to go soft when propagating in a jar?

Low oxygen and stagnant liquid let bacteria and fungi multiply quickly. Stems need air around the cutting wound; when the environment is airless and warm, microbes break down tissue and the stem becomes soft and brown. Proper ventilation, routine water changes, and clean tools cut microbial load and protect the tissue.

How do microbes and fungus gain an advantage in closed containers?

Closed glass traps moisture and reduces gas exchange, so beneficial microbes that support roots can’t compete. Pathogenic bacteria and fungal spores thrive, feeding on decaying plant sugars. Using a clean jar, avoiding leaf contact with the liquid, and refreshing the liquid cuts their food and oxygen supply.

Do roots formed in a jar differ from those grown in potting mix?

Yes. Roots developed in liquid are thinner and adapted to absorb oxygen from the air-water interface. Soil roots are thicker and built for nutrient uptake and stability. Liquid roots often struggle when left too long before transplant because they need time to adapt to darker, denser soil conditions.

What are the first steps to set up a safe propagation station at home?

Start with clean, sharp shears and sanitize the jar. Pick a clear container that holds stems upright so nodes stay submerged but leaves remain dry. Place cuttings in bright, indirect light and change the liquid regularly—about every week—to keep oxygen levels healthy.

How often should I refresh the liquid to prevent bacterial buildup?

Change the liquid at least once a week; more often if it gets cloudy or smells. Fresh liquid restores dissolved oxygen and removes waste and microbes. Topping off between full changes helps, but full replacements are best to avoid gradual contamination.

Can too many stems in one jar cause problems?

Yes. Overcrowding reduces oxygen around each stem and increases the chance of disease transfer. Give each stem space so nodes aren’t touching, and separate new stems from older, struggling ones to limit cross-contamination.

Should I mist cut leaves or keep humidity high around a jar?

Avoid misting leaves inside the container or leaving foliage wet. High local humidity can prolong wet tissue and invite rot. Keep good room ventilation and only let the nodes contact the liquid; dry leaves stay healthier and reduce infection risk.

What light conditions help avoid tissue breakdown while rooting?

Bright, indirect light works best. Low light slows root growth and gives microbes time to act. Direct sun can overheat the jar and stress stems, also raising microbial activity. A stable, bright spot near an east- or north-facing window is ideal.

My stem looks mushy—how can I rescue it?

Remove the cutting from the jar immediately. Trim back to healthy, firm tissue with sterile scissors, clearing any discolored parts. Rinse the cutting, change the jar and liquid, and restart the stem with only healthy nodes submerged. Isolate recovering pieces until they show fresh roots.

When should I isolate a problematic stem from the rest?

Isolate at the first sign of softness, dark streaks, or a foul odor. Quick separation prevents microbes from spreading and protects healthy stems. Increase water changes and monitor closely while the affected piece recovers or is discarded.

How do I position a restarted stem to reduce repeat issues?

Place the healthiest node just below the liquid surface and keep leaves above the rim. Use a narrow-neck jar or support to hold the stem steady so only intended nodes stay submerged. Stable positioning prevents wobble wounds and limits tissue contact with water.

How long should a stem remain in a jar before moving to soil?

Wait until roots reach about 1–2 inches and show fine branching. That typically takes one to three weeks for fast-rooting species like pothos. When roots look healthy and fibrous, potting reduces transplant shock and supports thicker root development.

Can I leave some plants in water long-term and expect good health?

Some species handle long-term liquid culture, but it requires strict maintenance: frequent full liquid changes, good oxygenation, and occasional nutrient additions. Many plants do better when transitioned to soil after initial root formation for stronger growth and resilience.

Why does delaying transplant increase shock for water-adapted roots?

Water-adapted roots lack the protective hairs and structure that soil roots develop. The longer they stay fragile, the more they depend on dissolved oxygen and low mechanical stress. Sudden planting into dry, dense media forces rapid structural changes they can’t handle without a gradual acclimation.

When is soil a better option than liquid for propagating certain plants?

Woody species and succulents generally root more reliably in a porous, well-draining medium. If a plant shows slow root initiation in a jar, moving to a sterile mix or using a humidity dome offers better contact, support, and disease control for tougher stems.

How can I keep long-term liquid-rooted plants healthy?

Maintain weekly full liquid replacements, use an air stone or gentle aeration if possible, and add a weak water-soluble fertilizer occasionally. Keep the container spotless and trim any slimy roots or leaves. Regular care prevents algal and bacterial buildup that stresses plants.

Which houseplants are reliable for node-based rooting in a jar?

Pothos, philodendron, tradescantia, and coleus usually produce roots quickly from nodes. These species tolerate bright, indirect light and show visible root growth within days to a few weeks, making them forgiving examples for beginners.

Comments

No comments yet. Why don’t you start the discussion?

Leave a Reply

Your email address will not be published. Required fields are marked *