Surprising fact: over 70% of common houseplant enthusiasts can root a healthy leaf any time of year and grow several new plants from one single start.
What this means: rooting a single healthy leaf with its petiole is a simple way to form roots and tiny plantlets that become full pots later. Most varieties clone true from leaves, though some chimeras will not. Also, check the plant tag first — a few mass-market hybrids are legally protected.
This guide previews two easy methods: a light soil or growing medium method and a clean water-rooting method. Both are low-cost and work for beginners. Expect patience: one leaf can yield several baby plants over months.
Promise: choose the right leaf, make a clean cut, use a light mix, keep humidity steady, give bright indirect light, and wait for clear milestones: roots → baby leaflets → potting up → blooms.
Key Takeaways
- One healthy leaf plus its petiole can produce multiple new plants.
- Two main methods: rooting in soil/growing mix or rooting in water.
- Most varieties clone true; some chimeras do not and some hybrids may be protected.
- This is a patient, low-cost hobby great for beginners and trading with friends.
- Follow a simple repeatable routine: clean cut, light mix, humidity, bright indirect light.
Why Propagate African Violets From Leaf Cuttings?
Many growers choose leaf starts because they reliably make exact copies of the parent plant. This is a cheap and simple way to expand a collection or create insurance if the original plant struggles.
What “true to the parent plant” means
Most new plants will be clones of the parent plant, so blooms and foliage usually match. That makes sharing safe for collectors who want the same flower and form.
When surprises happen
Chimeras and some multicolor types can produce different blooms from a leaf. If you grow a variety that sports, bloom-test before you name or trade it.
Realistic timing and temperature
Expect about a month to visible roots, then months for plantlets and size-up. Many growers see first flowers in about 9–12 months.
- Your results may vary: leaf age, health, humidity, and light change how fast things move.
- Fastest growth: aim for 72–80°F and avoid cold drafts or overheating.
Pick the Right Leaf From the Mother Plant for Best Results
Select a healthy section from the mother plant to give new starts the best chance to root quickly.
What a healthy choice looks like: firm, unblemished blades with a green, sturdy stem. Avoid brown, soft, or damaged stems that signal rot or disease.
Choose mature but not old leaves. Mature leaves have stored energy to form roots. Very old outer leaves tend to rot or root slowly.

Where to pick
Look to the middle rings of the rosette—commonly the third row from the center. These leaves are the sweet spot: neither tender nor tired.
Variegation and risk
For variegated plants, pick leaves that are mostly green. This reduces rot risk while keeping the pattern in future plants.
Label and track
Always tag each cutting with the variety name and date. Proper labels preserve value and make sharing or showing easy.
| Feature | Good sign | Avoid |
|---|---|---|
| Blade | Firm, unblemished | Spots, mushy areas |
| Stem | Green and sturdy | Brown or squishy |
| Position | Middle/third row | Center tiny leaves or oldest outer leaves |
| Variegation | Mostly green for best results | Heavily white or thin tissue |
Tools and Supplies for african violet propagation leaf cutting
Good tools and the right growing medium make rooting success far more likely than luck alone. Gather a few basics before you begin and you’ll avoid common problems like rot and slow rooting.
Potting mix options
Choose a very loose, porous mix. A peat-based violet potting mix with high perlite works well when fluffy. Perlite and vermiculite blends are even airier and cut rot risk for beginners.
Pots and drainage
Use small, shallow pots with good drainage. Shallow containers help the medium dry evenly so cuttings don’t sit in wet mix.
Hygiene and humidity
Sterilize blades with rubbing alcohol between cuts to prevent disease. If home humidity is under 40%, cover pots with a clear plastic bag or clamshell until roots form.
- Minimum kit: small pots with drainage, a light potting medium, a sharp clean blade, labels, and a clear humidity cover.
- Moist, not soggy: think of a wrung-out sponge—holds shape, never drips.
- Condensation tip: light fogging is fine; heavy dripping means lower humidity or more ventilation.
| Item | Best choice | Why it helps |
|---|---|---|
| Mix | Peat-based mix with high perlite or perlite/vermiculite blend | Airy structure reduces rot and speeds rooting |
| Pot | Small, shallow with drainage holes | Prevents waterlogging and stabilizes moisture |
| Humidity cover | Clear plastic bag or clamshell | Maintains moisture when indoor humidity is low |
| Tool care | Rubbing alcohol for sterilizing blade | Stops disease transfer between starts |
How to Take and Trim a Leaf Cutting
A clean removal and smart trim give each start its best chance to form roots and tiny plantlets.

Remove the leaf without bruising the stem
Gently hold the blade at the base and either twist with a small wiggle or use a sharp sterile blade for a single clean cut. Avoid pinching the stem—bruised tissue easily rots and stops rooting.
How long to leave the petiole and how to make the angled cut
Trim the petiole to about 1–2 inches so there is enough tissue to root without burying too much stem. Make a slanted cut across the petiole; an angle increases the exposed area and helps plantlets grow toward light.
Optional technique: split the stem base for more plantlets
For extra clones, carefully split the stem base about 1/4 inch deep. This creates more wound sites and can encourage multiple plantlets from one start. Keep the split shallow to limit rot risk.
If the leaf breaks off: make a wedge to simulate a stem
If a leaf detaches with no petiole, trim a small wedge from the base and insert the wedge into the medium. This mimics a stem and often still produces roots and babies.
Caution: keep all cuts clean and minimal. Overhandling or planting too deep increases rot far more than it increases success.
Rooting African Violet Leaves in Soil or Growing Medium
Starting plants in a loose growing medium gives new starts a gentle, stable place to send out roots. Many growers prefer this method because roots formed in soil transition easily into long-term potting and it often becomes a true “set it and forget it” step.
Prep the medium: thoroughly moisten the potting soil, then let excess drain so the mix is damp but not dripping. Keep the medium fluffy—don’t pack it—to ensure oxygen reaches developing roots.
Planting depth and angle
Insert the petiole shallowly—generally no more than 1 inch—so babies don’t have far to reach the light. Tilt the start at about a 45-degree lean with the fuzzy top up and the blade above the soil line.
Humidity enclosure and when to skip it
Seal in a clear bag or clamshell that does not touch the leaves to reduce drying. If your room stays around 50–60% humidity and warm, you can often skip plastic and still succeed.
Light and what to watch for
Place in bright, indirect light or run grow lights about 12 hours daily. Light condensation inside the enclosure is fine; heavy dripping means the medium is too wet. After a few weeks, a gentle tug that meets slight resistance usually signals roots, and small green bumps at the soil line are the first babies.
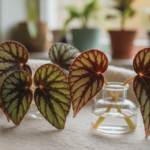
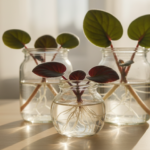
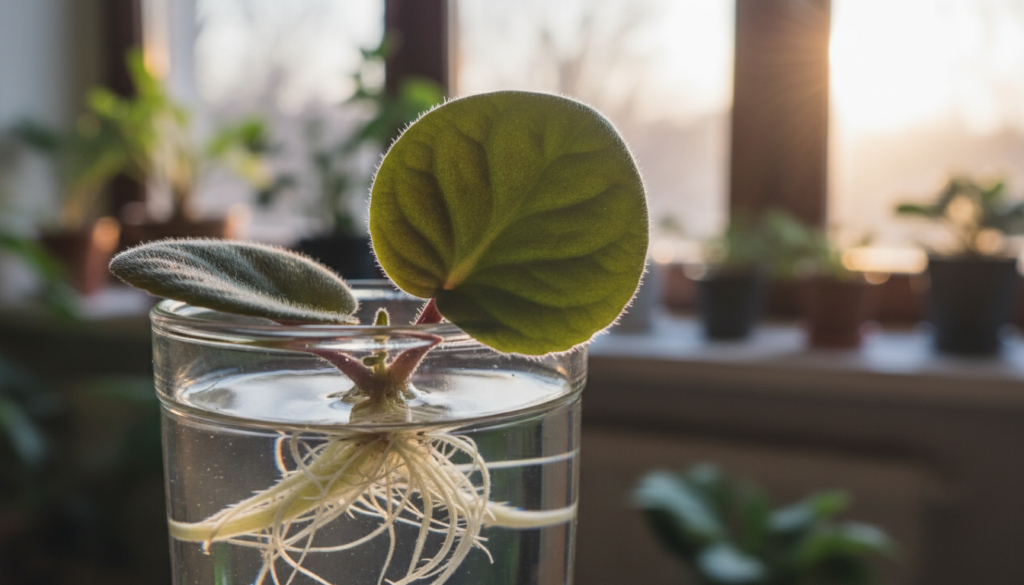
Rooting African Violet Leaves in Water
A simple jar and a careful set-up let you watch roots form in plain sight. This method is ideal for beginners who want a low-mess way to observe progress and learn what early roots look like.

Simple jar method
Use a small jar or bottle and cover the mouth with plastic wrap, waxed paper, or foil. Make a small hole that holds the petiole so only the stem sits in water while the blade stays dry.
Water quality and algae control
Use clean, relatively pure water and avoid softened tap water. Change the water if it becomes cloudy to prevent bacteria and algae.
“A dark, long-neck bottle slows algae and keeps the view tidy.”
When to move to potting mix
Watch for tiny, white, slightly thick roots about 1/4 inch long. At that point, gently transfer the start into a loose mix so roots can adapt and strengthen in soil.
- Helpful tip: the blade must stay dry to reduce rot.
- Handle with care: water-grown roots are fragile—move slowly when potting up.
Do You Need Rooting Hormone for Violet Leaf Cuttings?
You don’t always need a commercial rooting powder to get strong roots from a healthy leaf start. Many growers skip it because these fleshy leaves form adventitious roots easily under the right conditions.
Why a hormone is usually optional
Simple biology explains it: this type of tissue already has the capacity to form new root tips. Good warmth, steady moisture, and bright indirect light matter more than a chemical boost.
If you choose to use hormone
Use only a tiny amount. Excess powder can cake and burn delicate new roots. A safe method is to pour a little rooting hormone into a separate dish, then very lightly brush or tap the cut surface with a dry paintbrush or toothpick.
“Never dip a wet stem into the original jar — that can contaminate the whole container.”
- Skip it if you prefer: many hobbyists get excellent results without any hormone.
- Clean handling: avoid double-dipping to keep the jar sterile.
- Real gains: hormone may shave off a bit of time in some setups, but consistent care usually delivers better returns.
What Happens Next: Roots, Plantlets, and Timing
Expect clear milestones instead of guessing—roots, tiny rosettes, and pot-ready babies arrive on a predictable timeline.

Weeks to roots
After setup, check starts gently after a couple of weeks. A soft tug that meets slight resistance often means the start has begun to form roots.
By about four weeks many healthy starts are clearly rooted and can resist a light pull without sliding free.
Months to babies
In the next months you’ll see tiny green bumps at the soil line. Those bumps develop into plantlets and then miniature rosettes.
Ready to pot up
Potting readiness looks like several small leaves per baby, a visible crown, and enough root mass to hold soil when moved.
- Checklist: multiple tiny leaves, formed rosette, roots visible at medium surface.
- When those appear, separate carefully and move each baby into its own small container.
Flowers and overall timeline
Plan on close to a year from start to first flowers in typical home conditions. Faster results come with steady warmth, bright indirect light, and even moisture.
| Stage | Typical time | Signs | Action |
|---|---|---|---|
| Roots form | 2–4 weeks | Resistance on tug; tiny white roots | Keep humidity steady |
| Plantlets appear | 2–6 months | Small green bumps and mini leaves | Reduce enclosure, increase light |
| Pot-ready babies | 6–8 months | Multiple leaves, visible crown | Separate and pot up |
| First flowers | 9–12 months | Small buds with steady growth | Maintain light and feeding |
Separating and Potting Up African Violet Babies Without Damage
Only separate starters when each has a clear crown and leaves large enough to handle. A good rule is dime-sized foliage and a developing rosette, often four to six leaves. That size means the little plant has enough roots and reserves to survive transplant.
How to remove the clump safely: slide the whole root ball from the container, lay it on its side, and gently work away the mix until you can see where each rosette joins the shared base. Find the neck or crown — that’s the true junction where one plant becomes independent.
Common beginner mistakes to avoid
- Do not pull a rosette apart by individual leaves — that tears tissue and usually kills the start.
- Avoid potting several crowns together as if they are one plant; each crown needs its own tiny home to thrive.
Repotting basics
Use a very small container (1–2 inch) with drainage and a loose, airy mix. Make a small hole, set the plantlet centered, and keep the crown just above the mix — never buried. Firm gently and water lightly.
Aftercare: return newly potted plants to a gentle humidity cover for one to three weeks to cut transplant shock. Give steady, bright indirect light and avoid direct sun while they recover.
Pot sizing as they mature
Step up containers slowly. A good rule: choose a pot roughly one-third the plant’s diameter. Overpotting keeps roots too wet and reduces bloom potential.
| Action | Sign to wait | Tip |
|---|---|---|
| When to separate | Dime-sized leaves; 4–6 leaf rosette | Wait until roots hold the rosette in place |
| How to separate | Visible crown/neck | Slide out clump, remove mix, cut at natural junction |
| Potting up | Small individual root system | Use tiny pot, loose mix, crown above surface |
| Aftercare | Newly potted and pale leaves | Brief re-bagging and bright indirect light |
Conclusion
A single well-chosen leaf can become the core of a growing collection with the right routine. Pick a healthy leaf, make a clean angled cut, set it in an airy medium, and keep moisture gentle while giving bright, indirect light.
Be patient: roots and baby leaves take time, but the stages are predictable when conditions stay steady. A light, steady approach beats rushed action every time.
Try both soil and water ways to see which fits your home. Soil gives reliability; water shows progress. Label each start so you don’t lose track when you grow many.
One small start can make several new plants. Give it care and time, and you’ll expand your collection affordably while enjoying more blooms down the road.