Surprising fact: nearly 40% of stem cuttings fail when conditions are off, even though the simple jar method can work fast.
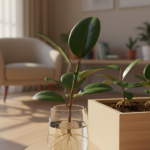
Rubber plant propagation in water means taking a stem cutting, placing it in a clear jar, and watching roots form before moving the cutting to soil.
This method is popular because it’s easy and you can see progress. It can be faster than potting mixes, but the new roots may be weaker than those grown in soil or perlite.
Clean jars, bright indirect light, and fresh water matter. Sap can cloud the jar and irritate skin, so handle cuttings carefully and rinse cuts if needed.
This short guide sets expectations and shows what to watch for: healthy light-colored roots, a firm stem, and no foul smell. Follow simple steps and patience pays off.
Key Takeaways
- Easy visual setup: ideal for beginners who like to watch root growth.
- Success needs clean jars, good light, and fresh water changes.
- Handle sap safely; it can irritate skin and cloud the jar.
- Wait until roots are about 1–2 inches before potting to reduce shock.
- Look for white or pale roots and firm stems—not mushy tissue or bad odors.
Does Water Propagation Work for Ficus elastica?
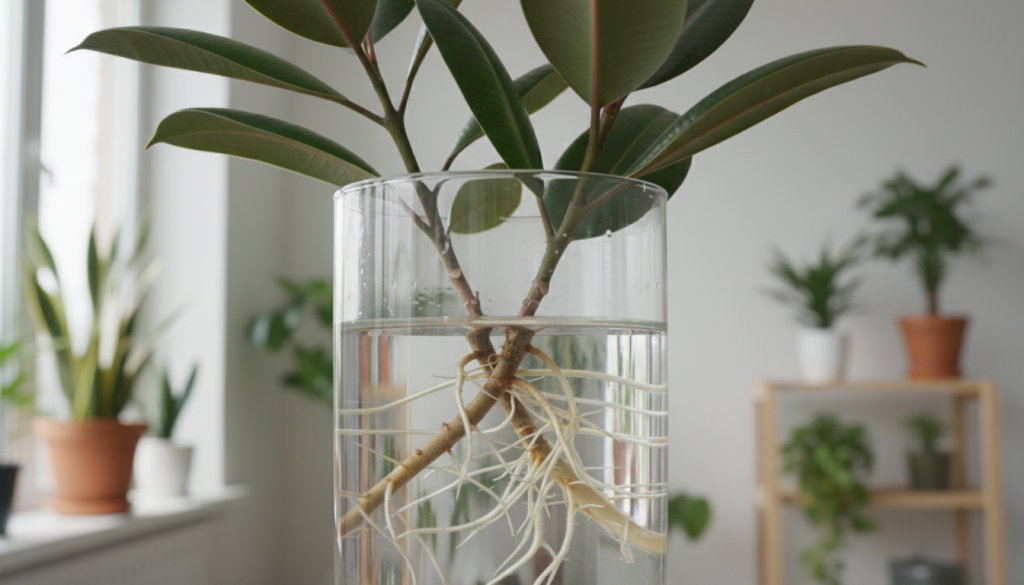
Clear containers let you track early root stages, which helps spot problems fast.
Short answer: Yes — this method can work for ficus elastica, but success depends on warm, bright conditions and clean water. Many cuttings form tiny nodules at nodes before true roots lengthen.
What “success” looks like in the first weeks
In the first weeks a healthy cutting stays firm and leaves stay turgid. The jar should not smell. Small white bumps or short hairs often appear at a node before visible roots grow longer.
Roots sometimes show as soon as about 3 weeks, but most cuttings take 4–12 weeks depending on light and temperature. Slow progress is common and not a failure.
 cutting propagating in a clear glass container filled with water, showcasing vibrant green leaves with glossy surfaces. In the foreground, include the cutting's roots starting to develop, visibly suspended in the water. The middle ground features a wooden table, adding a natural touch, while the background gently blurs to reveal a softly lit indoor garden setting with a hint of plant foliage. The lighting is warm and inviting, creating a serene atmosphere. The angle is slightly above the cutting, offering an intimate perspective on the propagation process. The mood is calm and nurturing, emphasizing growth and vitality in plant care.")
How this method compares to soil and air layering
| Method | Ease | Root strength | Best for |
|---|---|---|---|
| Water | Very easy | Moderate (may need adjustment) | Visibility and simplicity |
| Soil / perlite | Moderate | Stronger (resistance builds) | Higher success and sturdier roots |
| Air layering | More involved | Most reliable | Large pieces or guaranteed results |
Choose water for quick visibility, soil mixes for the strongest start, or layering when you need high confidence. If you want care tips for established specimens, check this indoor watering guide.
Best Time, Safety, and Supplies for Propagating Rubber Plants
Spring is the window that gives new stems the strongest start toward healthy roots and new growth. Longer daylight and warmer rooms across many U.S. homes reduce stress and help cuttings root faster.

When to take a stem
Take a stem cutting during active spring growth. The parent will recover faster, and the cutting usually roots more reliably.
Wear gloves and handle sap safely
Wear gloves when you cut. The white milky sap can irritate skin and bother people with latex sensitivity.
Keep a damp paper towel handy to blot sap, wash hands after handling, and avoid contact with eyes or fabrics.
Tools, supplies, and sanitizing
- Sharp, clean pruners or scissors — sanitize with isopropyl alcohol before use.
- Clear glass jar and room-temperature water.
- Optional rooting hormone for faster starts.
Good tools, safe handling, and steady light and warmth are the simple recipe. Sanitize blades to prevent disease and lower the chance of rot so your cuttings have the best shot at success.
rubber plant propagation in water
Choose the right stem first. Choose a lively top stem with a clear node and a few leaves; this selection matters for success. Aim for about a 6-inch cutting that includes new tip growth and visible nodes.
Where and how to cut
Make a clean 45° diagonal cut just below a leaf node to increase surface area and improve uptake. Use sharp, sanitized shears and make a single smooth cut.
Prepare the cutting
Remove lower leaves so no foliage sits inside the jar. Submerged leaves rot and foul the water quickly.
Set up and placement
Use a clear glass container and fill with room-temperature water so at least one node is submerged while leaves stay dry. Place the jar in bright, indirect light and a warm spot. Avoid direct sun that can overheat the water and stress the stem.
Care routine and checkpoints
Refresh the water weekly or sooner if it turns cloudy. Expect early root signs within several weeks and wait until roots reach about 1–2 inches before potting. If the stem blackens, gets mushy, or smells bad, recut above the healthy tissue and restart with fresh water.
| Step | Key action | Why it matters |
|---|---|---|
| Pick stem | 6-inch tip with nodes | Healthy tissue roots faster |
| Cut | 45° below node | More surface for uptake |
| Prep jar | Clear glass, room-temp water | See progress; avoid shock |
| Care | Change water weekly | Prevents cloudiness and rot |
| Transplant | Roots 1–2 inches | Reduces transplant shock |
Rot or Roots? How to Prevent Problems While Propagating Rubber in Water

A clear jar can tell you fast if a cutting is heading toward roots or rot. Watch color, smell, and texture to catch issues early. Small habits prevent most failures.
Common causes of rot
Submerged leaves and dirty water are the top triggers. Cold spots and low light slow growth and invite decay. Make sure only nodes sit in the jar and keep the water fresh.
How to tell healthy roots from rot
Healthy roots look pale or white and feel firm. Rot shows as dark brown or black tissue, a slimy texture, and often a foul smell. Trust what you see and smell.
Quick rescue steps if the cutting turns mushy
If the base goes soft, recut above the healthy tissue with sanitized shears. Remove any leaves that would sit below the surface and restart in clean, room-temperature water.
Sap and cloudiness — when to worry
Right after the initial cut, sap can cloud the jar; this usually clears after a water change and poses no harm. Persistent cloudiness combined with odor or softening at the cut end signals bacterial growth and a real rot risk.
| Problem | Sign | Action |
|---|---|---|
| Submerged leaves | Cloudy water, soft tissue | Remove leaves; change water |
| Dirty water | Odor, film | Refresh weekly or sooner |
| Cold / low light | Slow or no root growth | Move to bright, warm spot |
| Mushy stem | Dark, slimy base | Recut above healthy tissue; restart |
When and How to Transfer Your Water-Rooted Cutting to Soil
Transplant timing matters — aim for sturdy, pale roots roughly 1–2 inches long. That length gives enough strands to support the stem and helps the new root system handle soil without shock.

Why not wait too long
Roots that grow too long in jars adapt to a soaked setting. They may struggle when moved to a well-draining mix. Move at the right time to speed adjustment and reduce stress.
Pot and soil basics
Pick a small pot with drainage holes so excess moisture can escape. Use a quality indoor soil and stir in perlite for better aeration and faster drainage.
Planting steps
- Spread the roots gently in the pot so they point outward, not bunched.
- Fill around the stem with soil, firm lightly but do not compact.
- Water once until it runs from the bottom, then allow the surface to dry between sessions.
| Goal | Action | Why it helps |
|---|---|---|
| Root length | 1–2 inches | Enough strands to anchor and feed the stem |
| Pot size | Small, with holes | Prevents soggy mix and encourages root spread |
| Soil mix | Indoor mix + perlite | Good drainage and air for roots |
| First watering | Water until runoff | Settles soil and removes air pockets |
Expect a brief pause after transplant. New growth may slow as roots adapt. Keep light steady and follow gentle care to help your rubber plant resume steady growth.
Post-Propagation Care for a New Rubber Tree Plant
Newly rooted stems need steady light and predictable care to turn into a healthy young tree. Set up a home spot that gives bright, indirect light near a north- or east-facing window and shields foliage from harsh midday sun.
Light, moisture, and humidity
Light: Aim for bright, indirect light; rotate the pot weekly so growth stays even.
Moisture: Let the top inch of soil dry before you water. When you do water, soak until excess drains so the whole root zone is refreshed.
Air and humidity: Moderate indoor humidity helps new leaves. Mist occasionally or set the pot near a humidifier in dry winter rooms.
Temperature and placement tips for U.S. homes
Keep the young tree between 65°F and 78°F. Avoid cold drafts, air-conditioning blasts, and chilly glass at night.
Place away from vents and doors that open to cold zones. A stable, warm spot encourages steady growth.
Feeding and signs of new growth
Wait until the specimen shows steady growth before fertilizing. Then feed lightly during the growing season—monthly is a safe cadence.
New growth appears as small, glossy leaves near the node below the cut. Leaves start shiny and compact, then expand and deepen in color as they mature.
| Goal | Action | Why it helps |
|---|---|---|
| Even canopy | Rotate pot weekly | Prevents lopsided growth |
| Healthy roots | Dry topsoil between waterings | Reduces root stress and rot risk |
| Leaf health | Mist or raise humidity | Supports glossy, firm new leaves |
Be patient. Growth may slow after transplant, but steady light, sensible moisture, and stable temperatures usually restore forward momentum for your new tree.
Conclusion
, Small habits — clean tools, bright light, and warm air — make the biggest difference. Keep cuts tidy, place a healthy top stem near a node, and avoid submerged leaves to lower rot risk during propagation.
Use the method that fits you: use a jar to watch roots, choose soil or perlite for sturdier starts, or try air layering for higher success with larger pieces. To safely propagate rubber, move a cutting when roots reach about 1–2 inches and wear gloves if sap bothers your skin.
Be patient. If an attempt fails, check cleanliness, light, and temperature rather than blame yourself. Keep steady care once the new rubber plant settles and it will grow into a strong specimen over time.