Surprising fact: a single mature snake plant can yield a whole new collection in months, and many beginners see tiny shoots in about three months when using leaf cuttings.
Plant propagation means turning one healthy specimen into more using division, soil leaf cuttings, or water trials. Division gives near-instant results because roots and rhizomes are already present. Leaf cuttings are slower and steady; expect weeks into months before new growth appears.
Pick division for crowded, mature specimens if you want quick success and to keep variegation. Choose soil if you want a low-fuss approach. Use water when you want to watch roots form.
What success looks like: the original leaf rarely grows taller. New shoots come from rhizomes at the base of the cutting. One key gotcha: variegated varieties often revert to solid green from leaf cuttings, so divide if the pattern matters.
Quick safety note: sap can irritate skin and may upset pets. Wash hands after handling and keep cuttings out of reach.
Key Takeaways
- Division is fastest; leaf cuttings take months for visible shoots.
- Soil roll is low-fuss; water lets you monitor root growth.
- Variegation often fails with leaf cuttings—divide to preserve it.
- New growth appears from rhizomes, not from the original leaf getting taller.
- Wash hands after handling; keep cuttings away from curious pets.
How to propagate snake plant successfully before you start
Good timing and clean cuts set the stage: aim for active growth months and use firm, undamaged leaves. Spring and summer are best because the plant is actively growing. Early fall can work in mild climates. Winter slows root formation and stretches the time required.

Best season and realistic timing
Rooting and visible new growth can take weeks or several months, especially with leaf cuttings. Resist overwatering while you wait — soggy soil invites rot.
Picking material and whole leaves vs sections
Choose mature, firm leaves with no mushy spots or discoloration. Whole leaves are simple and keep orientation clear. Cutting leaves into sections yields more cuttings but raises the risk of planting pieces upside down.
Tools, mix, and pots
Gather clean pruners or a sterilized knife, a small pot with drainage, and a light, well-draining mix such as succulent/cactus soil blended with perlite or pumice.
Where to cut and callusing
Make a straight cut near the base (about 1–2 inches above soil level) with a sharp tool. Let the cut end dry and callus for 24–48 hours, or longer for thick leaves — up to 5–10 days in cool, humid conditions.
Light, placement, and variegation note
Place cuttings in bright, indirect light; avoid harsh sun that can scorch tender tissue. Important: variegated specimens often revert to solid green from leaf cuttings, so use division when you want to preserve striping.
“Plan for patience: careful prep and clean cuts reduce failure and speed healthy rooting.”
Propagate snake plants by division for the fastest results
Division is the quickest way to multiply a mature specimen. Choose this when the container looks crowded, offsets crowd the base, or thick roots distort the pot.
, prominently featuring a freshly divided section with healthy, vibrant green leaves reaching upward. The foreground displays the divided plant, its roots slightly exposed to showcase the division process, with a few soil particles scattered around for realism. In the middle, a pair of gardening gloves hold a small trowel, hinting at the propagation method. The background is softly blurred with hints of a bright, well-lit indoor setting, perhaps a sunlit window with soft, natural light filtering through. The atmosphere feels calm and nurturing, emphasizing a sense of growth and new beginnings. Focus on capturing intricate textures of the leaves and soil for a rich, detailed image.")
When division makes sense
Look for multiple shoots, visible rhizomes, or a root ball that holds the soil shape. These signs mean each section can carry its own roots and start feeding immediately.
Step-by-step clean split
- Slide the clump from its pot and support the base while loosening soil.
- Find natural separations in the rhizome mass and identify sections with leafy growth points and roots.
- Use a clean blade to cut through rhizomes; avoid tearing to reduce rot risk.
Potting and aftercare
Replant each division at the same depth in a small-to-moderate pot with good drainage and a gritty mix. Water lightly after a few days and keep in bright, indirect light.
| Step | Why it matters | Quick tip |
|---|---|---|
| Choose division | Preserves variegation and yields established offsets | Do it when the base is crowded |
| Clean cut | Limits infection and speeds healing | Use a sterile blade |
| Repot | Prevents waterlogging and supports root growth | Use gritty mix and drainage |
“Division gives fast, reliable results and keeps original striping intact.”
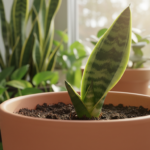
Snake plant leaf cuttings in soil for low-fuss rooting
A simple pot and a gritty mix give leaf cuttings a steady place to form roots over months. This propagation method needs little handling once set, and there’s no later transfer from water. It suits busy homes and small spaces.

Soil setup and pot choice
Use a light succulent/cactus soil mix and amend with perlite or pumice for extra airflow. Drainage holes are essential to prevent rot.
Pick a small pot (4–6 inches) with at least one hole. Crowded pots hold moisture and invite problems.
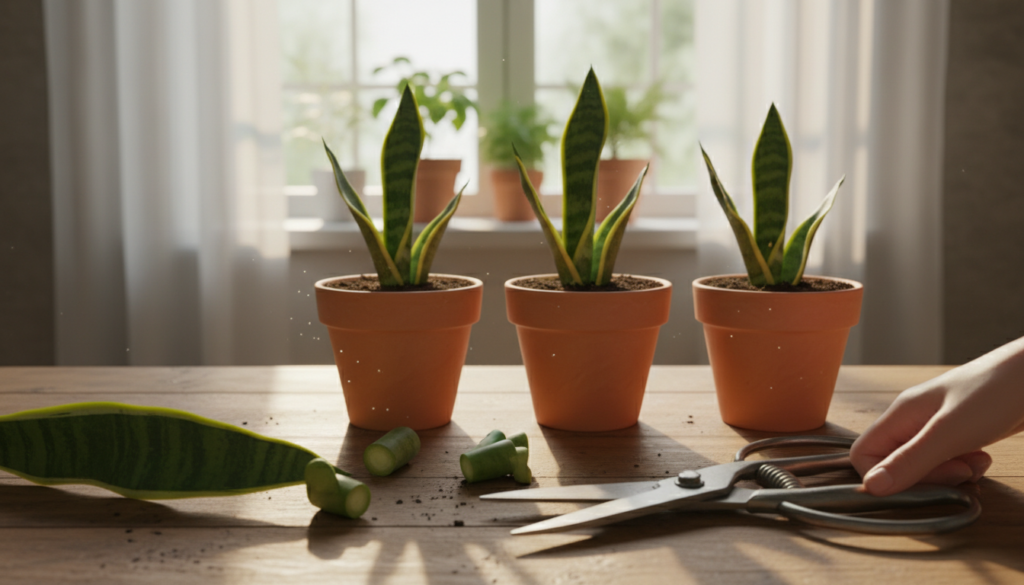
Planting technique and orientation
Insert the callused bottom of each cutting 1–3 inches deep and space pieces so air can circulate. Stake tall leaves for stability while roots form.
The #1 mistake: planting a leaf upside down. Make a small angled cut or an inverted “V” at the bottom so you always know which end goes into the soil.
Watering rhythm and timeline
Let cuttings settle for about 3–7 days before the first thorough water. After that, water sparingly and only when the mix is dry.
Expect little visible change at first. Over weeks and months roots and rhizomes form, and baby shoots often appear around three months. Patience pays off.
“Plant correctly, wait patiently, and the soil method rewards with steady, low-fuss growth.”
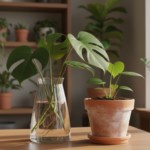
Water propagation for snake plant cuttings you can monitor
Water propagation gives a clear view of root growth and is satisfying for many home growers.

Jar method basics
Use a clean glass jar and fresh water. Place the callused end of the leaf so only about a few inches — roughly one quarter of the length — sits underwater.
Change the water about once a week. Rinse the jar if it looks cloudy or slick to cut bacterial buildup.
Light, algae, and evaporation
Keep the jar in bright, indirect light. Direct sun warms water and spurs algae, which stresses cuttings.
Check the level every few days in warm, dry conditions and top off so the cut end stays submerged.
When to move into soil
Wait until roots reach about 1–2 inches long before potting. This often takes several months rather than a few weeks.
Pot the cutting into a small pot with a gritty mix and keep moisture steady for the first couple weeks. That reduces transplant shock.
“Watching roots appear in clear water helps you confirm progress without disturbing the cutting.”
Aftercare for propagating snake plants: potting up, growth milestones, and common problems
Proper follow-up turns a fragile cutting into a durable household specimen. Small moves now save time later.
Wiggle test: gently hold the leaf and give a small twist. If it resists and feels anchored, roots have likely formed in the soil. Avoid digging; disturbance raises rot risk.
Pot size and potting-up
Keep cuttings in a modest pot until you see new shoots or the container dries too fast. Move up one size only. A jump to a large pot encourages soggy mix and slow growth.
Moisture management
Use a fast-draining mix and water only when the top inch is dry. Aim for “dry between waterings,” not bone-dry or constantly wet. Overwatering causes the most failures.
Troubleshooting and patience
- Signs of rot: mushy base, yellow-brown discoloration, sliminess, or a bad odor.
- Salvage plan: trim to healthy tissue, let the end callus for a few days, and restart in fresh soil or clean water.
- Patience checkpoint: new growth may take months; the original leaf often looks unchanged until shoots appear.
“Clean tools, proper callus time, good drainage, and restrained watering stop most problems.”
| Check | When | Action |
|---|---|---|
| Wiggle test shows resistance | After several weeks | Keep in same pot; water sparingly |
| Container dries very fast | New shoots visible or dry mix | Move up one pot size |
| Mushy or foul-smelling base | Any time | Trim rotten tissue, callus, restart |
| Wrinkled cutting | Early stages | Use sphagnum moss or a humidity dome briefly |
Optional media notes: LECA stabilizes moisture, perlite boosts airflow, and sphagnum supports humidity for stubborn cuttings.
Conclusion
In short, select the approach that suits your space, skill, and patience, and stick with steady care.
Quick recap: division gives the fastest results; soil leaf cuttings are low-fuss; water lets you watch roots form. Pick the goal—speed, pattern preservation, or the fun of visible rooting—and match the method.
Success formula: use healthy material, clean tools, let the cut end callus, place pieces in a gritty mix or clean water, and keep everything in bright, indirect light.
Remember orientation: mark the bottom end of each leaf or section so you don’t plant it upside down. Expect little change for a few weeks and often new growth after months.
Ready? Take one healthy leaf, make a clean cut near the base, and start one small pot or jar. For extra tips on light and recovery, see this leggy flowering plants guide.