peace lily propagation

Peace Lily Propagation: The Only Method That Works (Division)

Surprising fact: one mature specimen can yield three to five healthy new houseplants when split correctly — a dramatic payoff for a single effort.

The phrase peace lily propagation usually means creating new growth from an existing specimen. For home growers in the United States, division is the reliable method that works every time when done right.

Division creates new pots with established roots, not a gamble on cuttings. This guide previews the full flow: prep tools, lift the parent plant, separate root sections, repot in fresh soil, and follow clear aftercare steps.

You will end up with multiple healthier plants and a less crowded parent. Keep in mind that these plants are toxic to pets; plan placement and gifting with care.

Later sections will cover normal transplant shock, how to avoid root rot, and fast settling tips so your divisions thrive quickly.

Table of Contents

Key Takeaways

  • Division is the consistently successful method for home growers.
  • It produces multiple new plants with existing roots.
  • Follow a clear sequence: prep, lift, split, repot, and care.
  • Expect short-term shock; monitor moisture to avoid rot.
  • These plants are toxic to pets—choose placement wisely.

Why Division Is the Only Reliable Peace Lily Propagation Method

Many hobby growers try stem or leaf cuttings and end up frustrated when nothing roots. Cuttings and single leaves lack the growth points needed to form a new root system. That means a stolen leaf often decays rather than becomes a new plant.

A close-up view of a healthy peace lily plant, showcasing its lush green leaves and a cluster of white blooms, symbolizing tranquility and growth. In the foreground, focus on the division process: a gardener's hands gently separating the roots of the peace lily, revealing healthy new shoots sprouting from the soil. The middle ground includes a few decorative pots filled with vibrant potting mix, indicating readiness for planting. In the background, soft natural light filters through a nearby window, casting gentle shadows that create a peaceful atmosphere. The image should evoke a sense of calm and nurturing, highlighting the importance of the division method in propagating peace lilies. Use a shallow depth of field to emphasize the foreground action while keeping the background slightly blurred.

Why cuttings fail

Cuttings work for vines because nodes contain latent buds. These houseplants do not have the same regenerative tissue in isolated leaves. If you attempt propagating peace lily from cuttings, expect low success and wasted material.

What division actually is

Division means splitting a mature clump into smaller sections that already have roots and foliage. Each section can photosynthesize and recover fast because it is not starting from scratch.

Best time to divide in the U.S.

Aim for spring or early summer when day length and warmth speed root recovery. Many growers divide when the pot is crowded or every 2–3 years. Indoors with steady warmth you can divide year‑round, but expect slower growth in winter.

Peace Lily Propagation: What You’ll Need Before You Start

Before you split a mature specimen, gather the right gear and pick a healthy candidate.

Choosing the right plant

Look for a mature peace lily with multiple crowns, crowded growth, and roots circling the pot. These signs show the clump is ready to divide and will produce strong new plants.

Avoid splitting any specimen that is drooping, recently treated for pests, or showing soft, rotting roots. A stressed plant makes weak divisions.

Tools and sanitation

Use sharp pruning shears or clean scissors, a serrated knife for stubborn root balls, gloves if you want them, and a watering can for aftercare.

Wipe blades with 70% isopropyl alcohol or disinfectant, let them dry, and re-clean between each cut to protect plant health.

Pots, containers, and soil mix

Choose pots or nursery containers slightly larger than each root mass and always pick ones with drainage holes. Heavy, non‑flexible pots make future divisions harder.

Use a drainage-first potting mix. Avoid dense garden soil. For a DIY option mix 2 parts potting soil, 1 part perlite, and 1 part coconut coir for airy soil that holds moisture without staying soggy.

Workspace setup

Lay down newspaper or a washable mat, set a tray for displaced soil, and leave space to arrange sections before repotting. A tidy area speeds the job and reduces mess.

How to Propagate Peace Lily by Division in Soil

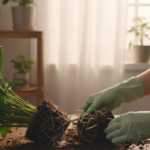
Gently easing a mature plant from its container sets the stage for successful division and healthy new plants. Work on a covered surface and support the base when you tip the pot on its side. For plastic pots squeeze the sides; for rigid containers run a knife around the edge.

A close-up view of a healthy peace lily plant being propagated by division in rich, dark potting soil. In the foreground, focus on the intricate, lush green leaves of the peace lily, glistening with droplets of moisture, showcasing the vibrant white blooms. The middle ground features a gardener's hands gently dividing the root system, emphasizing the process of propagation. In the background, soft, natural light filters through a window, creating a warm, inviting atmosphere filled with a sense of tranquility. Use a shallow depth of field to blur the background slightly, drawing attention to the details of the plant and the gardener's hands. Capture the serene ambiance of nurturing and caring for plants.

Remove and reveal the root mass

Pull from the base, not the leaves or blooms. Shake or brush away loose soil until you can see crowns and root lines. Tease roots apart from the bottom and follow natural separations.

Choose viable smaller sections

Each section should have its own root mass and at least one or two healthy leaves. Two divisions keep a full look; larger clumps can become three or more new plants.

Trim and tidy roots

Use clean shears to remove black, mushy, or foul-smelling roots. Keep firm, light-colored roots intact. Minor root breakage is OK if most roots remain.
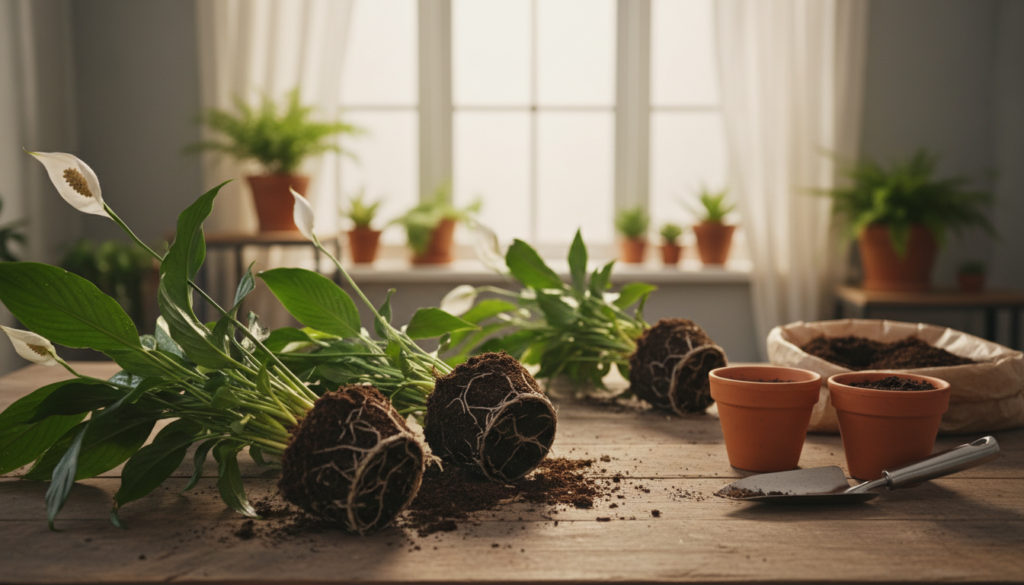
Repot and settle in

Place each section in a container with well-draining potting soil. Set the crown at the same height it had before—do not bury it. Fill gaps, press lightly to remove air pockets, and avoid compacting the soil.

Watering and placement

Water thoroughly until excess drains, then empty saucers so containers do not sit in water. Move new plants to bright, indirect light away from direct sun, vents, and drafts while they re-establish.

Step Action Tip
Remove Loosen pot, support base, lift root ball Avoid pulling leaves; use a knife for rigid pots
Tease Brush soil off, separate natural crowns Work from the bottom to prevent breakage
Divide Create sections with roots + 1–2 leaves Two divisions keep fullness; larger clumps allow more
Trim Cut away black or mushy roots Sanitize shears and keep firm roots intact
Repot Use fresh potting soil, set original crown height Press gently, water thoroughly, avoid waterlogging

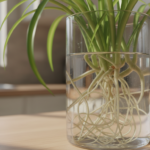
Optional: Propagating Peace Lily Divisions in Water Before Potting

Water-starting a division is an optional trick that reduces transplant stress for a few weeks. Use this method as a short holding step, not a long-term solution. Only use a clump that already has healthy roots — this is not a substitute for taking cuttings.

A tranquil indoor scene featuring a close-up of a Peace Lily plant with lush green leaves and white blooms, freshly divided into sections. In the foreground, a clear glass bowl brimming with water showcases the lily divisions, roots gently submerged and swaying slightly. In the middle ground, a wooden table holds a few gardening tools, like a small trowel and scissors, emphasizing the act of propagation. The background softly blur the warmth of a sunlit window, with soft rays filtering through sheer curtains, creating a serene and nurturing atmosphere. The overall mood should evoke a sense of calm and hope, symbolizing the propagation of peace, as the delicate flowers and their roots illustrate growth and nurturing in a peaceful home.

How to place roots in water without submerging leaves

Choose a clear jar or vase and add room‑temperature water. Position the division so only the roots sit below the surface. Keep all leaves and crowns out of the water to cut rot risk.

How often to change water and when to transfer to soil

Replace the water every few days and rinse the container if it gets cloudy or slimy. New white tips usually show in about 2–3 weeks. When roots reach roughly 5–7 cm, move the plant into fresh potting soil for long-term growth.

Quick notes: avoid direct sun on the jar, use clean water, and treat this as a staging step. In the long run, plants do better in soil because it supplies nutrients and stabilizes the root system for steady growth.

Post-Propagation Care for Strong Growth and Fewer Problems

New divisions need a calm, steady environment to recover and start healthy growth. Follow a short checklist to reduce stress and speed root re-establishment.

A beautifully arranged indoor setting featuring a healthy peace lily plant in the foreground, showcasing its lush green leaves and elegant white flowers, symbolizing vitality. In the middle ground, a gardener, dressed in modest casual clothing, is gently watering the plant with a small watering can, emphasizing care and attention. Behind them, a softly-lit living room with warm, natural sunlight pouring in through a window, adding a serene and nurturing ambiance. The background includes subtle hints of other houseplants, creating a harmonious indoor garden vibe. The overall mood is calm and inviting, exuding a sense of peace and dedication to plant care. The image captures the essence of nurturing and post-propagation care that ensures strong growth.

Light and indoor conditions

Place divisions in bright, indirect light. Avoid direct sun that can scorch leaves and low light that slows growth.

Keep temperatures warm and stable. Move plants away from vents, drafts, and cold windows to prevent leaf browning.

Watering rhythm and moisture checks

Water thoroughly, then wait until the top 1–2 inches of soil dries before watering again. This keeps roots healthy and reduces rot risk.

Use the finger test, lift the pot for weight, and check saucers for standing water. Empty excess immediately.

Fertilizing and seasonal feeding

Feed in spring and summer with a balanced liquid fertilizer at half strength. Pause or cut back in winter when growth slows.

Transplant shock and warning signs

Slight droop or a few yellowing leaves is normal as roots rewire. Watch for persistent limp growth, a sour smell, or mushy stems—these need fast action.

Common problems and fixes

  • Yellow leaves — reduce watering and improve drainage.
  • Brown tips — raise humidity and keep watering consistent.
  • Slow growth — check light levels and pot size.
  • Root rot — trim mushy roots and repot in fresh, airy soil.

Quick recovery checklist: stable warmth, bright indirect light, careful watering, and gentle feeding in spring and summer. Good aftercare turns divisions into lasting, healthy plants with steady growth.

Conclusion

If your clump is crowded, splitting it into rooted sections will almost always succeed. Division is the proven method to propagate healthy new plants without relying on uncertain cuttings.

Follow the simple formula: strong roots, a bit of foliage, a well‑draining setup, and steady aftercare. Do the job in spring or early summer for the fastest recovery, though a warm indoor spot can work any time of year.

Expect a little droop at first; most plants bounce back as roots settle and new growth appears. If you want to refresh a parent specimen and get more houseplants, division is the practical, low-risk way to go.

Ready to try? Revisit the step‑by‑step section when you are set to propagate peace lily clumps again.

FAQ

Can I propagate a peace lily from cuttings?

No. Taking stem or leaf cuttings rarely produces roots for this plant. The reliable method is division — separating a mature plant into smaller sections that already have roots. That’s why division is the go-to approach for getting healthy new plants.

What does “division” mean for this plant and why does it work?

Division means splitting a mature clump into smaller rooted sections. Each section keeps its own root mass and crown, so the new plants can resume growth quickly. This preserves established roots and reduces the time the plant needs to recover.

When is the best time to divide one in the United States?

Spring and early summer are best. The plant is entering an active growth phase, which helps divisions establish faster. Avoid dividing during winter or extreme heat to minimize stress.

How do I choose a good specimen to divide?

Pick a mature, healthy plant with multiple crowns or visible clumps. Avoid plants with widespread root rot or severe pest issues. Look for firm, green leaves and a solid root ball before you start.

What tools do I need and how should I sanitize them?

Use a clean trowel, a sharp knife or pruning shears, and fresh pots. Sanitize tools with a 70% isopropyl alcohol wipe or a diluted bleach solution (1 part bleach to 9 parts water), then rinse and dry. Clean tools reduce the risk of spreading disease.

What pot or container size should I use for new divisions?

Choose pots only slightly larger than each division’s root ball — typically 4–6 inches for small sections. Too-large pots hold excess moisture and increase rot risk. Ensure containers have drainage holes.

What’s the best potting mix for new plants?

Use a well-draining indoor potting mix with organic matter and added perlite or coarse sand to improve drainage. A mix labeled for houseplants or indoor foliage with good aeration works best to prevent soggy soil.

How should I set up my workspace before dividing and repotting?

Work on a clean surface with newspaper or a tray, keep tools and pots within reach, and have fresh potting mix ready. Good lighting and a trash bag for old soil help the process go smoothly and keep the area tidy.

How do I remove the plant from its pot without damaging it?

Water the plant lightly a few hours before to loosen soil. Gently turn the pot, support the crown, and tap the sides to slide the root ball out. Avoid pulling on leaves or stems — work the root ball free instead.

How do I find natural sections when teasing roots?

Gently loosen the root ball and look for separate crowns or clumps of stems and roots. Use your fingers or a blunt tool to tease soil away until you can see distinct sections that can be separated with minimal root damage.

How do I separate the plant into smaller growing sections?

Use your hands or a clean knife to separate at natural breaks between crowns. Keep as many healthy roots attached to each division as possible. If roots are densely intertwined, work slowly to preserve root mass.

What should I do about black or mushy roots?

Trim away any soft, dark, or foul-smelling roots with sanitized scissors. Healthy roots are firm and light-colored. Removing damaged roots reduces disease risk and helps the divisions recover.

How deep should I pot each division?

Plant each section so the crown sits at the same level it grew before — not buried, not too exposed. Fill around the root ball with fresh mix, gently firm the soil, and leave a small rim to aid watering.

When and how should I water new pots after repotting?

Water thoroughly right after potting until water drains from the bottom. Then allow the top inch of soil to dry slightly before watering again. Maintain even moisture without letting the soil stay soggy to prevent rot.

Can I place divisions in water before potting them into soil?

Yes, as an optional step. Place only the roots in clean water and avoid submerging leaves or crowns. This can help build root strength, but transfer to soil once roots look healthy and several inches long.

How often should I change water if I use the water method?

Change the water every 3–5 days to keep it oxygenated and reduce bacterial growth. Use room-temperature, non-chlorinated water if possible. Move divisions to soil after roots establish, usually 2–6 weeks.

What light and temperature conditions help divisions recover?

Bright, indirect light suits recovering plants. Keep temperatures between 65–80°F and away from drafts or direct midday sun. Stable indoor conditions encourage steady new growth.

How should I adjust my watering routine after dividing?

Water moderately and check soil moisture with your finger. Let the top inch dry slightly between waterings. Overwatering is the most common mistake and can lead to root issues.

When should I fertilize new divisions?

Wait 4–6 weeks after repotting to let roots establish, then use a balanced, dilute houseplant fertilizer during spring and summer. Avoid heavy feeding right after dividing to prevent stress.

How can I tell normal transplant shock from a real problem?

Mild wilting and slowed growth are normal for 1–3 weeks. Severe yellowing, mushy stems, or a persistent foul smell point to root rot or infection. Act quickly to trim damaged roots and adjust care if those signs appear.

What common problems occur after dividing and how do I fix them?

Overwatering, poor drainage, and pest issues are the main problems. Improve drainage, trim rotten roots, repot if needed, and treat pests with insecticidal soap or neem oil. Good airflow and proper soil help prevent recurrence.

How long until new divisions start growing again?

Expect new leaf growth within a few weeks to a few months, depending on conditions and season. Spring divisions restart faster; patience and steady care speed recovery.

Can I divide a larger specimen into many smaller pots?

Yes, but avoid making divisions too small. Each new plant needs a healthy root mass to thrive. Aim for sections with at least a few stems and a solid root cluster to ensure good establishment.

Are there any special care tips to reduce transplant stress?

Keep newly potted plants in bright, indirect light, maintain even humidity, and avoid fertilizing immediately. Gentle handling, proper pot size, and well-draining mix all reduce stress and support steady regrowth.

Comments

No comments yet. Why don’t you start the discussion?

Leave a Reply

Your email address will not be published. Required fields are marked *