Surprising fact: many new growers wait three months or more before seeing tiny pups — root growth is slow but steady.
This method is a low-cost way for US indoor gardeners to get extra greenery. It suits beginners who like a simple, steady project. Expect patience: first aim for roots, then for new shoots. The original piece won’t grow taller; new growth comes from underground rhizomes.
Common mistakes are easy to fix. Planting the wrong end, skipping callusing, overwatering, heavy soil, too much sun, and digging to check roots all slow progress. Success feels like gentle resistance when you tug a cutting, then baby shoots at the soil line.
This guide previews soil versus water approaches and gives a clear soil-first method for most home growers. You’ll learn which tools to use, how deep to plant, when to water, where to place the pot, and how to handle stalls. Tone is reassuring: most failures boil down to moisture, drainage, and orientation — all fixable.
Key Takeaways
- Be patient — expect months before pups appear.
- Roots come first; new shoots emerge from rhizomes, not the original piece.
- Avoid overwatering, heavy mix, and planting the wrong end down.
- Soil is the recommended starter method for beginners.
- Keep conditions bright but not harsh; monitor drainage and moisture.
- Different varieties may change pattern; variegated types can behave differently.
Why Try Leaf Cuttings With Snake Plants (and When It Works Best)
Leaf sections are a great choice when a blade bends, flops, or pinches at the base. They turn damaged foliage into new specimens without buying extras.
Best time and conditions: try during spring and summer for fastest results. Early fall can work in mild areas. Keep indoor temps near 65°F–80°F and place trays in bright indirect light.
Timing: roots first, shoots later
Expect roots to form in weeks to about two months in water or soil. New pups usually take three months or more. Patience prevents premature digging and loss.
Variegation and division
Variegated types often lose their pattern from sections. If you want identical coloring, choose division instead. Division gives you ready, patterned sections and is one of the fastest ways to expand a pot.
Safety note
Keep cuttings and jars out of reach. These plants are toxic if eaten. Place setups where pets and kids cannot access them.
Why it’s worth trying: low cost, low effort after setup, and satisfying results when you match warmth, light, and watering to the species’ succulent nature.
What You’ll Need for Success: Tools, Pots, Soil, and Light
A tidy setup and a few right choices make rooting reliable. Use a clean, sharp knife or pruners so each cut heals fast. A smooth edge reduces rot and speeds recovery.

Tools and hygiene
Sanitize blades with soap and water, then wipe with rubbing alcohol. A crisp cut is the goal; ragged cuts invite fungus.
Pots and drainage
Choose a small pot for a few pieces—about 4″. Move to 6″ if you add several. Material can be plastic or terra cotta, but every pot must have a drainage hole. Small pots dry more evenly and cut rot risk.
Soil and potting mix
Pick a light, airy soil. A cactus/succulent potting mix is ideal. If using regular potting soil, amend with perlite or pumice to create a fast-draining mix. Look for brands like Bonsai Jack, Superfly Bonsai, Cactus Cult, or Hoffman’s for texture cues.
Light and location
Place your pot where it gets bright indirect light, not harsh direct sunlight. Too much sun can burn before roots form; too little will stall growth.
“A clean cut, good drainage, and gentle light cover most problems.”
Set-and-forget checklist: stable indoor temps, a saucer for runoff, and a low-traffic spot so you don’t disturb the young roots.
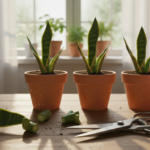
Snake plant leaf cutting propagation in soil: Step-by-Step Method
A tidy, near-soil cut gives you the healthiest material to grow new specimens.
Select a healthy leaf: choose a firm, unblemished blade and cut it cleanly close to the soil line. Whole leaves are easy to handle; 2-inch sections let you get more starters from one blade.
Mark orientation: make a small notch or angled cut on the bottom end so you never plant the top upside down. Orientation matters — only the bottom should go into the mix.
Let the cut end callus for a couple of days, longer in humid homes (up to 10 days). This reduces rot risk and gives the wound time to seal.
Planting depth & spacing: insert pieces about 1–3 inches into a light, draining potting mix so they stand upright but stay out of soggy pockets. Space them for airflow.
First watering: wait 3–7 days after planting, then water thoroughly and let the pot drain. Keep the mix lightly moist at times, but avoid long wetness—the fastest path to rot.
Place the pot in bright indirect sunlight and steady indoor temps (65–80°F) while roots form.
“A small notch saves a lot of guesswork—orientation is everything.”

| Method | Pros | Cons |
|---|---|---|
| Whole leaf | Simple handling, lower rot risk | Fewer new starts per blade |
| 2-inch sections | More starters from one blade | More orientation checks needed |
| Planting tips | 1–3 inches deep; light mix; wait before watering | Avoid soggy, heavy mixes and direct hot sun |
Water Propagation vs. Soil Propagation: Choosing the Right Way
Deciding on a water or soil method comes down to how much hands-on care you want. Each way has clear pros and cons. Pick the approach that fits your schedule and tolerance for maintenance.

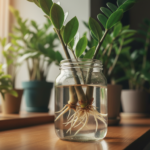
How to root cuttings in water without encouraging rot
Use a clean glass or jar and add a couple inches of fresh water. Submerge only about 25% of the base so the piece can breathe.
Change the water weekly and rinse the jar to remove slime or bacteria. Bright, indirect light speeds rooting without overheating the jar.
Weekly water changes and how much to submerge
Swap water at least once every seven days. Rinse the cutting and the container when you change water.
Keep the submerged portion shallow—too much under water raises rot risk. Stagnant water makes the base mushy fast.
When to move from water to soil after roots form
Roots often show up around two months in water. Wait until you see several noticeable roots, not just a tiny nub.
Then move the piece into a small pot with a draining potting mix. Water once, let it drain fully, and keep the pot in bright, indirect light.
“Water lets you see roots grow, while soil asks for less fuss once set.”
| Option | Pros | Cons |
|---|---|---|
| Water method | Visible roots; easy start for beginners | Needs weekly changes; higher rot risk if neglected |
| Soil method | Lower maintenance; less disturbance | Slower visible progress; hard to check roots |
| Best fit | Choose water if you will maintain jars weekly | Choose soil if you want a low-maintenance way |
Common Mistakes That Stop Leaf Cuttings From Rooting (and How to Fix Them)
A few simple checks will save many promising cuttings from rotting or stalling.
Planting the wrong end: upside-down pieces never root. Mark the bottom with a small notch or angle so you always plant the correct end down.
Skipping callus time: allow cut ends to dry for a couple of days. This short rest reduces the chance of mushy failures, especially in wetter soil.
Overwatering spiral: wet mix + no drainage + low airflow leads to rot. Use a pot with a hole, water sparingly, and increase airflow or light to keep cuttings healthy.
Heavy potting soil: dense potting soil holds too much moisture. Switch to a cactus-style potting mix or amend with perlite for a light, airy mix suitable for cuttings soil.
Light mistakes: harsh direct sun can scorch new pieces. Too little light slows rooting and yields weak growth. Aim for bright, indirect light and steady indoor temperatures.
“Most propagation issues are fixable by adjusting moisture, mix texture, and light rather than starting over.”

| Problem | Cause | Quick Fix |
|---|---|---|
| Upside-down planting | Wrong orientation | Notch bottom; plant correctly |
| Mushy base | No callus; wet soil | Dry cut 2–7 days; use drier mix |
| Root rot | Poor drainage; overwatering | Use draining pot; water less |
| Burn or stall | Too much sun / too little light | Move to bright, indirect light |
Conclusion
Successful starts often come down to patience and a few simple habits you can keep up. Give the process months, not days, and expect visible change only after a steady period of root development and pup formation.
Preventing rot is the fastest way to consistent success. Let cut ends callus, use a light, well-draining mix, and keep containers that let excess moisture escape. These steps cut failures dramatically.
Pick the approach that fits your routine: choose soil if you want lower maintenance or choose the jar method if you will swap water weekly. Both paths work when you stay consistent.
Mistake-proof checklist: mark orientation, let ends dry before placing them, keep setups in bright indirect light, and water sparingly in a draining container. For extra troubleshooting on curled or stressed foliage, see troubleshooting curling leaves.
Try starting with one healthy section this weekend and then let nature do the rest. With steady care and patience, new growth will arrive in time.