string of hearts propagation butterfly method

String of Hearts Propagation: The “Butterfly Method” Explained

Surprising fact: many hobby growers report up to a 70% increase in new shoots when they switch to tiny, double‑leaf cuttings during active growth. That simple change makes a big difference for Ceropegia woodii owners.

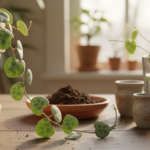
String of Hearts is a trailing houseplant with patterned, heart-shaped leaves. Home gardeners often revive leggy vines through propagation when spacing and thin growth show up from low light.

The so-called butterfly concept uses very small segments — about 1/2 inch — with a node in the middle and a leaf on each side that look like wings. Growers favor this because each tiny cutting can sprout on both ends.

This short guide focuses on the butterfly method, not water or full-length cuttings. You’ll learn why it works, what supplies to pick, and a step-by-step routine for reliable results.

Key success tip: keep leaves dry while the node touches a lightly moist medium to prevent rot. Timing, light, and gentle airflow also shape success.

Key Takeaways

  • Small double-leaf cuttings can produce shoots from both sides.
  • This approach helps thicken leggy vines and refill a mother pot.
  • Keep the node moist but the leaves dry to avoid rot.
  • Best results come during active growth with bright indirect light.
  • The guide focuses on supplies, steps, week-by-week expectations, and potting up.

Why the Butterfly Method Works for String of Hearts Vines

A half‑inch segment cut so a node sits between two leaves gives each cutting two chances to root. That small design concentrates energy at the node, the true engine for new vine growth.

What the pieces look like: these tiny “butterflies” are simply a short stem with a leaf on each side and the node centered between them. The pair of leaves acts as small energy stores while the node generates roots and shoots.

Where to cut: make clean snips on either side of a leaf pair so the node remains intact. Aim for roughly 1/2 inch so the cutting sits neatly on the surface of your medium.

A close-up view of lush String of Hearts vines gracefully draping over a wooden trellis. In the foreground, the delicate, heart-shaped leaves exhibit a mix of vibrant green and subtle variegations. The middle section features vines intertwined, showcasing their unique growth patterns, while tiny roots are visible anchoring themselves in rich, dark soil. In the background, soft, diffused sunlight filters through light, airy curtains, creating a warm and inviting atmosphere. The scene is captured from a slightly elevated angle, enhancing the depth and texture of the vines against a blurred, natural backdrop. The mood is tranquil, emphasizing the beauty and resilience of these propagating plants.

Why this helps: because the node sits in the middle, new vines can sprout in either side direction. That symmetric setup raises the chance of successful rooting and faster visible growth.

Timing and conditions: in the United States, late spring through summer is the easiest time to use butterfly cuttings—plants are actively growing and recover quickly after trimming. Indoor growers with warm temps and strong grow lights can use this way year‑round, but expect slower rooting outside peak seasons.

To get consistent results, keep bright indirect light and controlled moisture at the node while keeping the leaves dry. Next, prepare clean tools and pick a medium that holds node moisture but stays airy around the leaves.

Prep and Supplies for the string of hearts propagation butterfly method

Begin with a close look at the mother plant to select firm, well-spaced vines and visible nodes. Choose stems that are turgid and free from yellow leaves or mushy sections.

A tranquil indoor gardening scene showcasing the propagation of String of Hearts plants using the butterfly method. In the foreground, a beautifully arranged propagation station features several healthy cuttings with lush, heart-shaped leaves resting in clear glass water jars. The middle ground includes a soft, natural wooden table adorned with gardening tools like scissors, a small pot filled with soil, and a notebook with notes about plant care. In the background, a sunlit window filtered by sheer curtains casts gentle, warm light over the setup, creating a serene atmosphere. The colors are vibrant yet soothing, emphasizing the greens of the plants and the earthy tones of the materials, lending an inviting and nurturing vibe to the image. The perspective is slightly angled, capturing depth and inviting the viewer into the scene.

Picking the right vine and spotting nodes

Nodes sit where each leaf pair meets the stem. Small brown aerial tubers appear near leaf bases and can speed rooting when pressed into the medium.

Tools to gather

  • Clean, sharp scissors (sterilized) and optional gloves.
  • A shallow container or tray and a clear lid (a reusable plastic takeout works well).
  • Clean water for rinsing tools and dampening media.

Rooting setups: soil, sphagnum, or perlite

Soil: well-draining succulent soil makes potting up easiest but needs more misting. Sphagnum moss: holds moisture for fast rooting but can cling to roots at potting. Perlite in a prop box: layer moist lower perlite and a drier top to keep the surface less wet — this reduces leaf rot.

Optional boosters and hygiene

Rooting hormone can speed results; cinnamon is a gentle DIY antifungal. To prevent fungus gnats, use small bits of mosquito dunk or keep the setup ventilated. Open the clear lid occasionally to cut humidity and lower mold risk.

Quick choice guide: for lowest-maintenance humidity control pick a prop box with perlite or sphagnum moss. For easiest potting, start in soil.

How to Propagate String of Hearts Using the Butterfly Method Step by Step

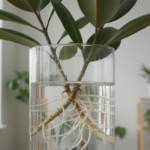
Cut a long runner into tiny, half‑inch pieces that keep a node centered between two leaves. Aim for neat segments about 1/2 inch so each cutting has one node and two leaves. This size sits well on the surface and gives roots two directions to start.

Delicate butterfly cuttings of String of Hearts plants lie artistically arranged on a rustic wooden table. In the foreground, focus on the heart-shaped leaves, showcasing their variegated green and purple hues, gently reflecting soft, natural light. The middle ground features scattered garden tools, including a pair of shears and soil, emphasizing the propagation process. In the background, a blurred indoor garden setting is visible, with sunlight streaming through a window, creating a warm, inviting atmosphere. The overall mood is serene and nurturing, inviting viewers to explore the beauty of plant propagation. The image should appear crisp and vibrant, captured with a shallow depth of field to enhance the foreground details.

Prepare your media

Perlite prop box: add 1–2 inches of perlite, wet slightly, then top with 3–4 inches of dry perlite so the surface is drier and leaves stay safe.

Soil: use well‑draining succulent soil. Start drier; wait a week before light misting to avoid leaf rot.

Sphagnum moss: soak 15–20 minutes, wring until damp (not dripping), and spread in a shallow container for faster rooting around nodes.

Placement, humidity, and airflow

Place cuttings on the top with the hearts facing up and the node touching or barely pressed into the surface. Keep leaves off wet media.

Use a clear‑lid container or a sealed plastic bag to raise humidity, but open every few days for fresh air to cut mold risk. If mold appears, increase airflow and reduce moisture.

Light, watering, and what to expect

Give bright, indirect light; avoid harsh midday sun which can bake cuttings. Water sparingly—keep nodes lightly moist without soaking the surface.

In perlite or moss you may see fuzzy white roots within a week. Over 2–3 weeks roots lengthen; new growth is the best sign the process worked.

Potting up and troubleshooting

Wait until roots are sturdy—about 2–3 inches—before potting. Tuck rooted cuttings into the top layer of a pot to thicken the crown and encourage cascading vines.

If rot shows, cut wettings back, increase airflow, and consult a short guide on root rot prevention for treatment tips.

Setup Layering / Prep Best timeline Notes
Perlite prop box 1–2″ wet bottom, 3–4″ dry top Fuzzy roots ~1 week Surface stays drier; low leaf rot risk
Well‑draining soil Pot/tray with dry start Mist after ~1 week Easy potting later; avoid soaking
Sphagnum moss Soak 15–20 min, wring damp Roots often visible ~1 week Holds moisture; handle gently at potting
Humidity control Clear lid or bag, open every few days Maintain until roots form Prevent mold with brief airing

Conclusion

A few well-placed half‑inch pieces can turn a leggy vine into a lush display in weeks.

Quick recap: small double‑leaf cuttings with a central node are easy to root on top of your chosen medium. Use soil for simplest potting, sphagnum or moss for fast start, or perlite in a lidded tray to keep leaves dry.

Key rules: press the node into the medium, keep leaves up and dry, control moisture, and give steady airflow to avoid mold. Add healthy rooted pieces back into the mother pot to thicken vines and boost the plant’s look.

Start small, use clean tools, and be patient. Some cuttings won’t make it, but with care you should see enough new shoots to change a sparse string hearts into a fuller display. For related leaf issues consult this leaves curling guide.

FAQ

What is the butterfly method for propagating string of hearts?

The butterfly method uses small paired-leaf cuttings trimmed from a vine so each cutting looks like a tiny butterfly. You cut just around a node or aerial tuber, leaving a pair of leaves on a short stem. That node sits on the root medium so new roots form without burying the leaves. This reduces rot and speeds rooting.

Why does this way work better than simply planting a long cutting?

Butterfly-style cuttings expose more nodes to the medium while keeping leaves dry, improving oxygen at the node and lowering fungal risk. Smaller pieces also focus energy into new roots rather than maintaining long vines. In practice that means faster, cleaner rooting and healthier new growth.

When is the best time to propagate in the United States?

The ideal window is spring through early fall, when temperatures are 65–80°F and light is bright but indirect. Warmer months encourage rapid root development and new shoots. In cooler months, expect slower progress and keep humidity and warmth steady.

How do I choose healthy vines and spot nodes or aerial tubers?

Pick firm vines with glossy leaves and no brown tips. Nodes look like small bumps where leaves attach; aerial tubers are tiny swollen bumps along the vine. Cut a few inches of vine that include clear nodes or tubers for the best chance of rooting.

What tools and supplies do I need to prepare?

Gather clean scissors or pruning shears, a container with a clear lid or a plastic bag, gloves, and clean water. For mediums choose well-draining potting mix, sphagnum moss, or perlite in a propagation box. Optional items: rooting hormone and powdered cinnamon to reduce rot.

Which rooting medium should I use: soil, sphagnum moss, or perlite?

All three work. Sphagnum moss holds humidity and supports delicate roots, perlite gives excellent aeration, and a light, well-draining potting soil is forgiving for potting up. For the butterfly approach, use a surface layer that lets the node touch the medium while keeping leaves above it.

Should I use rooting hormone or other boosters?

Rooting hormone can speed rooting, especially in cooler conditions. A light dusting helps but isn’t required. Cinnamon can be applied to cut surfaces to discourage fungus. Also control fungus gnats with sand or sticky traps if using damp organic media.

How do I set the butterfly cuttings in the medium properly?

Prepare a shallow bed of your chosen medium so the node contacts the surface. Lay each paired-leaf cutting with the “butterfly” wings facing up and the node touching the medium. Do not bury the leaves. Secure with a small pin or light press so they stay in place.

How do I balance humidity and airflow to prevent mold?

Use a clear-lid container or a plastic bag to raise humidity but open vents or lift the lid daily for 5–10 minutes to exchange air. Avoid sealing completely. If you see condensation, briefly remove the cover to reduce moisture build-up and lower mold risk.

What light and watering routine works best during rooting?

Provide bright, indirect light—near an east or north window is ideal. Keep the medium lightly moist but not soggy; mist the surface daily or every other day depending on conditions. Overwatering causes rot, so let the top layer feel slightly damp, not wet.

What should I expect week by week after placing cuttings in the box?

Week 1–2: callusing and moisture adjustments; watch for any blackening. Week 2–4: fuzzy or thin root hairs appear from the node. Week 4–8: thicker roots and tiny new shoots may form. Timing varies by temperature and medium; be patient and keep conditions stable.

How do I pot up rooted butterflies into a fuller plant?

Once roots are a few inches long or visibly active, transplant several rooted pieces into fresh, well-draining soil near the pot surface so new shoots trail over the edge. Gently spread roots and cover the node base lightly. Water in and keep humidity a week to reduce transplant shock.

Can I root cuttings directly on the mother plant using the butterfly technique?

You can encourage new growth by leaving short paired sections on the mother vine and tucking nodes into moist sphagnum or soil in the same pot, but this is trickier. It’s safer to remove cuttings and root them separately for better control over moisture and airflow.

How many inches long should my initial strand be before making butterflies?

Take strands about 4–8 inches long so you can trim multiple paired-leaf cuttings with clear nodes. Each butterfly usually spans 1–2 inches, so a longer strand yields several cuttings and increases success odds.

How do I prevent fungus gnats and other pests when using moist media?

Use sterile media or pasteurize potting mix, top with a layer of horticultural sand, and avoid overwatering. Sticky traps catch adults, and beneficial nematodes or Bacillus thuringiensis israelensis (BTI) target larvae in the medium.

Comments

No comments yet. Why don’t you start the discussion?

Leave a Reply

Your email address will not be published. Required fields are marked *