Surprising fact: many hobby growers turn one vine into a shelf full of plants in a single season by using simple techniques that work indoors.
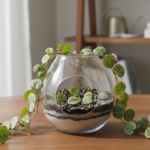
Ceropegia woodii wins fans in the United States for its trailing ropes of heart-shaped leaves that shine in hanging planters and on shelves.
This guide sets clear expectations: you can make multiple plants from one vine using three reliable propagation options—rooting cuttings in water, rooting cuttings in soil, or using tuber and layering methods. Pick the method that fits your comfort and mess tolerance.
Success looks like visible roots, fresh growth, and firmer stems. Common slowdowns include cool temps, low light, and overly wet soil. The real key is the node; clean cuts and the right environment make the biggest difference.
Key Takeaways
- One vine can become many with simple, repeatable steps.
- Three main approaches: water, soil, and tuber/layering methods.
- Look for roots, new growth, and stronger stems as signs of success.
- Nodes, clean cuts, and proper conditions are crucial.
- A friendly, step-by-step method will suit beginners and veterans alike.
Before You Start: Timing, Tools, and What Makes Cuttings Root
Before you cut a vine, get a quick plan for timing, supplies, and the small steps that help roots form.
Best season: Aim for spring and summer when active growth speeds rooting. You can try any time indoors, but cooler months often slow progress and raise risk.
Gather supplies
- Clean scissors or pruning shears — reduce rot and infection.
- Clear glass or jar for water rooting and a small pot for soil rooting.
- A gritty, well-draining potting mix and a clear plastic bag for humidity.

Find the node and prep the stem
Look for nodes where leaves meet the stem. Nodes are non-negotiable — roots form there.
Take sections with about three to four nodes. Remove lower leaves so nothing sits in water or gets buried in wet soil. This avoids rot and improves success.
Set the right environment
- Warm indoor spot with bright, indirect light — near a window but not in harsh midday sun.
- Have containers ready so cuttings do not sit out long after cutting from the mother plant.
- Choose firm, healthy vines and avoid damaged sections.
“Clean tools and the right node placement are the two simplest things that change results overnight.”
| Item | Why it matters | Quick tip |
|---|---|---|
| Spring/Summer | Active growth speeds rooting | Start during warm time for faster results |
| Clean cutters | Prevents rot and bacteria | Wipe with alcohol before each cut |
| 3–4 nodes | Nodes are root origin points | Strip lower leaves for safety |
| Gritty mix | Drains well around tender nodes | Use perlite or pumice for aeration |
How to Propagate String of Hearts in Water (Stem Cuttings Method)
Begin by trimming a strong section of vine and preparing a bright, warm spot for rooting. Use clean shears and take a stem cutting with about three to four nodes. Remove lower leaves so nothing sits in the water.

Take a healthy cutting and set it correctly
Fill a clean glass container with room-temperature water. Position the cutting so at least two nodes are submerged while leaves stay above the surface. This prevents rot and encourages nodes to form roots.
Jar setup and maintenance
Place the jar in bright, indirect light in a warm room. Refresh the water weekly (every 5–7 days) or sooner if it looks cloudy. Clear water keeps oxygen levels up and reduces bacterial growth.
When to pot up and aftercare
Most cuttings show visible roots within a couple of weeks. Transplant once roots reach about a half-inch long. Move the cutting into a small pot with well-draining soil, water thoroughly, and keep the mix evenly moist for the first couple of weeks.
“If stems turn mushy, reduce submersion depth, improve cleanliness, and avoid hot direct sun.”
Propagate String of Hearts in Soil for an Easy, Low-Mess Setup
Soil is a low-mess choice that turns cuttings into ready-to-grow pots with minimal fuss. It skips a jar and often means less handling when roots form.

Plant cuttings correctly
Use a small pot or container with a gritty, well-draining mix. Take cuttings of three to four nodes and strip the lower leaves.
Insert each cutting so at least two nodes sit buried and the remaining leaves stay above the soil line. This encourages steady rooting without rot.
Moisture and humidity boost
Moisten the soil lightly with a spray bottle; keep it damp but not soaking. Mist every few days if the surface dries quickly.
Cover the pot with a clear plastic bag to raise humidity. Vent the bag once a week for 10–15 minutes to refresh air and cut mold risk.
Alternative: lay stems on the surface
Lay a stem along the surface so nodes and any small tubers touch the mix. This often yields multiple rooting points and a fuller-looking plant.
Tip: Warm temps and bright, indirect light speed progress. Avoid direct sun that overheats covered cuttings.
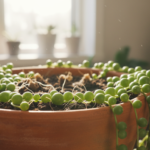
Layering and Tuber Propagation for Fuller String of Hearts Plants
Layering is an easy way to get a fuller pot quickly. This method uses natural aerial tubers along the stem that form roots when given steady contact with soil.

Set the pot and lay the vine
Place a small pot filled with well-draining mix next to the mother plant. Drape a healthy stem so the tubers sit on the soil surface.
Secure and encourage rooting
Lightly press or bury each tuber so it keeps contact with the mix. Coil the stem around the inside rim of the pot and pin it down with a bent paperclip if it lifts.
Keep the soil evenly moist but not soggy. Under warm, bright conditions tubers usually form visible roots within a few weeks.
When to separate from the mother plant
Wait until you see established roots—many growers cut the connecting stem once roots reach about two inches. Then pot the new plant and resume regular care.
- Why this way: multiple rooting points create bushier string hearts plants in one method.
- Quick tip: root several tubers around the rim for spread-out trails rather than one central shoot.
“Layering is often the simplest, most reliable method for producing fuller pots.”
Conclusion
Wrap up: one vine can become many using three reliable ways—water cuttings, soil cuttings, or tubers and layering. This short recap covers the essentials and gives a quick choice guide for busy gardeners.
Key rule: always include nodes or tubers and keep leaves out of standing water or constantly wet soil. That avoids rot and helps visible roots form faster in spring and summer.
Pick water if you like watching roots, pick soil for low mess, and pick layering for a fuller plant fast. Once established, treat Ceropegia woodii like a succulent: bright indirect light, well-draining mix, and let the pot dry between waterings.
Trim regularly—those cuttings become new plants and a simple way to expand your houseplant collection. Happy gardening!