Surprising fact: nearly 40% of newly bought houseplants show white, fuzzy growth in their first week at home.
This guide lays out a simple seven-day plan to stop that issue before it becomes a repeat problem in your home.
Start by stabilizing moisture, then remove visible white patches, and finally set up better light and airflow. These steps change the conditions that keep the surface damp and low in oxygen.
Why act fast: most white fuzz is a saprophytic fungus feeding on dead matter and is not an emergency. Still, it signals excess wetness and can invite pests or hurt roots if left alone.
This intro previews a day-by-day checklist so you know when to water, when to scrape, and when repotting is needed. Follow the steps to protect your new plant and keep spores from building up in your home.
Key Takeaways
- Spot white fuzzy growth early and adjust watering first.
- Improve light and airflow to discourage repeat growth.
- Scrape or refresh the top layer if the surface stays damp.
- Check drainage and empty any decorative cachepots after watering.
- Most cases are fixable; quick action protects roots and reduces spores at home.
What You’re Seeing: Mold vs. Normal Life in Houseplant Soil
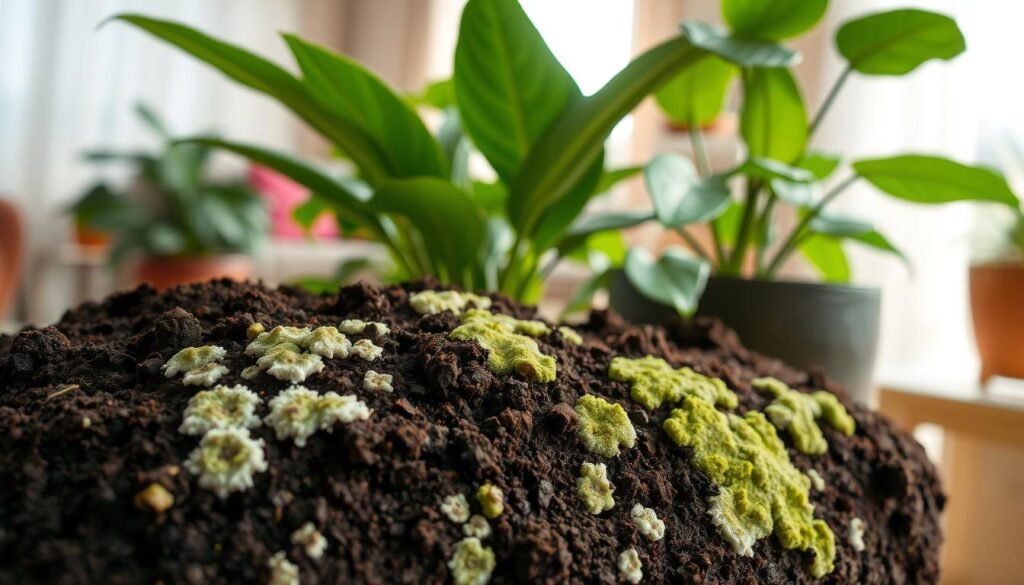
White, fuzzy patches on the surface can look alarming, but they often point to normal decomposition rather than immediate danger.

What it looks like: The most common sign is pale, cottony growth across the top layer or near drainage holes. You may also spot tiny colonies that grow into larger patches when the surface stays wet.
Why that fuzzy layer appears
Often the white layer is saprophytic fungi feeding on dead organic matter in the mix. These decomposers break down leaf bits and other debris and are part of normal soil biology.
When it’s more than cosmetic
Look for spread, a sour smell, persistent sogginess, or pests. Heavy coverage plus poor drainage signals that conditions—watering, airflow, or light—are off and need fixing.
- Note: lightweight mold spores travel easily, so cleanup and better ventilation reduce spread.
- Watch for fungus gnats, bad odor, or constant wetness as triggers to act.
Day You Bring It Home: Quick Isolation and Inspection Checklist
Give new arrivals a brief quarantine. Move the houseplant to its own spot for a few days so spores and pests don’t travel to other houseplants.

Check the pot and drainage before settling it
Confirm real drainage holes. Look for packed soil at openings or white fuzz near the holes. If the container is sitting in a cover pot, empty excess water after each check.
Scan the surface and texture
Assess how the soil looks: compacted, dripping wet, or fast-drying. Remove fallen leaves and dead bits; rotting debris feeds fungus and invites more mold plant soil issues.
Rule-outs: what else it might look like
Do a quick check for tiny white bugs that look like powder. Mealybugs hide at leaf joints, stems, and the soil line and can be mistaken for mold.
- Isolate the new item for 3–5 days.
- Take photos and note the starting condition to track any spread.
- If the soil is dripping wet, focus on moisture control first—not treatments.
Why That White Growth Often Starts After You Bring a Flower Home
C) What looks like a sudden outbreak usually starts with retained moisture and limited airflow after the pot leaves the store.
Overwatering is the top trigger. When plant soil stays constantly soggy, oxygen drops and fungi thrive. That wetness invites visible white growth fast.
Poor drainage makes things worse. Cover pots without drainage hold water at the base. Trapped water keeps the surface damp for days.

Other common conditions
- High humidity and low air circulation create low-oxygen pockets that favor fungal growth.
- Low sunlight and cool temperatures slow evaporation and lengthen dry-down time.
- Contaminated or damp-stored potting soil can introduce active fungi right away.
- Fallen leaves or rotting organic matter provide food that supports saprophytic growth.
“Fix moisture first, then remove the food source, then improve airflow and drainage.”
| Trigger | Why it helps fungi | Quick fix |
|---|---|---|
| Overwatering | Keeps mix soggy; low oxygen | Let top dry; test before watering |
| Poor drainage | Traps water in base | Use pots with holes; avoid sealed covers |
| High humidity / low airflow | Slows evaporation; spores persist | Space pots; add a fan or dehumidifier |
The First 48 Hours: Stabilize Moisture Without Stressing the Plant
Your priority for 48 hours is to stop adding water and help the mix dry at a steady pace. Resist the urge to water again until you confirm dryness with a simple test.
How to test correctly: push your finger about an inch or two into the plant soil. If it feels cool and damp, wait. Water only when the top few inches feel dry, not just the crusty surface.
Where to place the plant: move it to brighter, indirect sunlight and better air. More light and gentle air circulation speed evaporation and help prevent mold growth without stressing the plant.
What not to do: avoid adding water “on schedule” and do not seal the surface with plastic or decorative coverings. Those traps keep moisture and cut oxygen exchange, which lets mold return.

| Action | Why it helps | Timing |
|---|---|---|
| Finger moisture test | Shows real wetness below the surface | Before every water for 48 hours |
| Move to bright, indirect light | Boosts evaporation without heat stress | First 48 hours, then as needed |
| Improve air circulation | Reduces damp pockets and spores | Continuous; use fans if needed |
Days 3-4: How to Remove Visible Mold Safely and Cleanly
When the surface shows light whitening, a targeted scrape and tidy will usually stop it from coming back. Work gently so you do not spread spores into the room.
Scrape-and-discard for light surface growth: use a clean spoon or small trowel. Lift the top inch or so where the fuzzy patch sits and place the removed material into a sealed trash bag.
Only scrape when the issue is shallow. If the pot feels waterlogged or the surface returns quickly, scraping alone won’t fix it.
Top-dress after the mix dries
Wait until the rest of the mix is noticeably dry before adding a fresh layer of potting mix. Adding new material over damp mix can trap moisture and help spores persist.
Clean nearby surfaces and keep air moving
Wipe shelves and windowsills where spores may settle. Keep the area ventilated with a fan or open window. Quick cleanup and airflow reduce spread and speed recovery.
- Use clean tools and a trash bag to limit drifting spores.
- Remove fallen leaves; debris feeds the issue.
- If the whitening returns fast, plan to improve drainage or treat the root zone next.
Days 4-5: Natural and Store-Bought Treatments That Help Prevent Mold Growth
Short-term topical aids can help when drying and airflow alone don’t fully stop surface fuzz. Treat these options as helpers, not replacements for moisture control and ventilation.
Cinnamon as a natural fungicide
Dust lightly. After scraping and letting the surface dry, sprinkle a thin layer of cinnamon over the affected area. A light dust discourages fungi at the surface where food and damp meet.
Baking soda and water: when to try it
Mix a teaspoon of baking soda with a pint of water and test on a small spot first. Use it only for minor, recurring white fuzz and apply as a light, targeted spray—do not soak the mix.
When to step up to a commercial fungicide
If whitening returns despite better drying and cleanup, choose a commercial soil fungicide labeled for houseplants. Follow label rates exactly and treat only as a next step.
Why to avoid vinegar
Avoid vinegar. Acetic acid can harm roots and stress the plant, especially in small containers. Don’t use vinegar as a surface treatment.
- Safety tip: Keep airflow running while applying treatments and avoid stirring up spores into the room.
- These methods work at the surface where dead organic food meets moisture; fix drainage and circulation for lasting results.
| Treatment | Best use | Limitations |
|---|---|---|
| Cinnamon | Post-scrape, light dusting | Surface-only; not a cure for waterlogged mix |
| Baking soda mix | Minor repeat surface fuzz; spot-test first | Can alter pH if overused |
| Commercial fungicide | Persistent or spreading issues | Use as directed; last-resort for repeat problems |
Days 5-6: Fix the Root Cause—Drainage, Air Circulation, and Pot Choice
Fixing the underlying causes during days five and six keeps surface fuzz from returning and helps roots breathe. Start by choosing a genuinely well-draining potting soil: it should hold moisture for the plant while drying in a few days so oxygen can reach the roots.
Improve drainage by adding perlite or coarse sand. These amendments create air pockets that let water pass through faster and cut low-oxygen pockets where fungi like to grow.
Use pots with drainage holes. If you prefer a decorative cover pot, keep the nursery pot inside it. Remove the inner pot and water over a sink. Wait until it stops dripping before returning it to the cover pot.
Space houseplants so air can move between them. Good air circulation reduces humidity pockets across the plant soil surface.
Run a small fan or use a dehumidifier in persistently humid rooms. Increase sunlight when possible to speed drying and lower the chance of repeat growth.
Finally, remove dead leaves and other organic matter promptly. Decaying debris acts like mini compost on top of the mix and feeds repeat issues.
Days 6–7: Decide Whether to Repot (and How to Know It’s Necessary)
If moisture problems persist despite drying and cleaning, switching the mix may be the best move. Repotting is a practical reset that removes waterlogged material and restores oxygen to the root zone.
When scraping isn’t enough
Repot if: the potting soil stays very soggy, smells sour, drains poorly, or white coverage is widespread. These signs mean surface treatment won’t fix deeper issues.
Repotting basics for flowers
- Choose a fresh, well-draining mix and a clean or new pot with drainage holes.
- Gently lift the plant and check roots. Healthy roots feel firm and look pale; rotten roots will be mushy and dark.
- Place fresh mix, seat the root ball, and avoid saturating the new mix—water lightly and only after the new top layer firms.
Aftercare the first week
Focus on light and moisture rhythm. Give bright, appropriate sunlight and steady airflow. Test moisture with your finger before each water and keep the area ventilated.
“Repotting is a reset, not a punishment—fresh mix and better drainage help growth return.”
| Signal | Action | Why it helps |
|---|---|---|
| Very soggy mix | Repot with fresh, airy mix | Restores oxygen and lowers rot risk |
| Widespread white coverage | Replace top-to-bottom | Removes contaminated material |
| Foul smell or slow drainage | Clean pot and refresh mix | Improves drainage and health |
After repotting, monitor for returning fungi, gnats, or slow dry-down. If those repeat, revisit light, drainage, and your watering routine—see a detailed watering schedule for flowering species here.
Conclusion
Conclusion
Finish the first week by confirming the changes you made now create steady conditions that discourage surface growth. Small shifts—pausing unnecessary watering, clearing fallen leaves, and boosting daylight and airflow—stop repeat issues more reliably than quick fixes.
Remember: white mold often comes from saprophytic fungi feeding on dead organic food. It rarely harms a healthy root system if you correct moisture and ventilation promptly.
Long-term wins: use pots with drainage holes, choose a well-draining mix, place the houseplant in brighter spots, and keep air moving. These steps reduce soggy pockets where fungus likes to start.
Make a simple habit: inspect the surface, remove debris, and water only after a finger test. For seasonal watering cues, see this watering schedule for flowering houseplants to help you get rid of repeat problems fast.