Surprising fact: many home gardeners report that healthy cuttings root within two to three weeks, filling sparse pots far faster than waiting for new shoots.
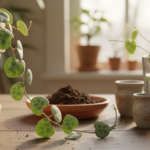
The beaded trailing plant Curio rowleyanus, also called string pearls, shows bald spots as thin tops, leggy stems, or bare soil patches. These gaps make an older specimen look tired.
String of pearls propagation is the quickest, most reliable fix. By re-rooting healthy stems onto the soil surface you can redirect growth and restore that classic pearls-on-a-string look.
This short guide previews easy methods: soil-on-surface, inserting nodes into mix, water rooting, single-leaf attempts, and division. Each method suits different skill levels and timeframes.
Good news: with a clean cutting and simple watering care, beginners can expect rooted cuttings in weeks and visible new growth soon after.
Key Takeaways
- Identify bald spots: thin tops, leggy stems, bare soil.
- Re-root healthy stems on the soil surface to fill gaps quickly.
- Methods covered: surface, node insert, water, leaf, and division.
- Rooting usually occurs in a few weeks; growth follows soon after.
- The article includes tools, soil, light, timeline, and aftercare steps.
Why propagate string of pearls to fix bald spots and boost growth
Older trailing pots often look sparse because the top crown gets shaded and stems rush outward. The plant shifts energy to long runners, leaving the center thin and bare. That makes an otherwise healthy specimen look tired.
Propagate string to replant healthy nodes where you want new shoots. By laying or planting cut segments at the soil line you force roots and branches to form closer to the pot rim. This fills bald spots without buying another pearls plant.

Prune and reuse: trim leggy vines and press those cuttings onto the surface or into fresh mix. The trimmed plant branches up and the cuttings become new trails on top, giving a fuller look fast.
- Why older pots get sparse: vines trail, the crown is shaded, and energy shifts to long stems.
- Best U.S. seasons: aim for spring and summer — rooting is quicker and growth is stronger.
- Off-season note: you can still propagate in fall and winter indoors, but expect slower rooting and less vigorous shoots; plan extra time.
Overall, propagating string pearls refreshes growth, encourages branching, and controls size. What matters most next: correct time, warm temps, bright indirect light, and drainage-focused potting choices to maximize success.
Prep for success with soil, light, and the right container
Good setup equals faster recovery. Start by choosing a gritty, well-draining soil that keeps oxygen near the roots and lets excess water leave quickly.
Two soil mix options: use a ready-made cactus/succulent soil as-is if you are experienced. If your home is humid or you overwater, lighten the mix with extra perlite.
DIY recipe: 2 parts potting mix + 2 parts coarse sand + 1 part perlite. This blend helps drain fast and keeps delicate roots healthy.

Drainage basics: always use a pot or container with drainage holes. Never let the container sit in leftover water, and add a coarse layer (expanded clay) if the mix compacts.
Shallow, wide containers work well because stems can touch the soil and root where they land. Bright, indirect light and warm temps (around 70–75°F) speed rooting.
“Let cut ends callus for 1–2 days before planting to reduce rot risk.”
- Tools: clean scissors or pruners, spray bottle, paper clips to pin stems, small jar for water rooting, and optional rooting hormone.
- Prep checklist: sanitize tools, prep the soil mix and container, and decide where the pot will live before taking cuttings.
String of pearls propagation methods that work
Use targeted cuttings and easy steps to refill bare spots without buying new plants.
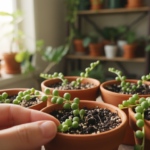
Pick healthy stems: choose firm, plump leaves on green, unblemished stems. Avoid mushy sections that rot in soil or water.
Cutting at the leaf node
Take 4–6 inch cuttings and snip just below a leaf node. Nodes are where new roots form, so that exact cut matters.
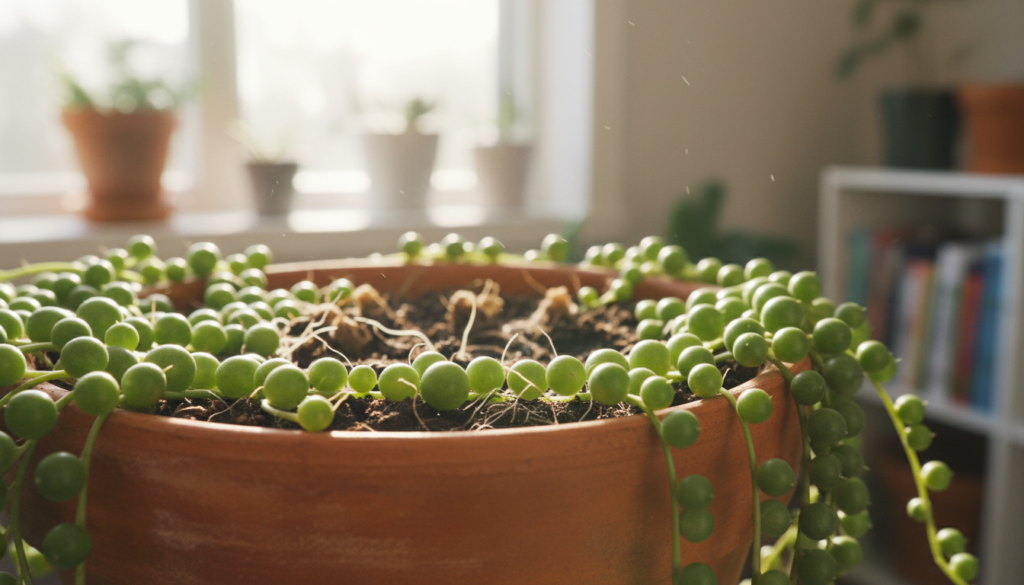
Soil surface method for bald spots
Lay stems across the top of the soil so nodes touch the surface. Pin them gently with paper clips to keep contact. This fills gaps fast with minimal transplant shock.
Planting nodes under the mix
Strip 2–3 inches of leaves from the lower section. Let the cut end callus for 1–2 days, dip in rooting hormone if you like, then plant so several nodes sit under soil for stronger anchoring.
Water rooting and transplant timing
Submerge only nodes; keep leaves above the water line. Change cloudy water. Move to soil once roots reach about 1 inch to reduce shock.
Single-leaf and division methods
Single-leaf attempts are slower and less reliable because one leaf stores less energy than a stem cutting. For dense pots, split the root ball and repot sections to create multiple fuller plants.

| Method | Best use | Time to root | Transplant cue |
|---|---|---|---|
| Surface soil | Fill bald spots | 3–4 weeks | Visible tiny roots at nodes |
| Inserted nodes | Stronger anchoring | 3–4 weeks | New shoots and root feel |
| Water | Quick root view | 2–4 weeks | Roots ~1 inch long |
| Leaf | Experimenting only | 4+ weeks | New node or tiny roots |
Tip: place several cuttings around the pot top so new trails balance and the finished plant looks fuller.
For more on reversing leggy growth and how to place new cuttings, see how to fix leggy stems.
Rooting timeline and what to expect week by week
Weeks of slow change are normal; this schedule tells you what to watch for each week.
Callusing (day 1–2): let cut ends dry and form a thin seal. This small step lowers rot risk when you place cuttings in soil or water.
Week 1–2
Callus finishes and the plant shifts energy to healing. Keep cuttings in bright, indirect light and warm temps. Avoid heavy watering.
Week 2–4
Roots begin to form. Look for fine white threads at nodes. Many cuttings root in about 3–4 weeks under steady conditions.
After week 4 (growth and potting)
New growth usually appears after roots show. For water-rooted pieces, transplant when roots reach about 1 inch. In soil, wait until gentle tug shows resistance — that means a healthy root system.
| Timeframe | Sign to watch | Action |
|---|---|---|
| Day 1–2 | Callus forms | Place cuttings in a dry, bright spot |
| Week 2–4 | Fine white roots | Keep light steady; water sparingly |
| Week 4+ | New shoots | Pot into small container; encourage steady growth |
Tip: if you reach week 4 with no roots, reassess light, temperature, and moisture before taking more cuttings.
Aftercare to keep cuttings alive and prevent rot
After rooting, your cuttings need a gentle shift in routine to avoid rot and encourage steady growth. Follow a simple plan for watering, light, and placement so new roots establish without stress.
 in the foreground. Focus on several vibrant, healthy cuttings of string of pearls in small, modern pots with well-draining soil, accentuated by pebbles on top. The middle ground features a watering can and tools neatly arranged, emphasizing aftercare essentials. In the background, soft natural light filters through a nearby window, casting gentle shadows that create a serene, nurturing atmosphere. The colors should evoke freshness, with greens and earthy tones predominating. Capture this image from a slight angle to highlight the lushness of the cuttings, providing depth and dimension, while maintaining a professional, clean aesthetic.")
Watering strategy while rooting vs once roots are established
While cuttings form roots, keep the top soil lightly moist. Mist or dab water when the surface starts to dry — not soggy, just slightly damp.
Once roots are established, change to the classic succulents pattern: let the soil dry completely between waterings. In many U.S. homes that means watering only once or twice a month.
Signs of underwatering and overwatering
Use the pearls and leaves to diagnose problems:
- Shriveled pearls mean underwatering; increase water slightly.
- Mushy, translucent pearls or soft stems point to overwatering and early rot; reduce water and improve drainage.
Where to place your pot for steady growth
Indoors: pick a bright spot with indirect light near a window. Outdoors: start in partial sun and acclimate slowly to avoid leaf burn.
Seasonal note: during spring summer growth you may water a bit more often, but always check dry soil and firm pearls first.
Rot prevention: prioritize drainage holes, fast-draining soil, and avoid letting the pot sit in a saucer of water.
Safety note: toxicity risks for pets and kids
Keep trailing plants out of reach. The species is toxic if ingested and can cause vomiting or diarrhea. Secure containers and quickly remove dropped pearls to keep curious pets and children safe.
Success looks like new pearls forming at nodes, firmer strings, and a fuller top as multiple rooted cuttings trail together and fill bald spots.
Conclusion
Small cuttings placed where you want new growth will remake a tired trailing pot. Take healthy stems, target the nodes, and use the soil-surface method to fill bald spots fastest.
Repeat when you trim: you can propagate string pearls each time you prune. Over time one leggy plant becomes a dense, cascading pot.
Choose your way: soil for ease and less shock, water for visible roots. Callus the ends first, expect roots in about three to four weeks, then watch new shoots appear.
Keep trimming to maintain shape and let the soil dry between deep waterings to avoid rot. Store pots out of reach—these plants are toxic to pets and kids.
Next action: pick one method today, set the pot in bright indirect light, and check progress weekly so you can adjust watering early.