Did you know a single Chlorophytum comosum can produce dozens of new shoots in one season? That surprising pace makes it one of the easiest house additions to multiply at no cost.
This guide defines what “babies,” spiderettes, and plantlets are so you spot ready shoots at a glance. You’ll learn the core choice: cut the baby now or let it root on the runner. That decision affects how quickly roots form and how well each offshoot takes.
We’ll preview three simple methods: rooting in soil, rooting in water, or leaving the baby attached until it roots. I’ll also cover dividing a crowded parent for extra starts when no runners exist.
Quick roadmap: identify ready spiderettes, gather tools, pick soil vs water or wait, follow easy steps for rooting, and do aftercare so babies keep growing. Focus on healthy roots and the right light—those two things make success almost certain.
Key Takeaways
- Spider plant propagation is beginner-friendly and cost-free for expanding your collection.
- “Babies,” spiderettes, and plantlets are the same tiny offshoots to watch for.
- Decide whether to snip now or wait—each method changes rooting speed and success.
- Soil, water, or staying attached are the three main approaches you’ll use.
- Healthy roots and proper light are the top factors for success.
- The guide that follows covers identification, tools, steps, and aftercare in order.
Knowing When to Cut Spider Plant Babies (Spiderettes)
Knowing the right moment to separate a baby matters for faster rooting and less stress. Aim for spring or summer when active growth speeds establishment and reduces recovery time.

Spotting a ready-offshoot
Simple visual checklist:
- Firm green leaves and multiple leaf blades.
- Visible knob-like root nubs or tiny roots at the base.
- No yellowing or limp foliage.
Cut now or wait?
Leaving a baby attached to the mother plant lowers risk. The parent keeps feeding the offshoot until roots form in soil.
Snip the runner first when hanging baskets or space make planting awkward. Either method works; those with root nubs usually establish faster.
| Choice | Risk | Speed | Best when |
|---|---|---|---|
| Leave attached | Low | Moderate | Easy access to parent pot |
| Cut and root | Medium | Fast if roots visible | Hanging baskets or gift giving |
| Wait for flowering | Low | Variable | Want more plantlets from blooms |
Encouraging more plantlets
Keep the parent plant in bright, indirect light and steady warmth. Slightly snug pots, regular watering, and occasional blooms boost baby production.
What You Need for Propagating Spider Plants Successfully
A tiny setup — clean shears, a small pot, and the right soil or jar — is all you need to start successfully.

Tools to prep
Must-haves: clean scissors or pruning shears, rubbing alcohol for sanitizing, and a small pot with drainage holes.
Wipe blades with alcohol before each cut to cut disease risk and help new roots form strong.
Choosing the right potting mix
Pick a lightweight, well-draining indoor potting mix. That means the soil stays moist but never soggy and lets air reach the roots.
If you only have standard garden soil, lighten it with perlite, coarse sand, or coconut coir at a 1:1 ratio for better aeration.
Water choices for water propagation
Use a clear jar so you can watch root growth. Keep the node or root nub submerged but not the leaves.
“Refresh the water every couple of days to prevent bacteria and keep oxygen levels up.”
Pro tip: distilled water reduces fluoride and mineral buildup that can cause brown tips later.
- Soil route supplies: sanitized shears, small draining pot, indoor potting mix, light top dressing.
- Water route supplies: clear jar, distilled or filtered water, fresh water every few days, and a bright spot.
Spider Plant Propagation Methods: Soil, Water, and Staying Attached
Pick a rooting method that fits your space and patience—each way has clear pros and trade-offs.
Rooting spiderettes directly in soil for the quickest start
Soil is usually the fastest way to get strong roots. Fill a small pot with a well-draining mix, make a shallow hole, and set the base so any root nubs touch the soil.
Lightly firm and water until evenly moist. Keep the new pot in a warm spot with bright, indirect light.
Soil propagation while attached to the mother plant for low-risk rooting
For the lowest risk, rest the baby on fresh mix beside the parent. Pin it down or use a small stake so the node stays in contact with soil.
Keep the area slightly moist. Only snip the runner once you feel resistance from new roots.
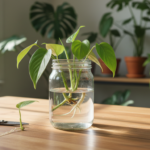
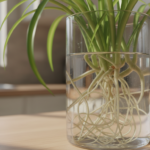
Water propagation in a jar: keeping leaves out and nodes submerged
Water offers great visibility and quick-feeling progress. Use a clear jar with distilled or low-mineral water.
Submerge only the node or root nubs; keep leaves dry to avoid rot. Refresh or top off the water every couple of days.
Where to place cuttings and how long rooting takes
All methods benefit from a stable, warm spot with bright, indirect light. Avoid direct sun that can scorch leaves.
Early roots often show in about 7–10 days. Stronger, pot-ready roots may take several weeks, commonly up to a month in home conditions.
“Early growth and a gentle tug test tell you when a baby is ready to pot up.”
| Method | Risk | Speed | Best use |
|---|---|---|---|
| Soil (cut) | Medium | Fast | Quick starts and gifting |
| Soil (attached) | Low | Moderate | Least stress for babies |
| Water (jar) | Medium | Visible/fast-feeling | Watch roots form and teach beginners |
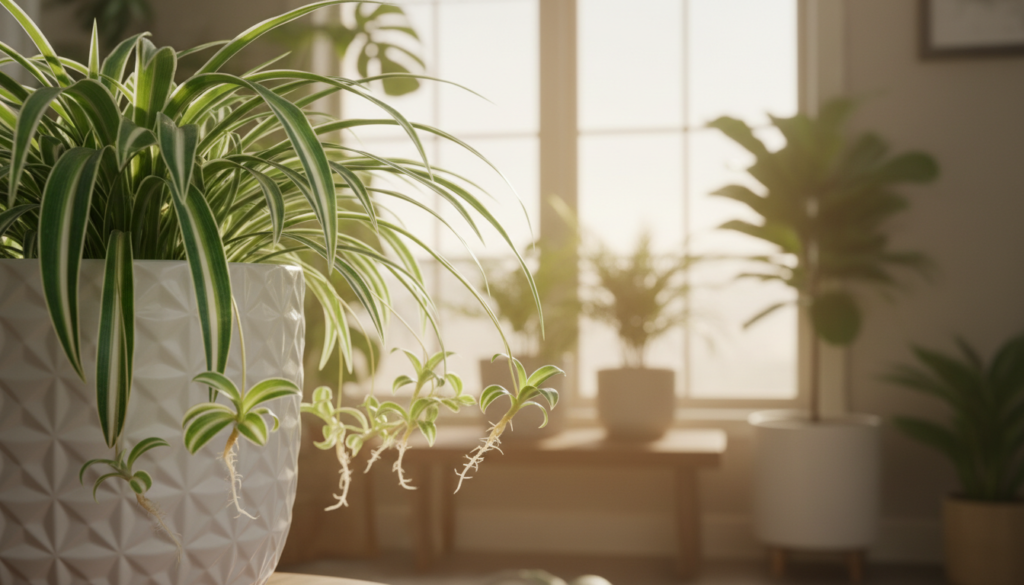
 in a stylish ceramic pot, adorned with vibrant green leaves and cascading baby plantlets. In the foreground, focus on the delicate tendrils of the plant, showing a close-up of both the mother plant and several small plantlets with their roots visible, emphasizing the propagation process. In the middle ground, include a clear, aesthetically pleasing glass jar filled with water, showcasing one of the plantlets submerged, illustrating the water propagation method. The background is softly blurred, with gentle rays of warm sunlight filtering through sheer curtains, creating a tranquil atmosphere that highlights the beauty of nature and plant care. The overall mood is calming and nurturing, inviting viewers to explore the art of propagation.")
How to Propagate a Spider Plant by Dividing the Parent Plant
If your main container is packed and drying too fast, splitting the root ball can revive growth and give you new starts.
When to choose division: Division is the go-to way when there aren’t many offshoots or the parent plant is root-bound. Look for roots circling the pot, slowed growth, water that runs straight through, or the clump pushing up.
Signs a split will help
Root-bound clues: tight roots at the rim, thin soil that dries too quick, and stunted new growth. These are good reasons to divide now.

Step-by-step dividing and repotting
- Slide the parent out of its pot and gently loosen the root ball.
- Separate sections where natural gaps or smaller clumps appear.
- Ensure each piece has healthy roots and a good clump of leaves.
- Repot into fresh, well-draining soil in appropriately sized pots.
- Water evenly and place in bright, indirect light until roots re-establish.
“Give divisions steady warmth and indirect light so roots recover without leaf scorch.”
| Sign | Action | Result |
|---|---|---|
| Roots circling pot | Divide and repot | Frees roots, improves growth |
| Water runs through | Split and refresh soil | Better moisture retention |
| Stunted growth | Separate clumps | More healthy shoots |
Caring for Baby Spider Plants After Propagation
Good aftercare turns a tiny offshoot into a full, healthy addition to your indoor collection. Follow simple routines for steady growth and fewer setbacks.
Watering during establishment
Keep soil slightly moist but never saturated. Too much moisture causes yellow leaves; too little slows growth.
A quick rule: water when the top inch feels dry and always use a pot with drainage.
Transplanting from water to soil
Water roots need a gentle transition. After planting, keep the soil evenly moist for a few weeks.
Gradually reduce frequency as new roots thicken and fresh leaves appear.
Light, placement, and a fuller look
Bright, indirect light is ideal—avoid direct sun that can burn delicate leaves.
For a fuller display, pot several babies together or tuck rooted plantlets into the parent plant’s pot.
Humidity, feeding, and quick fixes
- Light misting helps in dry homes; feed with a diluted fertilizer monthly in spring and summer.
- Yellow leaves = check watering; brown tips = switch to distilled or filtered water.
- Slow growth often signals low light or low nutrients; inspect and treat pests like aphids early.
“Two easy signs it’s rooted: a gentle tug meets resistance, and steady new leaf growth.”
Conclusion
To wrap up, here’s a friendly short guide to pick the best method and get started.
For quick results, choose soil. Leave an offshoot attached to the parent if you want the safest way. Try water when you want to watch roots form, and divide a crowded pot to create multiple new starts.
Pick spiderettes or babies with tiny root nubs when possible, or leave them until roots appear. Bright, indirect light, steady warmth, and even moisture (never soggy) are the top tips for success.
Early roots can show in about a week, but expect stronger root growth over several weeks. Now pick one step, propagate a few, and use the troubleshooting tips if leaves discolor or growth slows.