One of the most common challenges in caring for houseplants is mastering the watering routine. You might have an orchid that needs just a little water and an African violet that wilts at the first sign of dryness, both sitting side-by-side. Juggling these different needs can feel complicated and often leads to the dreaded cycle of overwatering or underwatering. The good news is there’s a simple, effective strategy that both your plants and your schedule will love: grouping them based on similar water needs. This approach transforms your care routine from a complex chore into a streamlined, intuitive process.
My name is Kamil Khan, and for years, I’ve been dedicated to understanding the nuances of indoor flowers. My journey wasn’t about memorizing complex botanical names but about observing how these plants behave in a home environment. I’ve spent countless hours arranging, rearranging, and watching how different plants respond to being placed together. This hands-on experience taught me that creating a thriving indoor garden is less about having a “green thumb” and more about creating smart systems. Grouping plants by their needs is the single most effective system I’ve found for maintaining healthy, blooming houseplants with less stress.
Understanding the “Why” Behind Grouping Plants
Grouping plants might seem like a purely aesthetic choice, but the practical benefits are far more significant. It’s a foundational strategy that directly impacts plant health and simplifies your role as a plant parent. When you arrange plants with similar needs together, you create small, manageable zones within your home, each with its own care schedule. This is far easier than trying to remember the individual requirements of a dozen different plants scattered around a room.
The Core Benefits of Strategic Plant Placement
At its heart, grouping is about efficiency and consistency. Instead of checking every single plant daily, you can check on a “group” and know that all the plants within it are likely ready for water at around the same time. This simple shift has a cascade of positive effects that I’ve observed time and again with my own collection.
- Simplified Watering Routine: This is the most obvious benefit. Your “moisture-loving” group gets checked every few days, while your “drought-tolerant” group might only need attention every couple of weeks. It removes the guesswork.
- Reduced Risk of Care Mistakes: When a plant that loves dry soil is sitting next to one that needs constant moisture, it’s incredibly easy to make a mistake. Grouping acts as a physical reminder of each plant’s preference, drastically cutting down on accidental over or underwatering.
- Creates Stable Microclimates: Plants release moisture through their leaves in a process called transpiration. When multiple plants are grouped together, this collective transpiration raises the ambient humidity in their immediate vicinity, creating a more favorable microclimate.
- Easier Health Monitoring: It’s much easier to spot a problem, like pests or disease, when you are closely observing a cluster of plants on a regular schedule. An issue on one plant can be caught early before it spreads to the entire collection.
How Grouping Creates a Healthier Environment
The humidity benefit is one that people often underestimate. Most of our favorite flowering houseplants, like orchids, anthuriums, and begonias, originate from tropical regions where humidity is naturally high. Our homes, especially with central heating or air conditioning, are often far too dry for them. Placing these plants together is a natural, free way to provide the humid air they crave. A single, isolated plant has to fight against the dry air of the entire room. A group of plants, however, creates a small pocket of humid air that benefits every member of the group.
This simple act of placement can be the difference between a plant that merely survives and one that truly thrives, producing vibrant flowers and lush foliage.
Solitary Plant vs. Grouped Plants: Environmental Impact
| Feature | Solitary Plant | Grouped Plants |
| Local Humidity | Low; moisture dissipates quickly into the room. | High; collective transpiration creates a humid microclimate. |
| Watering Consistency | Higher risk of forgetting or misjudging needs. | Easier to maintain a consistent schedule for the group. |
| Temperature Fluctuation | More exposed to drafts and sudden temperature changes. | The group buffers itself, creating a more stable temperature zone. |
| Overall Stress Level | Higher; the plant must adapt to a less-than-ideal environment alone. | Lower; plants benefit from a shared, more stable environment. |
The Three Main Watering Categories for Flowering Houseplants
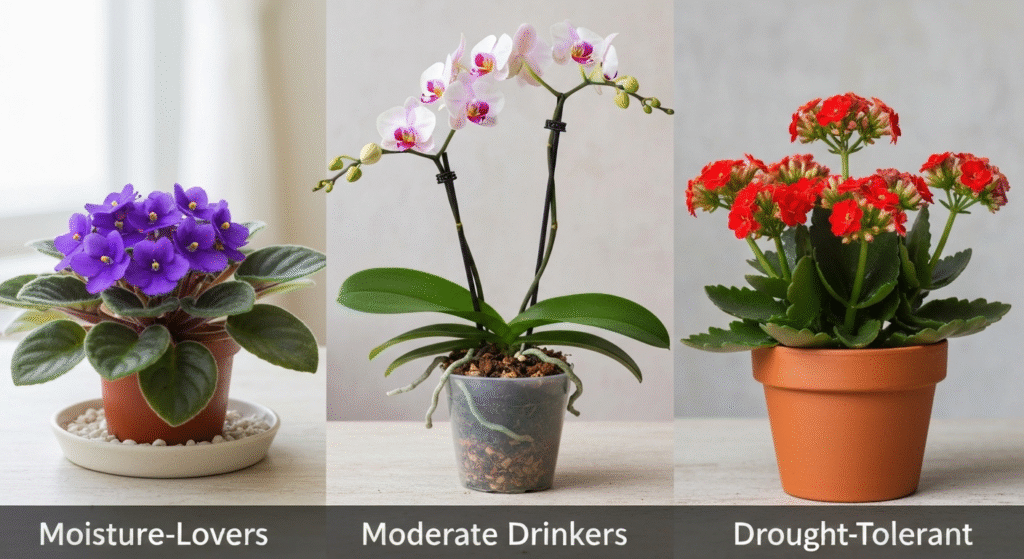
To start grouping effectively, you first need to categorize your plants. While every plant is unique, most flowering houseplants fall into one of three broad categories based on their water preferences. Understanding these groups is the first step to building your plant communities. I find it easiest to think of them as moisture-lovers, moderate drinkers, and those that are drought-tolerant.
Group 1: The Moisture-Lovers (Keep Consistently Moist)
These are the drama queens of the plant world. They don’t like their soil to dry out completely, not even for a little while. For these plants, the goal is to keep the soil feeling like a well-wrung-out sponge—damp, but not soggy or waterlogged. They often come from environments like rainforest floors where moisture is constant. Letting them dry out can lead to wilting, brown leaf edges, and dropped flowers.
Common examples in this group include:
- Peace Lily (Spathiphyllum)
- African Violet (Saintpaulia)
- Most Begonias (Begonia spp.)
- Maidenhair Fern (Adiantum) – though not primarily a bloomer, it’s a classic moisture-lover.
When caring for this group, I check the soil every 2-3 days, especially during warmer months. The moment the very top of the soil starts to feel dry, it’s time to water.
Group 2: The Balanced Approach (Allow to Partially Dry Out)
This is the largest and most common category for flowering houseplants. These plants are the perfect balance—they don’t want to be constantly wet, but they also don’t want to be bone dry. The standard rule of “water when the top 1-2 inches of soil are dry” applies perfectly here. This drying-out period is crucial for allowing oxygen to get to the roots, which helps prevent root rot, one of the most common houseplant killers.
This group includes many popular favorites:
- Phalaenopsis Orchid (Phalaenopsis spp.)
- Anthurium (Anthurium andraeanum)
- Christmas Cactus (Schlumbergera bridgesii)
- Gloxinia (Sinningia speciosa)
For this group, the “finger test” is my go-to method. I stick my finger into the soil up to the second knuckle. If it feels dry, I water thoroughly. If I feel any moisture, I wait another day or two and check again.
Group 3: The Drought-Tolerant Crew (Thrive on Dryness)
These are the camels of the indoor plant world. They have evolved to store water in their leaves, stems, or roots, allowing them to withstand long periods of dryness. For these plants, overwatering is a much greater danger than underwatering. They absolutely must have their soil dry out almost completely between waterings. Watering them too frequently will quickly lead to mushy stems and root rot.
Plants in the drought-tolerant category include:
- Hoya (Hoya carnosa)
- Kalanchoe (Kalanchoe blossfeldiana)
- Crown of Thorns (Euphorbia milii)
- Desert Rose (Adenium obesum)
I often care for this group with a “when in doubt, don’t water” mentality. I check them perhaps once every two weeks, and I always lift the pot to feel its weight. A pot with dry soil will feel significantly lighter than one with moist soil.
Watering Category Quick Reference
| Water Category | Watering Cue | Common Plant Examples | Primary Risk of Error |
| Moisture-Lovers | The top surface of the soil begins to feel dry. | Peace Lily, African Violet | Underwatering (leads to rapid wilting) |
| Moderate Drinkers | The top 1-2 inches of soil are completely dry. | Orchid, Anthurium, Christmas Cactus | Overwatering (leads to root rot) |
| Drought-Tolerant | The soil feels dry throughout most of the pot. | Hoya, Kalanchoe, Crown of Thorns | Overwatering (fatal for these plants) |
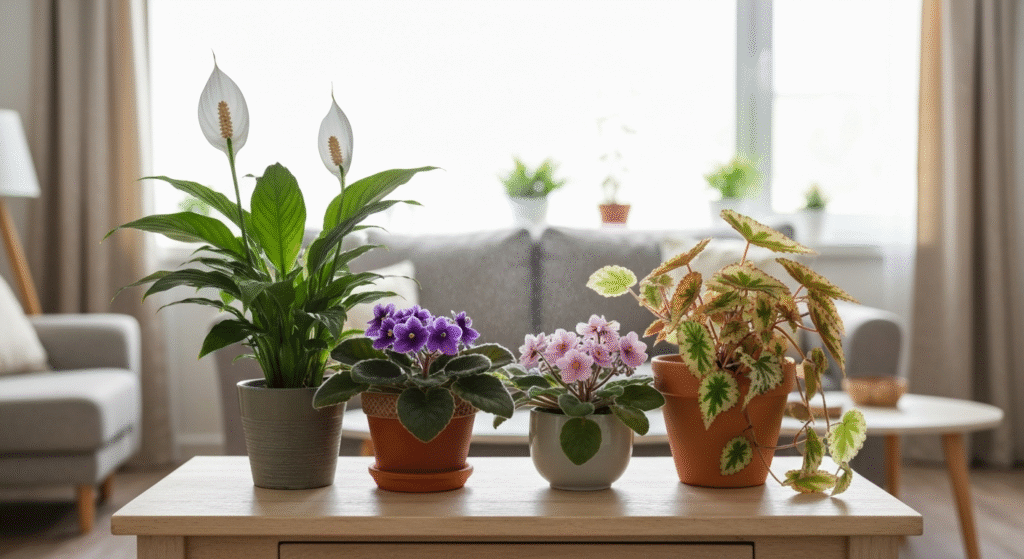
Creating Aesthetically Pleasing and Practical Groupings
Once you’ve identified which plants belong in which water group, the fun part begins: arranging them. A common misconception is that a practical arrangement has to be boring. That’s simply not true. You can create stunning, stylish displays that are also incredibly functional. The key is to think like an interior designer who also happens to be a botanist.
Combining Form and Function: Design Principles
A great plant arrangement uses basic design principles to create visual appeal. Don’t just line up plants of the same size. Instead, create depth and interest by mixing things up within your established water-need groups.
- Vary Heights and Shapes: In my “moisture-loving” corner, I might place a tall, elegant Peace Lily in the back. In front of it, I’ll position a few bushy African Violets, and perhaps let a trailing Begonia spill over the side of the shelf. This creates layers and draws the eye through the display.
- Mix Textures and Foliage: Even before the flowers bloom, your display can be beautiful. Combine plants with different leaf textures. For example, in a moderate-watering group, pair the glossy, smooth leaves of an Anthurium with the segmented, architectural stems of a Christmas Cactus.
- Use a Cohesive Color Palette: You can bring a disparate collection of plants together by using pots that share a similar color, material, or style. A collection of plants in various terracotta pots, for instance, looks intentional and cohesive, even if the plants themselves are very different.
Matching Light and Humidity Needs Within Water Groups
This is a critical final check. Just because two plants share the same water needs doesn’t automatically make them perfect roommates. You also need to ensure they enjoy the same light and humidity levels. A moisture-loving Peace Lily that thrives in medium, indirect light will not be happy grouped with a moisture-loving Rose that needs direct sun.
Fortunately, plants with similar water needs often have similar light and humidity preferences because they evolved in similar climates. It’s always best to double-check. A quick search or a look at the plant tag can confirm its preferences. This extra step ensures your beautifully designed group is also a healthy, thriving plant community.
Example Grouping Scenarios
| Goal | Plants (by Water Need) | Arrangement Strategy |
| Bright, Humid Bathroom Corner | Peace Lily, Begonia (Moisture-Lovers) & Phalaenopsis Orchid (Moderate) | Place the orchid on a pebble tray with the other plants nearby to share the high humidity. |
| East-Facing Windowsill | Anthurium, Christmas Cactus (Moderate) & Hoya (Drought-Tolerant) | Group Anthurium and Cactus together. Place the Hoya slightly closer to the window as it can handle more direct light. |
| Low-Maintenance Living Room Shelf | Kalanchoe, Crown of Thorns, Hoya (Drought-Tolerant) | Mix pot sizes and colors for visual interest. This group will only need watering every few weeks. |
Practical Tools and Techniques for Group Watering
Grouping plants doesn’t just make the when of watering easier; it also simplifies the how. Certain tools and techniques are perfectly suited for caring for plant clusters, making the process faster and more effective.
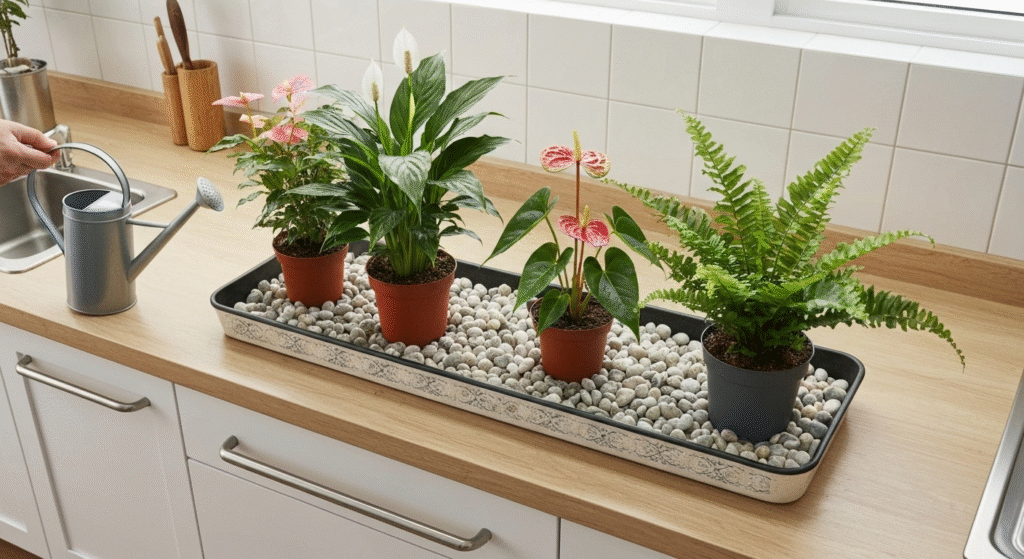
The Power of Plant Trays and Saucers
Using large, decorative trays is one of my favorite ways to manage plant groups. Instead of having a dozen individual saucers, you can place an entire water-group on a single waterproof tray. This not only looks tidier but also serves a practical purpose. Any overflow from watering is caught by the tray, protecting your furniture.
More importantly, you can easily turn this into a humidity tray.
- Find a tray that is at least an inch deep.
- Fill it with a layer of small pebbles, gravel, or decorative stones.
- Add water until it comes to just below the top of the pebbles.
- Place your potted plants on top of the pebbles.
The key is to ensure the pots are sitting on the stones, not in the water. This prevents the soil from becoming waterlogged. As the water in the tray evaporates, it creates a wonderfully humid pocket of air right where your plants need it most.
Bottom Watering for Groups
Bottom watering is a technique where you allow a plant to soak up water from the bottom through its drainage holes rather than pouring water over the top of the soil. This method is fantastic for plants that are sensitive to getting their leaves or crowns wet, like African Violets. It also ensures the entire root ball is evenly saturated.
Grouping makes bottom watering incredibly efficient.
- Place several plants from the same water group (ensuring they all have drainage holes) into a deep tray or basin.
- Add 1-2 inches of room-temperature water to the tray.
- Let the plants sit and absorb the water for about 20-30 minutes. You can tell they are done when the top of the soil becomes moist.
- Once they’ve had enough to drink, remove the plants and empty any excess water from the tray.
Comparison of Watering Methods
| Method | Pros | Cons | Best Suited For |
| Traditional Top Watering | Simple, fast, helps flush excess mineral salts from the soil. | Can lead to dry pockets in the soil; may cause leaf spot on sensitive plants. | Most houseplants, especially larger ones in deep pots. |
| Group Bottom Watering | Promotes strong root growth, prevents water on foliage, ensures even saturation. | Can take longer; may lead to salt buildup on the soil surface over time. | African Violets, Gloxinias, and any plant prone to crown rot. |
Frequently Asked Questions (FAQs)
How often should I check my grouped plants for water?
Even within a group, check the plants, not the calendar. Start by checking the “moisture-loving” group every 2-4 days, the “moderate” group weekly, and the “drought-tolerant” group every 2-3 weeks. Adjust based on the season, light, and how quickly your plants are actually drying out.
Can I group flowering and non-flowering plants together?
Absolutely! As long as their water, light, and humidity needs align, grouping flowering and non-flowering foliage plants is a great way to create lush, diverse, and interesting displays.
What if I have a plant that doesn’t seem to fit into any group?
Some plants can be tricky. If you have an outlier, give it its own spot for a while and observe it closely. Pay attention to how it communicates its needs (e.g., wilting, leaf color). Soon enough, you’ll learn its specific rhythm and can decide if it fits best with one of your existing groups or is happiest on its own.
Does grouping plants mean I have to use the same type of pot for all of them?
Not at all. However, be aware that pot material affects how quickly soil dries. Terracotta is porous and dries out fast, while plastic or glazed ceramic retains moisture longer. If you mix pot types within a group, you may find the plant in the terracotta pot needs water a day or so before the others.
Conclusion
Grouping your flowering houseplants by their watering needs is more than just an organizational hack; it’s a fundamental shift in how you approach plant care. It encourages you to see your plants not as a collection of individuals with random needs, but as small communities that can support each other. This strategy simplifies your routine, reduces common watering errors, and creates a healthier, more humid environment that allows your plants to flourish.
By taking the time to categorize your plants and arrange them thoughtfully, you replace guesswork with confidence. You’ll be able to create displays that are not only beautiful and cohesive but also practical and easy to manage. Ultimately, this approach frees you from the stress of plant care and lets you enjoy the best part: watching your happy, healthy plants burst into spectacular bloom.