Surprising fact: over 70% of casual growers build their first small orchid collection using simple division or keikis rather than seeds.
This guide sets realistic expectations. Some techniques work well on a kitchen counter. Others need clean, lab-like conditions you won’t get on a crowded table.
There are two main paths: sexual growth from seed and asexual methods like division, back bulbs, and keikis. For most beginners, vegetative routes let you create new plants faster and with less risk.
The right choice depends on species and growth habit. Copying a method meant for a different type can fail even when you follow every step.
Practical preview: this article covers division, back bulbs, keikis/offshoots, plus a short look at cuttings and seeds. Parent plant health matters: mature, actively growing stock gives the best results.
Quick tip: sterile blades and clean hands cut rot and infection, the main causes of failure. Timelines vary: divisions and keikis can be instant; back bulbs and seeds may take months or years.
Key Takeaways
- Vegetative methods are the easiest way to grow an orchid collection for most beginners.
- Seed work is possible but often needs sterile, controlled setups.
- Choose a method that matches the plant’s growth pattern to avoid failure.
- Healthy parent plants and clean tools reduce risk of rot and infection.
- Some new plants appear quickly; others require patience over months or years.
- For compact species and practical setups, see the guide to compact flowering houseplants.
What “Orchid Propagation at Home” Really Means
Deciding to make a new plant from an existing one feels simple, but the method you pick changes everything.
Propagation means creating a new living specimen from a current parent plant. It is not the same as repotting. Repotting refreshes media and space. Making a new plant produces an independent specimen that will grow on its own.

Vegetative vs. seed-grown: practical differences
Vegetative methods — division, back bulbs, and offshoots like a keiki — give clones of the parent and are the fastest for most growers. They need basic clean tools and steady care.
Seed work uses sterile flasking and often takes years before a first flower. Seed-grown plants vary genetically and demand lab-like conditions and patience.
When to try making a new plant
- The pot is crowded or roots are spilling out.
- Old pseudobulbs pile up and slow new growth.
- A clear keiki forms on a spike after the flower show ends.
- The parent plant is healthy and actively growing.
Don’t force a split if the parent plant is weak or recovering. A bad timing choice can set both plants back.
| Method | Speed to visible growth | Difficulty |
|---|---|---|
| Division / Keiki | Weeks to months | Easy–Moderate |
| Back bulbs | Months to years | Moderate |
| Seeds (flasking) | Years | Hard / sterile setup |
Quick decision lens: Is there active growth? Is the plant mature? Is there a clear baby (keiki)? If you answer yes, a vegetative route usually fits.
Care consistency — steady light, measured watering, and moderate humidity — is the key difference between a fresh start and rot. Small, careful steps yield better results over time.
Identify Your Orchid Type Before You Propagate
Before you make a cut or split a clump, identify which growth pattern your plant shows. A correct ID stops mistakes and protects the parent specimen. This step saves time and helps you pick the right method for healthy new plants.
Monopodial: single upright stem
Monopodial varieties grow from one central main stem with a single root system. Phalaenopsis and Vanda are common examples.
They lack pseudobulbs, so you cannot safely split them into divisions without severe damage. For these types, keikis or stem cuttings are safer choices.
Sympodial: rhizomes and pseudobulbs
Sympodial plants form a chain of growth: pseudobulbs linked by rhizomes. Cattleya and Oncidium fit this pattern.
Each pseudobulb stores energy and may support a small division if it has viable roots and active growth. That makes division and back-bulb work practical for these types.
What to check at the roots
- Look for firm, white or green roots — they signal readiness.
- Mushy, hollow, or brown roots mean rehab first; don’t split yet.
- If in doubt, give the parent time to recover before attempting any division.
Next step: If you have a sympodial specimen, read the division and back-bulb sections. If your plant is monopodial, focus on keiki and cutting techniques to safely get new plants without risking the orchid plant.
Division Propagation for Sympodial Orchids
When a clump becomes tight, careful division creates stable, fast-growing specimens with minimal shock. The goal is simple: turn one overgrown sympodial specimen into multiple healthy plants without setting them back.
Best timing: Divide after flowering ends and just before your next repotting cycle. That timing gives the plant energy to push new growth and roots.

Choosing strong divisions
Pick groups of three to four pseudobulbs that include an active lead. That active growth is the engine for recovery and future blooms.
Where and how to cut
Locate the connecting rhizomes and use a sterilized blade to separate units. Preserve as much of the roots and rootstock as possible while cutting through the rhizome.
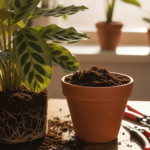
Potting the divisions
Use fresh, well-draining potting mix and a right-size pot—not oversized. Firm the division on a stable base so it won’t wobble and damage new roots. An appropriately sized orchid pot helps keep media from staying too wet.
Aftercare and expectations
Lightly mist the division for humidity but avoid soaking the mix. Wait to water normally until you see new root growth. Expect visible new growth within a month or two when conditions are right.
Label leftover older bulbs as back bulbs and save them for the next section; nothing needs to go to waste.
Back Bulbs and Dormant Eyes: Turning Old Pseudobulbs Into New Plants
Old storage bulbs often hide a sleeping bud that can restart a whole plant. Back bulbs are older pseudobulbs with no active lead but with dormant eyes. Given warmth and gentle care, they can produce shoots and roots and make new plants without heavy division.

Safe separation and handling
Sterilize a sharp cutting tool and cut between rhizomes to free a bulb. Preserve any attached root tissue. Minimize wounds to reduce infection risk.
Sphagnum moss setup and moisture
Use a small pot (about 2.5–3 inch). Place a pad of sphagnum moss in the base. Sit the bulb so its eye stays above the moss to lower rot chances.
Keep the area warm and bright with indirect light. Spray the moss and bulb to moisten but avoid soaking the media or bulb.
Patience, timing, and rot prevention
Eyes may break dormancy in weeks or remain inactive for years. Withhold regular water and fertilizer until you see new root growth.
Watch for wet rot: soft, dark, mushy tissue means remove and discard the affected bulb immediately to protect nearby bulbs.
| Step | Action | Why it matters |
|---|---|---|
| Separate | Cut along rhizomes with sterile blade | Reduces damage and infection risk |
| Set up | Place in small pot with sphagnum moss | Keeps eye above media and lowers rot |
| Care | Spray for humidity; avoid soaking | Hydrates without encouraging wet rot |
| Wait | Pot up only after new roots appear | Ensures safe transplant and steady growth |
Keikis and Offshoots: The Easiest Way to Get a Baby Orchid
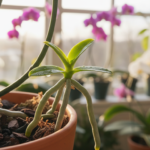
A keiki forms like a tiny clone on stems or spikes, ready to become its own potted plant. It arrives with small leaves and aerial roots, so you start with a baby that already shows growth signs.

Which plants make keikis and how to spot one
Dendrobium, Phalaenopsis, Oncidium, and Epidendrum often produce keikis. Look for a little shoot with leaves and aerial roots growing from a stem or spike. At first it can look like a bud on a stem before becoming a clear plantlet.
Encouraging a baby on a spent spike
Make a careful stem cutting just above an internode on a spent flower spike. Move the parent plant to slightly dimmer light and keep stable humidity; this can nudge a keiki to form.
When to remove and how to pot
Wait until the keiki has about 2–3 firm roots before cutting from the mother plant. Use sterilized tools and cut cleanly between stem and baby.
Pot the new plant in a small pot with damp (not wet) sphagnum moss. Stabilize the baby so it won’t wiggle and treat it like a tiny version of the parent: bright indirect light, warmth, and gentle care.
| Step | What to look for | Why it matters |
|---|---|---|
| Identify | Leaves + aerial roots on a stem | Shows the keiki can survive outside the parent |
| Encourage | Cut above internode; dim light briefly | Stimulates baby formation |
| Remove | 2–3 roots; sterile cutting | Reduces shock and root damage |
| Pot | Moss, small pot, damp not wet | Supports delicate roots and humidity |
Cuttings and Seeds at Home: What’s Possible, What’s Slow
Cuttings and seeds are where patience and clean technique matter most. These methods can work in a small setup, but they need stricter moisture control and hygiene than divisions or keikis.
Stem cuttings and high-humidity setups
Some growers try stem work with Vanda or Phalaenopsis. Success varies: some pieces root in a month, others take several months.
Simple setup: lay stem pieces on moistened sphagnum moss, cover to hold humidity, and keep bright indirect light. Check the moss often so it stays moist but not soggy.
Rot prevention: use sterile tools, allow gentle airflow, and remove any soft tissue fast to stop spread. New roots and steady leaf growth show success.
Seeds and flasking: the long project
Growing from seed uses sterile asymbiotic germination on agar. Pods are surface-sterilized (bleach 15–20 minutes); seeds often get a peroxide rinse. A glove box or very clean workspace matters.
Germination can take months; flowering from seed can take several years. For most casual growers, seeds are an advanced, time-rich hobby.
- Be realistic: cuttings and seeds are less predictable and need more care.
- Match the method to your space, patience, and tolerance for trial-and-error.
Conclusion
Make one smart choice—identify the plant type first—and the rest gets much easier.
Vegetative pathways (division, back bulbs, offshoots) are the most practical for many growers. For monopodial specimens, favor keikis or cuttings. Match method to form and timing.
Across every approach there are three simple rules: clean cuts, controlled moisture (spray rather than soak), and patience while new roots and shoots form. Good technique prevents rot and slows fewer projects.
Pick the right pot and fresh potting mix to reduce wobble and water logging. Expect quick wins from divisions and keikis, and slower returns from back bulbs or seed work.
Next step: choose one method that fits your current plant, commit to steady care, and avoid over-dividing—healthy stock makes stronger new plants.