Surprising fact: a healthy stem with a node will form roots in about 2–4 weeks, yet many beginners wait months and never get a new plant because they missed that tiny growth point.
This short guide aims to show exactly where to make a cutting so a stem makes roots first and then pushes new leaves. Success hinges on taking a piece that includes a node (not just a leaf), using clean tools, bright indirect light, and patience over weeks.
Two common paths are rooting in water or in soil. Water gives quick visual feedback; soil can reduce shock and rot. The best single rule is simple: take the stem just below a node, often near an aerial root, because that spot contains the growth point for roots and new shoots.
Don’t do this: leaf-only pieces may look alive in water but they lack the bud that makes a new plant. Expect roots in weeks and new leaves in a few months indoors.
Key Takeaways
- Include a node on any cutting for reliable new growth.
- Make the cut just below a node, often near an aerial root.
- Root in water for visibility or in soil to lower rot risk.
- Roots appear in ~2–4 weeks; leaves follow in ~2–3 months.
- Use clean tools, bright indirect light, and patience.
Why Monstera Deliciosa Propagation Works So Well
Because this vine produces nodes along every stem, you get many chances to start a new plant. The plant’s vining habit and repeated growth points make establishing cuttings forgiving and fast for most home growers.
Swiss cheese plant growth habits that make cuttings easy
The swiss cheese plant is a climbing understory vine. It forms nodes with aerial roots that grab supports in nature. Those same nodes act as restart points for new shoots and roots indoors.
What “new growth” really means: new roots first, new leaves later
Expect new roots to appear before you see new leaves. Rooting often shows progress in a few weeks, while leaf production can take a couple of months under typical home humidity.
“Root development comes before visible shoots—patience in the early weeks pays off with healthy new leaves later.”
| Stage | Typical time | Conditions that help |
|---|---|---|
| Initial rooting | 2–4 weeks | Bright indirect light, warm temps, steady moisture |
| Leaf emergence | 2–3 months | Higher humidity, active growing season, healthy parent leaves |
| Establishment | Several months | Stable environment, avoid stress, gradual potting |
- Healthy leaves on a cutting supply energy for root growth via photosynthesis.
- Brighter indirect light and spring/summer seasons speed progress.
- If a stem seems “stuck,” it may still be forming new roots below the surface.
Bottom line: give a node, steady conditions, and patience — this species rewards careful effort with reliable results.
Know Your Monstera Anatomy Before You Cut
Before you make any snips, learn the key parts of the vine so you can choose a cutting that actually grows.
How to spot a node and the axillary bud
Look along the stem for a slightly swollen joint where a leaf and petiole meet. That joint is a node.
Near that bump you may see a tiny bud. This is the axillary bud — the sleeping growth point that can wake and form a new shoot once the piece makes roots.
What aerial roots are and why they matter
Aerial roots are brown or tan, root-like nubs that come from nodes. They help the plant climb in nature.
Those structures often turn into true roots in water or soil. For beginners, an aerial root is a clear sign you chose a viable node and stem section.
Leaf-only cuttings: why they won’t grow into new plants
Leaves and petioles alone lack the axillary bud. A single leaf may survive for a while, but it cannot produce new shoots or new plants.
Leaf-only pieces often rot instead of rooting. Always include a node when you take a cutting.
| Feature | What to look for | Why it matters |
|---|---|---|
| Node | Swollen joint with a small bump | Houses the axillary bud that makes shoots |
| Axillary bud | Tiny nub near the node | Becomes a new stem and leaves after rooting |
| Aerial root | Brown/tan root-like growth from node | Speeds early rooting and shows a viable section |
- Trace the vine and count nodes; internodes are the stem gaps between them.
- Pick a healthy stem segment with at least one node and a good leaf above it.
- Wash hands after handling stems — sap can irritate sensitive skin.
“Spotting the node turns guesswork into repeatable success.”
Next: with nodes and buds identified, choosing exactly where to make the next cut becomes a simple, repeatable step.
monstera propagation where to cut for the Highest Success Rate
A precise cut in the right place is the single step that makes new roots predictable.

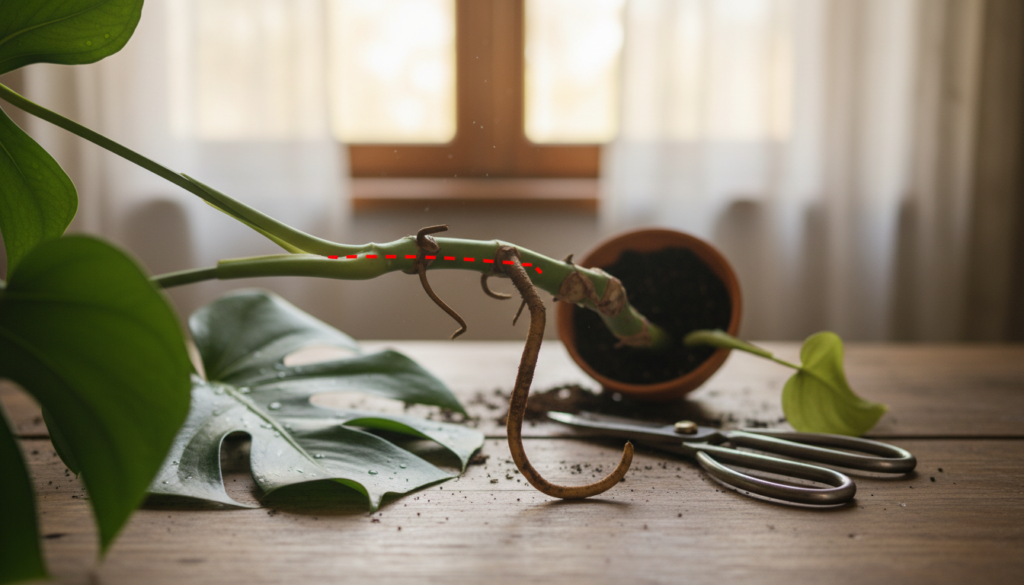
Cutting position: directly below the node along the internode
Place your blade on the smooth internode and make the cut about 1–2 inches directly below the node. This leaves the node on the cutting, which is the growth point that forms roots and shoots.
Choosing a node with an aerial root vs. without one
Nodes with an aerial root often show faster early rooting. They act like a head start.
Nodes without an aerial root still root well if kept warm and moist. Both are valid choices.
Best stem section traits: healthy, firm, and actively growing
Pick a firm, green stem with no mushy spots, blackening, or pests. Wrinkled or woody sections stall and should be avoided.
| Feature | Why it matters | Action |
|---|---|---|
| Node (knuckle) | Contains axillary bud and root tissue | Keep on the cutting; cut below it 1–2 inches |
| Aerial roots | Speeds early root formation | Prefer if present, but not required |
| Stem health | Determines success of root growth | Choose firm, unblemished tissue |
- Make sure at least one node is included and a healthy leaf is present if possible.
- Avoid overly woody, damaged, or dehydrated sections.
Once the slice point is correct, the next step is choosing how large a cutting you want for faster establishment.
Choosing the Right Cutting Size for Your Space and Goals
Pick a cutting size that matches your living space and patience. Size affects how quickly a piece roots and shows new growth.
Single-node cuttings with one leaf fit small jars and take little room. They let you make many plants from one vine. Expect slower visual results, but each piece can still push a new leaf over time.
Multi-leaf vine cuttings for faster establishment
Longer stem sections with 4–6 leaves and multiple nodes often establish faster. More leaf area boosts photosynthesis and helps roots form sooner. Use a larger pot and stake if the cutting feels top-heavy.
- Minimum: one node per cutting; more nodes = faster establishment.
- Multiple small cuttings save space and make great gifts.
- One long vine gives a fuller look in a corner with less transplanting.
- Plant several stems in one container for density, but leave a little gap so roots don’t tangle.
Realistic example: want a statement plant? Pick a larger vine cutting. Want many starters? Take several single-node pieces.
When to Take a Cutting and What to Expect on the Timeline
You can take a cutting any time of year, but the season affects how fast it moves from roots to leaves.
Spring and summer speed things up because the plant is actively growing. In warm months expect new roots in about 2–4 weeks and new leaves in roughly 2–3 months.
Cooler temperatures and low light in fall and winter slow progress. If you must work in the off-season, add supplemental light for about 2–3 hours daily in the early morning or late afternoon. That boost helps steady progress without overheating the cutting.
Plan a simple weekly check-in. Inspect water clarity or soil moisture once a week and avoid fussing with the cutting. Disturbing roots or moving the jar often delays results.
| Phase | Typical time | Practical tip |
|---|---|---|
| Initial root set | 2–4 weeks | Keep bright, indirect light and steady warmth |
| New leaves appear | 2–3 months | Maintain humidity and stable temps; be patient |
| Slow winter progress | Extra weeks to months | Add 2–3 hours supplemental light; avoid cold drafts |
Remember: larger, healthier cuttings and warmer rooms usually form new roots faster. If a cutting shows no leaf yet, it may still be forming roots below the surface — that is still success.
“Weekly care and patience beat constant checking; roots often form before any top growth is visible.”
Tools and Setup to Prevent Problems
A calm, clean prep routine protects the parent plant and gives cuttings their best chance.

Choose the right blade. Use sharp pruning shears or a clean knife so the slice is smooth rather than crushed. A clean cut heals faster and harms the parent plant less.
Simple sanitation steps
Wash blades with soap and water, then wipe them with rubbing alcohol before you take cutting. Repeat between plants when you work on multiple stems.
- Why this matters: cleanliness lowers chance of bacteria or fungus entering fresh wounds and causing stem rot or root rot.
- Setup checklist: clean tool, clean container, fresh water or potting mix, and a bright indirect light spot ready before you begin.
- Protect surfaces with paper towels and a tray—sap can drip and stain furniture.
“Prevention beats rescue: most failures are avoidable with sharp tools and sensible moisture control.”
Final tip: aim for “sterile enough”—home hygiene, not a lab. Once tools and station are ready, you can make sure the next step keeps the mother plant looking balanced.
How to Take the Cutting Without Stressing the Parent Plant
A careful plan before you take a cutting keeps your plant healthy and balanced. Step back and look at the whole specimen. Pick a cut point that keeps the silhouette even and avoids leaving a bare cane on one side.
Design the trim and limit shock
Choose one vine or a few short stems rather than trimming many at once. Conservative cutting lowers stress and lets the mother plant recover faster.
Let wounds seal briefly before rooting
After the snip, let the end air-dry for a few minutes. This small wait helps the wound seal and reduces rot risk when you place the cutting in water or soil.
- Keep aerial roots intact when possible; gently coil them instead of snapping.
- New stems often emerge just below the cut point, so pruning can lead to fuller growth over time.
- Return the parent plant to bright, indirect light and its normal watering rhythm to aid recovery.
“Plan your cut, be conservative, and the plant will reward you with steady regrowth.”
| Action | Why it matters | Quick tip |
|---|---|---|
| Step back and assess | Prevents an unbalanced look | Visualize final shape before cutting |
| Limit number of stems removed | Reduces stress and shock | Take one vine or a few segments |
| Let cut end dry | Helps seal wound, limits rot | Wait a few minutes before rooting |
Next: now that the cutting is taken, prepare it correctly so leaves stay out of the medium and the node roots cleanly.
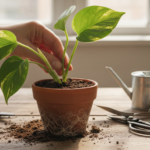
Prep Your Monstera Cutting for Water or Soil
Prep well and you cut the chance of problems later. Let the fresh wound dry for a few minutes so it seals. This simple pause lowers the risk of rot when the stem goes into water or soil.
Removing old sheathing that can rot
Look for papery brown tissue wrapped around the stem. That old sheathing breaks down in water and can foul the container.
Gently peel it away with clean fingers so only healthy green stem remains.
Keeping leaves out of the rooting medium
Keep large leaves and any damaged leaf above the water line or soil surface. Submerged leaves rot fast and invite bacteria.
Rule: node, not leaf, must contact the medium for new roots to form.
Arranging stems for spacing and future potting shape
Space stems so each node has room to make roots. Angle them gently so aerial roots can be tucked or coiled without sharp bends.
Plan the placement for an attractive look once you pot them. Fewer decaying bits means fewer microbes and less root rot.
- Quick check: no submerged leaves, node touching medium, container stable for a top-heavy piece.
- Option: root in water for easy monitoring, or place directly in soil for stronger media roots.
“A tidy stem and clear water make early growth obvious — and less likely to fail.”
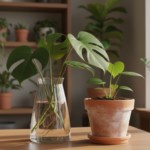
Rooting Monstera Cuttings in Water

Rooting cuttings in a clear jar is simple and forgiving. A see-through container lets you watch tiny white roots form without disturbing the stem.
Pick the right vessel
Use a clear glass or plastic container so you can monitor growth and spot problems early. This reduces accidental damage from frequent handling.
Water level basics
Keep the node and any aerial root tips submerged while keeping leaves above the surface. That placement gives the tissue direct contact with water and oxygen.
When and how often to change water
Change water every 3–5 days, or sooner if it becomes cloudy or smelly. Cloudy water usually signals bacteria or decaying bits and is your cue to refresh the container.
Best placement
Place cuttings in bright, indirect light—an east or north window works well. Avoid direct sun that can scorch leaves and overheat the water.
“Tiny white roots in a clear jar are a great early sign; patience matters because new growth often follows later.”
| Thing to watch | Good sign | Action |
|---|---|---|
| Root color | White or cream | Keep routine; wait for stronger branching |
| Stem tissue | Firm and green | Continue water method |
| Soft brown or mushy | Rot | Trim to healthy tissue and refresh water |
Note: roots often appear in about 2–4 weeks, but water-grown roots can be weaker than those started in soil. When roots are established, you may pot the piece or keep it in water longer if you prefer. For related care of leggy stems see how to handle leggy stems.
Rooting Monstera Cuttings in Soil
Using well-draining soil gives cuttings steady support and lowers the chance of soggy, cold rot. Many growers like soil because it yields roots that are already adapted to potting mixes. That means less shock later when you settle the piece into a home pot.
What the ideal potting mix looks like
Pick an airy, well-draining mix that holds moisture but does not stay waterlogged. A blend with chunky bark, perlite, and quality compost gives oxygen and drainage while keeping some moisture near the node.
Watering routine for the first weeks
Keep the medium evenly moist for the first one to two weeks so the node does not dry out. After that, let the top inch dry slightly between waterings to lower the risk of root rot.
Drainage, pot choice, and stability
Always use a pot with drainage holes. Avoid oversized pots; excess volume holds moisture and hides problems. Soil also provides physical support—add a small stake if the stem is top-heavy.
How to check for roots safely
After a couple of weeks, test by gently lifting the mix with a popsicle stick or small spatula near the node. Look for resistance or tiny white roots rather than pulling the cutting. This avoids tearing delicate new tissue.
“A careful lift with a small tool reveals progress without harming fragile roots.”
| Issue | Sign | Action |
|---|---|---|
| Too wet | Soft, dark stem base or bad smell | Repot in drier mix and increase warmth |
| Good progress | Firm stem and white root tips when nudged | Keep current routine; ease into longer gaps |
| Stability need | Top-heavy cutting leans | Add a stake and compact soil gently |
Other Rooting Media Options for Faster Drainage
If your goal is faster rooting and less mess, lightweight media can be the sweet spot between soil and plain water.
Why try alternatives? These mixes hold enough moisture for new roots while keeping more air at the node than heavy soil. That balance lowers damping-off risk and helps tender tips breathe.
Perlite for oxygen and moisture balance
Perlite is lightweight and airy. It drains fast but still holds a bit of moisture. Beginners who overwater often find perlite forgiving.
LECA for drainage and reusability
LECA are clay balls that drain exceptionally well. They let you water more often with less rot risk, and they can be cleaned and reused for future cuttings or semi-hydro setups.
- Watering: both perlite and LECA dry faster than soil and will need more frequent water checks.
- Placement: keep the node in the medium and leaves above the surface; add a stake if the piece leans.
- Choice guide: perlite is cheap and common; LECA costs more but is tidy and reusable.
“Roots form in many media as long as you manage moisture and oxygen.”
Next: if you want to speed things further, the following section covers when a rooting hormone helps and how to use it safely.
Rooting Hormone and Auxin
Auxin is a natural plant signal that tells cells near a node to divide and form roots. Commercial rooting hormone is simply a concentrated, helpful boost of that same message.

When it helps: use auxin in slower seasons, on single-node cutting, or after a failed attempt. It speeds root formation and often gives denser roots fast.
When you can skip it
Healthy, actively growing cuttings often root without additives if light and moisture are right. Skip hormones for vigorous stems in warm months.
How and where to apply
Dip or lightly dust the node area—not the leaf—before placing the stem in water or medium. For water-safe formulas, dilute per label and keep the jar clean by changing water often.
| Use case | Benefit | Tip |
|---|---|---|
| Slow season | Faster roots | Apply to node; keep warm |
| Single-node piece | Denser roots | Light dusting or gel works well |
| Healthy active stem | Often unneeded | Skip and watch for natural growth |
Remember: no amount of auxin fixes a bad cut. Include a node and care for the cutting, and you’ll best propagate monstera and encourage steady growth.
Caring for Cuttings Until You See New Growth
How you manage light, moisture, and support while a cutting roots determines if it will form strong new growth. Keep routines simple and consistent so small roots can develop without stress.
What healthy new roots look like vs. early root rot
Healthy new roots appear creamy white to pale tan and feel firm. Over time they branch and get finer at the tips, which is a good sign.
Early root rot shows as brown, soft, or foul-smelling tissue at the base. If you see that, trim mushy bits, improve drainage, and reduce how often you water.
Temperature, humidity, and slow leafing indoors
Warm rooms and bright, indirect light speed root building. Low indoor humidity and winter light often delay new leaves even when roots are forming.
Keep cuttings away from cold drafts and aim for stable temperatures to encourage steady progress.
Support for top-heavy cuttings while rooting
Use a bamboo stake and soft ties to steady long stems. A heavier pot or a wider container prevents tipping and keeps the node undisturbed.
- Check water or soil on a set schedule, but avoid daily repositioning.
- If the base smells or the stem softens, act fast to prevent full rot.
- When roots are visible and the cutting produces new shoots, it’s ready for transplanting.
“Gentle support and predictable care let delicate roots do their job without interruption.”
Transplanting: Moving from Water to Soil or Up-Potting
Once you spot thickening roots and signs of active growth, prepare a slightly larger pot and a gentle transition. This reduces stress and helps the plant settle after rooting in water.
Signs it’s time
Ready looks like multiple healthy white roots, new root branching, and a swelling bud or tiny leaf emerging. If roots are long and branched, the piece is stable for moving.
- Multiple creamy-white roots at least 1–2 inches long.
- New shoot activity or a swelling axil near the node.
- Firm stem base with no soft, brown rot.
Picking the right pot and drainage
Choose a pot about 2 inches wider than the current container and 1–2 inches taller. Avoid oversized pots that hold excess moisture.
| Situation | Pot choice | Drainage note |
|---|---|---|
| Water-rooted cutting | Nursery pot 2″ larger | At least one hole ~pencil diameter |
| Active young plant | Same rule; up-pot when roots fill mix | Use inner pot if using a decorative cachepot |
How to avoid transplant shock
Handle water-grown roots gently—they are more fragile than soil roots. Minimize root disturbance and keep the soil evenly moist for the first week.
- Pre-moisten the mix and plant at the same depth.
- Firm soil lightly for support, then water through until excess drains.
- Keep in bright, indirect light and skip fertilizer for a few weeks.
“Expect a short pause in visible growth—roots often need time after months in water before shoots resume.”
Special Situations: Large Cuttings and Variegated Monsteras
For oversized stems, giving the node contact with soil from the start reduces tipping and speeds early root development.
Large cutting strategy
Big cuttings are heavy and awkward in jars. Planting them directly in rich compost or airy potting soil gives stability and lowers stress.
Press any aerial root into the mix so it can convert quickly into functional roots.
Variegated types need patience
Variegated monstera deliciosa grows more slowly because light-catching tissue is limited. Expect fewer new leaves and longer waits—sometimes several months before visible growth.
Give brighter indirect light and avoid removing many green leaves at once.
Smart buying and quality checks
“Variegated seeds” claims are misleading; variegation is a mutation, not a guaranteed seed trait. Buy cuttings or plants from reputable sellers and always confirm a healthy node is included.
| Situation | Best method | Why it works |
|---|---|---|
| Large cutting | Plant in soil/compost | Stability, faster root establishment |
| Aerial root present | Embed root in mix | Speeds conversion to functional roots |
| Variegated type | Bright light, gentle pruning | Supports limited chlorophyll and steady growth |
Conclusion
Finish strong: the single most important step is keeping a node on the stem piece you place in water or soil. That simple choice makes roots and new growth predictable.
Quick process: identify a node, make a clean cut, remove papery sheaths, keep leaves above the medium, and root the cutting in water or a well-draining mix like perlite or soil. Make sure the node sits in the medium.
Expect roots in a few weeks and new leaves in months. Watch for creamy, firm roots; brown, soft tissue signals rot — refresh water or improve drainage and trim to healthy tissue.
Choose the method you will maintain: water shows progress, soil gives stability. Once rooted, support and pot the plant and enjoy steady growth. Consider staking the vine for fuller future leaves.