rex begonia propagation leaf cutting

How to Propagate Rex Begonia: Leaf Cuttings Step-by-Step

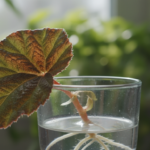
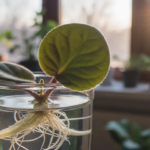
Did you know a single leaf can produce five or more baby plants? That surprising fact shows how much impact one small piece of foliage can have in your garden or on a shelf of houseplants.

This simple guide explains rex begonia propagation leaf cutting in plain terms. You will learn how to turn one leaf into multiple new plants. Expect a straightforward, step-by-step method that even beginners can follow.

We focus on indoor work in the United States where warmth and steady humidity make success more likely. The core technique is easy: pick a healthy section, make small cuts across main veins, and press those spots into a sterile, moist medium until tiny plantlets appear.

Success looks like small green starts forming along the veins, then rooting into transplantable starts. Plan on several weeks before you see growth. Two big secrets? Keep tools and medium clean, and give steady humidity plus bright, indirect light. Follow this friendly, proven way and you’ll soon have more begonias to share.

Key Takeaways

  • One healthy leaf can yield several new plants, making this an efficient way to expand your collection.
  • This article shows a clear indoor technique suited to U.S. climates and home conditions.
  • Expect growth in a few weeks; patience is part of the process.
  • Cleanliness prevents fungus and infection.
  • Right environment—humidity and indirect light—boosts success.
  • This is a cost-effective way to produce clones of hybrid begonias for sharing or filling pots.

What You Need Before Taking Leaf Cuttings

A few simple supplies set the stage for reliable, clean cuttings that root well.

A clear and inviting leaf cuttings tray, positioned in the foreground, filled with vibrant Rex Begonia leaf cuttings in various stages of propagation. Each cutting should be distinct, showcasing the intricate patterns and colors of the leaves, set atop a lush, dark soil mix. In the middle ground, a rustic wooden table adds warmth to the scene, while an array of gardening tools, such as a small trowel, scissors, and a spray bottle, are neatly organized beside the tray. Soft, natural light filters in from a nearby window, creating gentle shadows that add depth. In the background, hints of greenery from potted plants create a tranquil, nurturing atmosphere, inviting viewers into the world of plant propagation. The image is bright and cheerful, capturing the essence of gardening success.

Tools and supplies for clean, successful work

Gather sharp scissors or pruning shears for harvesting and a razor/X-Acto-style knife for precise slashes. Clean cuts reduce crushed tissue and lower rot risk.

  • Cutting tools: sharp scissors or pruners; razor/knife for vein slashes.
  • Containers: shallow nursery tray with a clear lid or small pots that fit under a humidity dome or plastic cover.
  • Stability helpers: T-pins and small stones to keep leaves flat and veins in contact with the mix.

Choosing the best medium

Use a soilless seed-starting mix or an inert option like perlite or a perlite+vermiculite blend. A free-draining potting mix (multi-purpose compost cut with perlite) also works.

Keep the medium damp like a wrung-out sponge—moist but not dripping—so water is available without encouraging fungus.

Sanitizing to reduce fungal problems

“Clean tools and a clean workspace are the most reliable defenses against mold and rot.”

Rinse hands, tools, and the tray in a mild bleach solution (1 teaspoon bleach per 1 quart water). Air-dry briefly before use. Cleanliness matters, especially under plastic humidity covers.

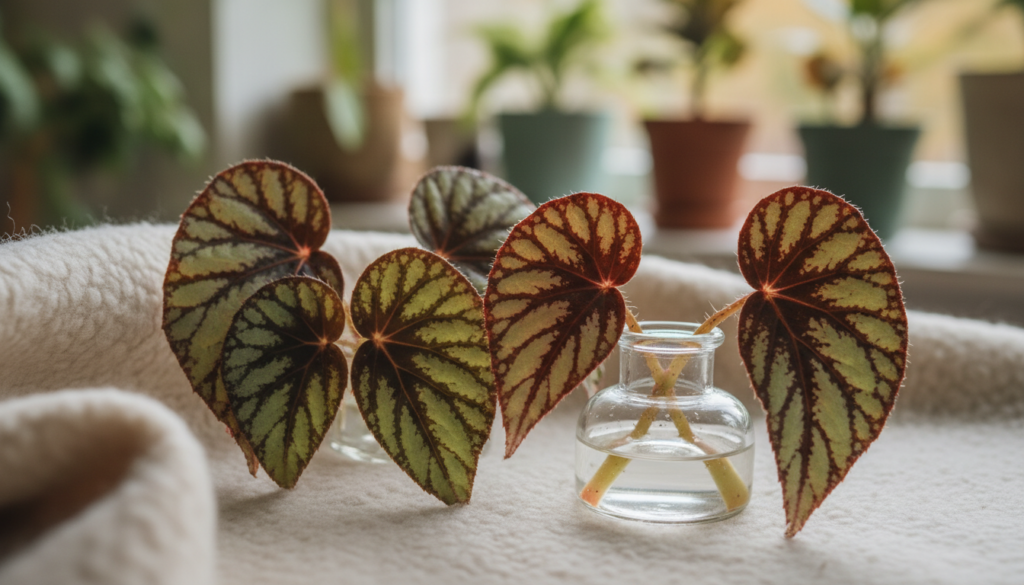
rex begonia propagation leaf cutting: The Leaf-Cutting Technique

Follow a simple, careful method to turn one mature leaf into several new plantlets.

Start with a full-grown, undamaged leaf whose underside veins are thick and firm—this is where growth begins. Choose a leaf that looks healthy even if the edges are older; plump veins under the blade mean tissues can generate new shoots.

A close-up view of vibrant leaf cuttings from a Rex Begonia plant, artistically arranged on a wooden table. The foreground features several healthy, green, and variegated leaves with rich textures, showing the intricate patterns characteristic of Rex Begonias. In the middle ground, a small, glass container filled with water holds a few of the cuttings, reflecting soft, natural light. The background has a blurred, lush indoor garden setting with bright green foliage, creating a calming, nurturing atmosphere. Use soft, diffused lighting to emphasize the leaves' colors and textures, while capturing the organic beauty of the propagation process. Shoot from a slightly angled top-down perspective to highlight the details of the cuttings and their surroundings.

Selecting and preparing the blade

Cut the leaf and stem cleanly from the parent plant with a sharp tool. Remove and discard the stem so you work with the blade only.

Making vein slashes

Flip the leaf over and use a fine knife to make small slashes about ½ inch long across 5–6 of the largest veins. Space cuts roughly an inch from the central vein to create several launch points for plantlets.

Placement, pinning, and spacing

Turn the leaf right-side up and press it gently into a moist seed-starting mix so each cut touches the medium. Use T-pins to hold the blade flat; avoid pinning through any main vein.

Place a few small stones on the edges to stop curling as humidity cycles. Fit multiple leaves in the tray or pot, but keep them from touching to improve airflow and reduce fungal risk.

“New plantlets typically form at the vein cuts, then root downward into the mix.”

For more on common leaf problems and care while rooting, see this guide on leaves curling on flowering houseplants.

Creating the Right Environment for Roots and Growth

Create a stable mini-greenhouse so cuttings stay hydrated while roots form. The goal is a gentle, humid microclimate that keeps tissue from drying as new growth appears.

Humidity setup: Place the tray or pot under a clear dome or cover with plastic wrap, but make sure the plastic does not touch the leaves. Use a tall lid, small stakes, or folded toothpicks to lift the cover. This prevents condensation from resting on the leaf surface and lowers fungal risk.

A close-up view of a humidity dome specifically designed for propagating Rex Begonia cuttings. The foreground features a clear, dome-shaped cover sitting atop a tray filled with soil and multiple leaf cuttings delicately positioned to take root. Each cutting shows vibrant green veins and variations in color typical of Rex Begonias. In the middle ground, soft light filters through the dome, creating a warm, nurturing atmosphere, enhancing the greens of the leaves while casting gentle shadows. The background is blurred, suggesting a well-lit indoor greenhouse environment filled with other healthy plants. The overall mood is serene and focused, capturing the essence of plant care and growth in a home gardening setting.

Keep temperatures steady near 70°F. Consistent warmth matters more than brief spikes. A seedling heat mat set around 70°F can speed rooting in cool homes or winter months.

Light and water: Provide bright, indirect light only. An east-facing window works when temperatures stay stable. For reliable results, hang fluorescent or shop lights about 6 inches above the covered tray and run them ~12 hours a day (some growers use ~14 hours).

“Direct sun on a covered tray can quickly overheat and ‘cook’ the cuttings.”

Check water by feel: the mix should be moist like a wrung sponge. Avoid overwatering and watch for early signs of rot; for tips on fungal problems and root rot prevention, see root rot prevention.

Aftercare: Watching for Plantlets, Then Potting Up New Plants

When new growth shows, a simple routine keeps plantlets thriving until they’re ready for pots.

A serene indoor gardening scene focusing on aftercare for Rex Begonia leaf cuttings. In the foreground, a series of transparent propagation jars filled with water, each containing healthy leaf cuttings with emerging root systems. A few small plantlets are visible at the base of some cuttings, showcasing their growth. In the middle ground, a rustic wooden table supports tools like a small watering can, a pair of scissors, and fresh potting soil in a decorative bowl. In the background, a sunlit window casts warm light, illuminating vibrant green foliage and soft, natural shadows, creating an inviting atmosphere. The overall mood is calm and nurturing, perfect for demonstrating plant care.

Water and mist routine while roots form

Keep the tray evenly moist but never soggy. Mist daily to maintain humidity and water the medium about once a week.

Adjust as needed: if the mix pulls away from the pot or edges crisp, raise watering. If you see standing water, a sour smell, or slimy spots, cut back immediately.

What early growth looks like and timeline

Watch for swelling along cut sites, tiny green nubs, then miniature leaves opening. This growth often appears within a few weeks and commonly by six weeks.

The original leaf may weaken or tear as energy shifts to the new plants—that’s normal.

When and how to pot up

Transplant when plantlets reach about 3 inches and have at least two true leaves. Gently loosen the mix, lift from beneath, and avoid tugging on the stem or roots.

Use 3-inch pots and a light mix suited for begonias. You can pot several plantlets together for a fuller look or divide them into separate pots to expand your collection.

“Patience plus a steady, gentle routine yields the healthiest new plants.”

Conclusion

With a clean workspace and steady warmth, the process becomes easy and predictable. Start by preparing sterile tools and a damp, free‑draining mix. Make small vein slashes, pin the leaf on the mix, cover for high humidity, and wait for tiny plantlets to appear.

Two big failure points: contamination and soggy mix. Prevent mold with sanitation and a sterile medium. Avoid rot by using perlite‑rich mix and watering sparingly so cuttings never sit in water.

Remember, one healthy leaf can yield several new begonias for your home or garden. Keep conditions near 70°F, bright indirect light, and protect young plants after potting until they are sturdy enough for a larger pot or outdoor placement.

FAQ

What tools and supplies do I need for clean, successful leaf cuttings?

Use a sharp sterile knife or pair of scissors, a shallow tray or small pots, a well-draining potting mix or sterile medium, clean water, rubbing alcohol for tool sanitizing, and optional plant labels. Have small stones or pins on hand to hold leaves flat and a clear plastic dome or plastic wrap to keep humidity high without touching leaves.

Which potting mix or sterile medium works best for rooting?

Choose a mix that stays slightly moist but drains well—seed-starting mix, peat-free potting mix blended with perlite, or a sterile mix of coconut coir and perlite all work. The medium should be fine-textured so vein cuts make good contact for root and plantlet formation.

How should I sanitize tools and work surfaces to reduce fungal problems?

Wipe blades and scissors with 70% isopropyl alcohol before cutting. Clean trays and pots with a mild bleach solution (one part household bleach to nine parts water), rinse well, and air dry. Always wash hands before handling leaves to minimize contamination.

How do I select the best leaf for taking a cutting?

Pick a healthy, mature leaf with prominent veins and no signs of pests or disease. Leaves that are firm and glossy with clear venation produce the most plantlets. Avoid very old, yellowing, or damaged foliage.

What is the correct way to remove the leaf stem and prep the leaf?

Cut the petiole close to the base with a sterile knife, leaving a clean edge. If you want to root just the leaf blade, trim the petiole flush so the blade lies flat on the medium. Make sure the cut surface is dry for a few minutes before placing it on the mix to lower rot risk.

Why make small cuts across the main veins, and how deep should they be?

Small slits across primary veins expose meristem tissue and trigger tiny plantlet formation along the vein. Make shallow cuts—just through the surface so the vein shows—without severing the leaf into pieces. Aim for cuts every 1–2 inches along each major vein.

How do I pin the leaf flat so the vein cuts contact the mix?

Use small stones, hairpins, or bent paperclips to hold the leaf flat against the medium. Ensure each cut or wounded vein touches the soil surface. Pins should be gentle to avoid crushing tissue but secure enough to keep contact until roots form.

What spacing should I use and why should leaves not touch each other?

Space leaves at least an inch apart to allow air circulation and prevent mold. Leaves that touch can trap moisture and foster fungal growth. Proper spacing reduces disease risk and gives emerging plantlets room to develop.

How do I set up humidity without letting plastic touch the leaves?

Place a clear plastic dome over the tray or drape plastic wrap supported by wire or toothpicks to create a tent. The goal is high humidity while avoiding contact with leaf surfaces, which can cause rot. Vent briefly each day to exchange air.

What light and temperature work best for indoor propagation?

Bright, indirect light is ideal—near an east or north window or under fluorescent/LED grow lights. Keep temperatures around 70–75°F (21–24°C). Avoid direct sun that can scorch leaves and sudden temperature swings that stress the cuttings.

How often should I water or mist while the cuttings are rooting?

Keep the medium lightly moist but not soggy. Mist the surface every few days if humidity drops, and water from the bottom when the top starts to dry. Overwatering invites rot, so let the top millimeter or two of mix dry slightly between waterings.

What does new growth look like and how long does it usually take?

Small plantlets appear along the veins as tiny leaves and pale roots. Depending on temperature and light, expect visible plantlets in 4–8 weeks. Cooler or lower-light conditions can extend this timeline.

When should I separate and transplant plantlets into 3-inch pots?

Wait until plantlets have a few true leaves and a small root system about 1–2 inches long. Gently lift the leaf and separate each rosette with some attached roots and medium, then pot into a 3-inch container using a light potting mix.

Should I keep plantlets together in one pot or divide them for fuller growth?

For a dense, immediate display, plant several compatible plantlets in one larger pot. To promote stronger individual plants, pot each into its own 3-inch pot. Either method works—choose based on the final look and space you want.

Comments

No comments yet. Why don’t you start the discussion?

Leave a Reply

Your email address will not be published. Required fields are marked *