Surprising fact: more than 70% of casual houseplant owners report that pothos cuttings root successfully when placed directly into potting mix rather than held in water first.
Propagating pothos in soil means taking a healthy cutting and encouraging roots to form right inside a potting mix so it becomes a new, independent plant.
This method is beginner-friendly and low-fuss. You need basic supplies: a healthy parent vine, sharp scissors, a small pot, and fresh potting mix. The process often takes a bit longer than water rooting, but the new roots are ready for pot life from day one.
In this guide you’ll follow clear steps: pick a healthy vine, find nodes, take the right-sized cutting, set up the potting mix, plant the cutting correctly, and care for it while roots form.
Success looks like resistance to a gentle tug, firm placement in the mix, and new leaf growth. Later sections will flag common beginner slip-ups, like burying leaves, missing nodes, or keeping the medium too wet.
Simple gear, clean tools, and steady light and moisture are all you need to get started at home with this safe, reliable method for common US houseplants.
Key Takeaways
- Soil rooting yields roots that adapt well to pot life.
- The method is easy and uses basic supplies.
- Follow steps: choose vine, find nodes, cut, pot, care.
- Look for firmness and new leaves as signs of success.
- Avoid burying leaves, missing nodes, or overwatering.
Why Propagating Pothos in Soil Is a Beginner-Friendly Method
Starting cuttings directly in potting mix gives new plants a straight path from stem to steady growth. This approach keeps handling low and avoids the extra step of moving roots later.
Soil vs. water: what changes for roots and transplant success
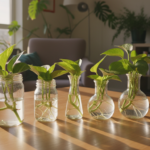
Cuttings placed in water often show roots faster and are easy to watch in a glass jar. But those water-formed roots tend to be finer and less ready for pot life.
Soil-started roots usually form thicker root structure that fits damp potting mix. That means fewer surprises when the new plant faces regular watering in a pot.
| Feature | Water | Soil |
|---|---|---|
| Visibility | Easy — seen in a glass | Hidden beneath the surface |
| Root type | Fine, quick-forming hairs | Sturdier, soil-adapted roots |
| Transplant risk | Higher if moved too soon | Lower — ready for pot life |

When this method makes the most sense at home
- When you want fewer steps and less handling.
- If water-rooted cuttings have struggled after potting.
- When you prefer starting several cuttings together for a fuller look.
Both ways work for common houseplants, but choosing the right method depends on your routine, light, and how closely you check moisture. Next, you’ll learn the exact steps that keep nodes buried, leaves dry, and moisture steady for reliable rooting.
When to Propagate Pothos and How to Prep Safely
Timing matters for success: aim for spring through summer when a pothos is actively growing and recovers quickly. Expect slower results during late fall and winter dormancy.
Green-light signs beyond the calendar: the parent plant is pushing new leaves, vines feel firm (not limp), and indoor temps stay consistently warm. These signs mean the cutting has extra energy for root growth.

Quick safety checklist
- Wear gloves and long sleeves if sensitive; the sap contains calcium oxalate and can irritate skin.
- Avoid touching your face, eyes, or mouth after handling stems; wash hands when finished.
- Keep cuttings, leaves, and tools out of reach of kids and pets—this plant is toxic if swallowed.
Sanitizing steps that prevent failure
Clean shears and containers before you start. Wipe tools with a 10% bleach solution (1 part bleach to 9 parts water) and rinse pots well. Use fresh substrate so pathogens have no foothold.
Why cleanliness matters
A fresh cut is an open doorway for disease, and a dirty pot can turn an easy project into rot or mold. Moving quickly from cutting to a clean pot increases your odds of strong roots and a healthy new plant at home.
Tools, Containers, and the Right Pothos Soil Setup
Gathering the right tools and a tidy container makes the start much easier. A brief setup reduces mistakes and helps cuttings focus on root growth.
What you’ll need
- Sharp, clean shears or scissors for a quick, sanitary cut.
- A small pot with at least one drainage hole.
- Fresh, well-draining potting mix suitable for indoor plants.
- Optional: rooting hormone powder for faster results in cool, low-light spots.
Choosing container size and drainage
Use a small starter container that holds roughly 8 ounces of mix. Small pots dry more evenly and cut the risk of rot.
Pre-moisten the mix
Mix water until damp. Squeeze a handful—if it clumps lightly but doesn’t drip, the soil is ready. Poke a hole before inserting the cutting so you won’t rub off hormone or damage the stem.
How to propagate pothos in soil

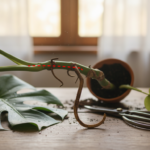
Start by choosing a healthy vine. Pick a parent stem that is firm, glossy, and free of pests or soft spots. A strong parent greatly raises success rates for cuttings.
Selecting a parent vine and identifying nodes
Find the bumps where each leaf meets the stem. Those bumps are nodes and aerial-root nubs. A cutting must include at least one node to form roots.
Cutting length and leaf count
Aim for a 4–6 inch cutting with one or two healthy leaves left at the top. Remove lower foliage so no leaf sits under the surface and rots.
Where to cut and preparing the cut end
Make a clean snip just below a node so the node will sit under the mix. Lightly dust the cut end with rooting hormone for faster, more reliable root formation.
Planting with the hole-poking method
Use a pencil or finger to make a planting hole first. This prevents scraping off hormone from the cut end when inserting the stem.
Positioning nodes and aftercare
Place nodes under the potting surface while keeping leaves above the line. Firm the mix around the stem, water lightly to settle, and set the container in bright, indirect light.
| Step | What to include | Why it matters |
|---|---|---|
| Select parent vine | Firm stem, no pests, healthy leaves | Healthy parent boosts cutting vigor |
| Cutting size | 4–6 inches; 1–2 top leaves | Enough tissue for energy and at least one node |
| Planting method | Hole-poke, insert node under surface | Protects rooting hormone and cut end |
| Aftercare | Light water, bright indirect light, keep moist | Encourages root growth over the next weeks |
Rooting Timeline, Signs of Success, and When to Transplant
A clear timeline helps set expectations for rooting and early growth. In the first one or two weeks a cutting focuses on callusing and survival. During this phase it may look unchanged while internal work begins.
By week three to four you often see actual root formation. New roots in potting mix usually show as steady resistance when you test the stem. Also watch leaves: firm, not floppy, and no foul smells from the container are good signs.

Confirming roots without damage
Use the gentle tug test: hold the stem near the surface and pull very lightly. If you feel resistance, roots have grabbed the container mix and the cutting is anchored.
When to move into a larger pot
Transplant once the cutting resists the gentle tug and shows fresh growth. Choose a permanent pot or container only slightly larger than the starter pot.
Correct crown depth and watering changes
Set the crown about 0.5 inches below the surface so the new root system is covered but the stem isn’t buried too deep. Keep the medium evenly moist right after potting, then let the top dry a bit between waterings as the plant establishes.
Quick care reminders: bright, indirect light, steady warmth, and patient checks. Soil-rooted cuttings often adapt faster than water-started ones and resume normal growth sooner.
Common Mistakes When Propagating Pothos Cuttings in Soil
Many beginner projects stall because of one simple oversight at planting. Spotting the common errors early saves cuttings and speeds success. Read these short notes and apply the fixes for better results.
Skipping nodes or burying leaves
Nodes are non-negotiable. A stem without a node cannot make roots. Always include at least one node under the mix.
Burying leaves leads to breakdown and rot. Keep foliage above the surface so the cutting stays healthy and the stem can focus on root growth.
Overwatering and poor drainage
A constantly wet container invites rot. Aim for an evenly moist mix, not soaking wet, and use a pot with drainage so excess water escapes.
Low light or harsh sun
Too little light slows rooting and makes stems soft. Too much direct sun can scorch leaves and dry cuttings faster than new roots form.
Using old or outdoor soil
Used garden dirt often carries pests and pathogens. Fresh potting mix reduces risk and gives tender cuttings a clean start.
Dull tools and unhealthy parent material
Sharp shears make clean cuts that heal quickly. Cuttings from stressed or sick vines lack the energy needed for steady root development.
What to do if rooting is slow
- Confirm a node is buried and leaves are dry above the surface.
- Keep warmth steady and the mix lightly moist for several weeks.
- Avoid tugging at the cutting; wait for gentle resistance as a sign of roots.
- Consider using a small amount of rooting hormone if growth stalls.
Patience matters: even with correct steps, roots can take weeks. Stay consistent with light, moisture, and care for the best chance of healthy growth.
Conclusion
A direct-in-pot approach often yields thicker roots that handle normal care better. If you want a simple, beginner-friendly way to multiply pothos, this method sets a new plant up for smoother long-term growth.
Key steps: choose a healthy parent vine, include at least one node, remove lower leaves, keep the mix lightly moist, and give bright, indirect light.
Remember: water in a glass shows roots fast, but soil-grown roots are ready for pot life with fewer transitions. Try rooting several cuttings together for a fuller look, as long as each has a node.
Once anchored, let the top of the mix dry slightly between waterings and follow smart seasonal cues—see tips on adjusting watering schedules. Most setbacks come from overwatering, low light, or impatience; small fixes often solve them.