Nearly one in three plant owners report trying DIY cuttings after seeing roots form on a windowsill.
Water propagation is a simple method that lets a vine develop roots while you watch. By the end, you’ll have a rooted cutting ready for potting or a thriving glass-grown plant.
This short guide previews the exact steps: choose a healthy stem, make a clean cut just below a node, place the node in fresh water, give bright indirect light, and maintain clean conditions until new roots appear.
Expect roots in about one to two weeks in good conditions; full readiness for soil may take several more. The approach is popular because it is low-cost, easy, and lets you monitor progress in real time.
Key success factors include healthy plant material, a submerged node, bright indirect light, and frequent water changes. This method applies to Philodendron hederaceum and many similar vining houseplants. A troubleshooting and care section follows for slow rooting or yellow leaves.
Key Takeaways
- Water propagation yields visible roots and low-cost new plants.
- Follow simple steps: select cutting, clean cut, place node in water, provide light.
- Roots often show in 1–2 weeks; potting readiness can take longer.
- Success depends on healthy material, a node submerged, bright indirect light, and fresh water.
- Applies to classic Philodendron hederaceum and similar vining houseplants.
- Troubleshooting tips available later for slow root growth or leaf issues.
Why Water Propagation Works for Heartleaf Philodendron
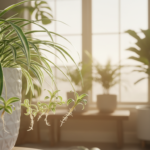
Rooting cuttings in a jar shows progress fast and saves money on new plants. One healthy plant can become several, filling shelves, hanging baskets, or swaps without extra cost. This makes the method a practical choice for anyone keeping greenery at home.
Basic biology: when a healthy stem is placed in fresh water and given bright light, it redirects energy from leaf upkeep into root growth. The cutting ‘reboots’ itself and builds a new root system that supports independent growth.
Beginners like this species because it roots reliably from nodes and tolerates indoor conditions. New cuttings also give clear visual feedback in a glass jar, so you can see roots forming and adjust care early.
A quick comparison
| Benefit | Why it matters | Practical tip |
|---|---|---|
| Low cost | One plant yields many | Use jars you already own |
| Visible progress | See roots form | Keep water clear and fresh |
| Forgiving | Roots from nodes easily | Choose healthy, undamaged stem pieces |
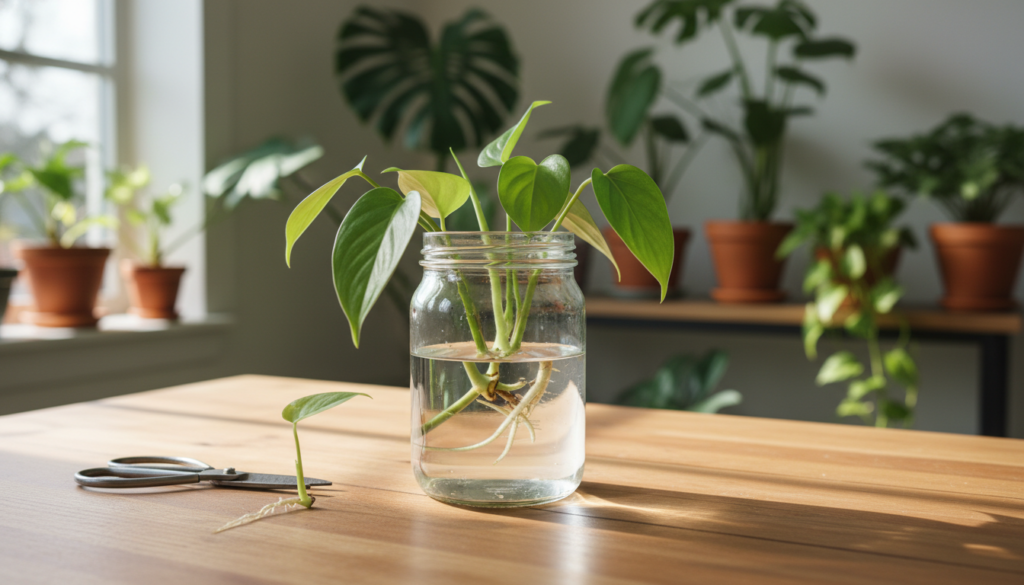
 with vibrant green, glossy leaves submerged in a clear glass container filled with fresh water, showcasing its root system developing beneath the surface. In the foreground, focus on the delicate roots intertwining with small stones at the bottom of the vase, symbolizing the propagation process. In the middle ground, capture the lush trailing vines and heart-shaped leaves of the plant, radiating health and vitality. The background features a softly blurred, sunlit indoor setting that evokes a sense of tranquility and warmth. Utilize natural lighting to create gentle highlights on the leaves and water surface, capturing the essence of nature and growth. The overall mood should be inspiring and educational, reflecting the beauty of successful water propagation.")
Watch for pitfalls: avoid submerged leaves, dim light, and stale water. Later sections cover the best stem selection and light levels that speed rooting and strong growth. This is a simple, budget-friendly way to propagate philodendron successfully.
Before You Start, Choose the Right Plant and Cutting
A healthy source plant and a well-made cutting give you the best chance for quick roots. Pick a mature philodendron with firm stems and rich color. Avoid any plant with webbing, sticky residue, visible pests, or soft, blackened spots.
Pick a mature, healthy plant free of pests and disease
Look for strong growth and no signs of stress. A vigorous parent reduces the risk of disease transfer and speeds up rooting.
Understanding nodes, leaf nodes, and where new roots form
A node is the small bump on the vine where roots will emerge. Find the leaf nodes along stems and plan cuts so one node will sit below the water line. Without a node submerged, new roots cannot form.
How many leaves to keep on a cutting for strong growth
Keep 2–3 leaves on each cutting. That balance gives the cutting energy through photosynthesis while it builds a new root system. Too many leaves raise transpiration and stress the stem indoors.
Best time of year and conditions for faster rooting
Spring and summer offer the fastest results thanks to warmth and longer daylight. Early fall can work in warm climates; winter slows progress. Aim for warm room temperatures, bright indirect light, and steady care—consistent water level and regular changes.
- Quick checklist: strong color, firm stems, no sticky residue, no webbing, no visible pests, no mushy or blackened areas.
- Expect some cuttings to root faster than others, even from the same plant.
What You’ll Need for Water Propagation
A small kit of clean tools and good water sets up cuttings for steady success.
Tools and containers to prep
Keep it simple: sharp scissors or snips, a clean glass jar or vase, and fresh room-temperature water.
Transparent containers help you watch progress and spot cloudy water early. Clean tools and a washed jar cut bacterial risks and save time later.

Water quality tips for rooting success
If tap water is heavily chlorinated, use distilled water or boil then cool tap water for 15 minutes. Make sure the water is room temperature before placing cuttings.
Optional rooting boost with a beneficial microbe solution
You don’t need fertilizer in the jar. As an optional boost, mix Natural Alternative® Protilizer® Seed and Plant Activator at about 1/2 tsp per 1 cup of clean water. A light brown tint is normal and not a sign of dirt.
“Clean tools and fresh water prevent common failures faster than any secret trick.”
| Item | Why it matters | Quick tip |
|---|---|---|
| Sharp snips | Clean cuts heal better | Disinfect before use |
| Clear jar | Monitor root growth | Choose a stable base |
| Clean water | Reduces rot risk | Change weekly |
Final note: good prep reduces wasted time and makes weekly maintenance easier, improving overall rooting success.
How to propagate heartleaf philodendron in water
A careful, clean cut and correct node placement set the stage for steady root growth.

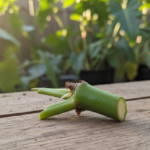
Make a clean cut just below a node
Choose a healthy stem and use sharp, sanitized snips. Cut about 1/2 inch below the last leaf nodule so the node sits on the exposed end.
Remove the lowest leaf to expose the node
Gently remove the single lowest leaf so the node is bare. This is not stripping the stem — just removing the leaf that would sit underwater.
Place the cutting in water without submerging leaves
Set the stem so the node is underwater while the leaves stay above the surface. This reduces rot and keeps the cutting breathing normally.
Set up the right light: bright, indirect sunlight
Place the jar near an east or north window for bright, indirect sunlight. Direct sunlight can scorch tender cuttings, so back the jar off a few feet if light is strong.
Keep the node submerged and the water level consistent
Make sure the submerged node never dries. Top off between changes and keep the water fresh. Longer stem cuttings may have two bottom nodes underwater; shorter pieces do fine with one.
Label each jar with the start date so you can track progress and compare results.
| Step | Key detail | Quick tip |
|---|---|---|
| Cut | About 1/2″ below node | Use disinfected, sharp snips |
| Leaf removal | Remove lowest leaf only | Expose node; avoid stripping stem |
| Placement | Node submerged, leaves above | Prevent leaf rot |
| Light | Bright, indirect sunlight | East window or filtered light |
| Water | Keep level steady; fresh water | Top off and change weekly |
Caring for Cuttings While They Root
Expect visible change within weeks if light, warmth, and clean water are steady.

When new roots usually appear and what healthy roots look like
In good conditions, new roots often show around 7–14 days. Some cuttings take longer depending on light, temperature, and leaf count.
Healthy roots are firm and pale—white to light tan—and start as one main root, then branch into finer side roots over the following weeks.
Water changes and freshness
Replace the jar water every week (7–10 days). Rinse the container if it looks cloudy and refill with room-temperature water.
This keeps oxygen high and lowers the risk of rot. For common rot signs and prevention, see root rot treatment and prevention.
Troubleshooting slow rooting and transfer cues
If roots lag, raise bright indirect sunlight and steady warmth. Make sure at least one node stays submerged and avoid letting leaves sit in the water.
Pot when the main root has side roots and is at least 1 inch long. Use a well-draining pot with fresh potting soil and keep the mix lightly moist at first.
“Don’t leave cuttings in the jar too long—very long, tangled roots make the soil switch harder.”
| Stage | Sign | Action |
|---|---|---|
| Early (1–2 weeks) | Single pale main root | Keep water fresh; steady light |
| Developing (2–4 weeks) | Side roots form | Prepare pot and potting soil |
| Ready | Roots ≥1 inch with branching | Pot into a container 2 inches larger |
| Problem | Yellow leaves or cloudy jar | Trim leaves, refresh water, boost light |
Conclusion
, Success with cuttings comes down to steady care and a few clear steps you can repeat. Select healthy cuttings, cut just below nodes, keep leaves above the water line, and give bright, indirect light until roots form.
Key levers: clean tools, correct node placement, steady water level, and consistent care during rooting. These actions make the biggest difference for quick growth and a strong root system.
Be patient. Some stems root faster than others, but most healthy philodendron cuttings will develop roots with time. When roots are established, move the cutting into well-draining soil and keep the mix lightly moist as it adjusts.
This is a repeatable skill. Once you master the loop, you can trim, nurture, and expand your plant collection or use the same method on other vining houseplants where appropriate.