how to propagate calathea by division

How to Propagate Calathea by Division (Beginner-Friendly Guide)

Surprising fact: splitting one healthy clump can produce usable baby plants within weeks — a single mature specimen often yields two or three ready neighbors.

Division uses the plant’s natural clumping habit to create new pots fast. It skips slow, fussy rooting and reduces risk for fragile roots when done carefully.

Start with a mature plant that has several stem clusters and a crowded root mass. The goal is keeping the root ball intact, working quickly, and repotting each piece right away.

This guide stays beginner-friendly and low-risk. You’ll get a clear workflow: best timing, simple supplies, gentle splitting of the root clump, repotting at the right depth, and aftercare that supports new leaves.

Why try this? Make more plants for your home, refresh an older specimen, reduce crowding, or share generous divisions with friends. Look for early success signs: steady leaf posture, no sour soil odor, and fresh growth within a few weeks.

For background on plant care and sources, see our short note at about Blotanic.

Table of Contents

Key Takeaways

  • Division is fast and reliable for clumping houseplants and skips slow rooting steps.
  • Work gently and quickly to protect fragile roots and improve survival.
  • Expect mild droop at first; stable leaves and new shoots mean success.
  • Follow a simple workflow: timing, supplies, split, repot, and consistent aftercare.
  • Use this method to expand your collection, refresh crowded pots, or share plants.

When to Propagate Calathea for the Best Results

Aim for early spring—right before the main growth phase—so new sections recover fast and push fresh leaves. In the United States, the best time is early spring through the active growing season, when higher light and warmth speed root recovery and steady growth.

A vibrant spring garden scene showcasing a variety of Calathea plants in full growth, with lush green leaves and striking patterns. In the foreground, depict healthy Calathea leaves glistening with morning dew, hints of new sprouts emerging from the soil. The middle ground features a gardener, dressed in modest casual clothing, carefully examining the plants and demonstrating the division technique, surrounded by gardening tools. The background showcases a bright blue sky dotted with fluffy white clouds, sunlight streaming gently through the leaves, illuminating the scene with a warm, cheerful atmosphere. Capture the essence of spring with vivid colors and a sense of renewal, evoking a feeling of freshness and growth. Soft focus on the background to highlight the detailed foreground elements.

Best window in the U.S.

Plan this work in spring or during the growing season. Repotting and splitting at this time reduces the stall period and encourages quicker root and foliage recovery.

Signs the plant is ready

  • The pot dries out fast and the soil holds less moisture.
  • Roots circle the pot or the clump feels tight when removed.
  • Stems look crowded and new shoots struggle for space.

Why timing matters

Dividing just before active growth gives each new piece energy for fresh roots and leaves. Faster recovery means fewer droopy days and a smoother return to steady growth.

“If you’re repotting anyway, spring is usually the safest day to split and rehome extra sections.”

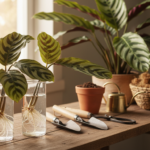
Supplies and Setup for Stress-Free Calathea Propagation

Prepare new pots and a tidy work surface so the root ball spends little time exposed.

Choose pots with drainage holes sized to each section’s root mass. Avoid oversized pots; extra wet soil raises the risk of waterlogging and root rot.

A close-up view of rich, dark potting mix in a terracotta pot, surrounded by gardening tools like a trowel and a pair of gloves. The soil is loose and crumbling, highlighting its organic texture. In the background, softly blurred green leaves of a Calathea plant provide a serene atmosphere, indicating the focus on plant care. Warm, natural lighting illuminates the scene, creating a cozy, inviting mood. The angle is slightly tilted downward to emphasize the pot and soil while keeping the plant visible. This layout conveys a sense of preparation and nurturing, perfect for a beginner-friendly plant propagation guide.

Pick the right soil and mix

Use a loose houseplant potting soil or a well-draining potting mix. If the mix feels dense, lighten it with perlite or expanded clay so water moves through instead of pooling.

Tools that make the process easier

Gather a clean trowel, a watering can, and a sharp, sterile knife as backup for tight, rootbound areas. A trowel helps fill pots fast and a watering can lets you water immediately after potting.

Prep step that protects roots

Water the plant well the day before. Moist soil loosens from roots and makes the root ball easier to remove with less tearing.

  • Pre-fill pots partway with fresh mix.
  • Have extra potting soil ready in a bowl for quick adjustments.
  • Set a clean work surface so the plant spends minimal time with exposed roots.
  • Sterilize blades before any cut to lower disease risk.
Item Why it matters Tip
Pots with drainage Prevents soggy soil and root failure Match pot size to the root mass; avoid oversizing
Loose potting mix Allows roots to breathe and water to drain Amend with expanded clay or perlite if dense
Sharp, sterile knife Makes clean cuts and reduces tissue damage Only use if hand separation fails
Watering can & trowel Speeds pot filling and immediate settling Water thoroughly after potting until it drains

How to Propagate Calathea by Division Without Damaging the Roots

Quick intro: Follow a gentle, ordered process and the new pieces recover faster. Work calmly, keep tools clean, and move each step at a steady pace.
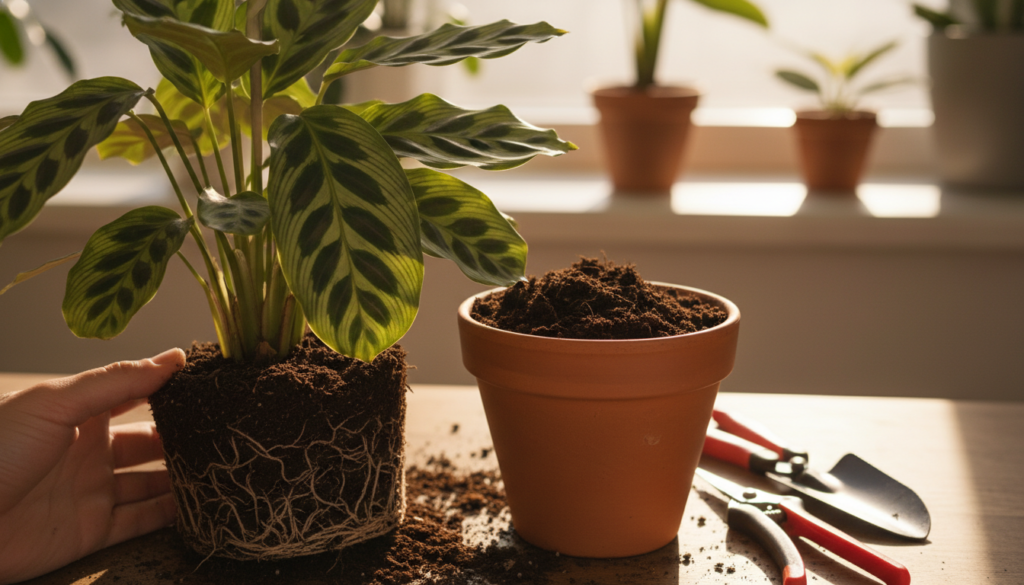
A close-up view of a healthy calathea root ball, showcasing its intricate network of roots nestled within rich, dark soil. The foreground features the textured roots in sharp detail, highlighting their resilience and vitality. In the middle, the vibrant, variegated leaves of the calathea plant gracefully arch over the root ball, displaying their lush greens and purples that are characteristic of the species. The background is softly blurred, hinting at a bright, natural setting with dappled sunlight filtering through leaves, creating a warm and inviting atmosphere. The lighting is soft and diffused, enhancing the colors while casting gentle shadows, making the scene feel peaceful and serene, perfect for an educational topic on plant care.

Remove and inspect

Tip the pot, support the stems, and slide the root ball out. Gently brush away loose soil so you can see natural junctions where stem clusters meet.

Find natural sections and separate

Look for clumps with their own roots and small leaf clusters. Tease these sections apart by hand first; stop when you feel resistance.

When cutting is needed

If hand separation risks tearing, use a sharp, sterile knife for clean cuts. Make decisive slices rather than rips.

Clean up and repot

Trim mushy or brown roots and keep only firm tissue. Repot each division at the same depth it grew before. Avoid packing soil too tight to prevent waterlogging.

  • Water thoroughly until it drains, then let the plant settle.
  • Optional: cover with a clear bag to raise humidity until new growth shows.

Aftercare for New Calathea Divisions: Light, Water, Humidity, and Ongoing Care

Give new plants a calm location with steady warmth and soft, indirect light. Bright, indirect light helps foliage recover without scorched leaves. Avoid direct sun and cold drafts; stable indoor conditions around 68–75°F (20–24°C) are ideal.

A serene indoor scene showcasing a few newly propagated Calathea divisions in small, stylish pots on a rustic wooden table. In the foreground, soft green leaves of the Calathea glisten with beads of moisture, indicating a light, humid environment. The middle ground features a gentle, diffused light filtering through a nearby window, creating a warm and inviting atmosphere. The background reveals a cozy room with gentle colors and a hint of various indoor plants, emphasizing a lush and nurturing setting. The overall ambiance should evoke a sense of calm and care, showcasing the importance of humidity in plant aftercare. The image is captured with a soft focus lens at a slight angle, enhancing its peaceful nature.

Best location and basic conditions

Place divisions where light is consistent and filtered. A north or east window with a sheer curtain works well.

Keep the room steady. Sudden temperature swings stress new plants and slow growth.

Practical humidity tips

Low humidity shows up first as brown edges on leaves. Raise humidity with a humidifier, plant clustering, or a short-term clear plastic bag tent. Open the tent daily for a few minutes to avoid excess moisture.

Watering and soil routine

Keep soil lightly moist but never soggy. Water when the top inch feels slightly dry. Use rainwater or mineral water if tap water is very hard to avoid mineral build-up.

Reducing transplant shock and spotting problems

Covering a plant with a clear bag briefly can reduce shock, but watch for condensation and mold. Drooping leaves are normal at first. Persistent yellowing with wet soil can mean overwatering and early root rot.

Quick reference

Need Practice Watch for
Light Bright, indirect Scorched or pale leaves
Humidity Humidifier / group plants / tent Brown leaf edges
Water Consistently moist, good drainage Wet soil + yellow leaves = risk

Expectations: As roots re-establish, growth becomes steadier and watering is easier. Steady light, humidity, and moisture are the trio that keeps new plants healthy long-term.

Conclusion

A careful split and prompt repotting give each new piece the best chance to thrive. Follow a steady routine: separate sections that have their own roots and leaves, pot them up in airy mix, and settle them in a calm spot.

Protect the trio that matters most: good drainage, high humidity, and bright indirect light. These three practices cut stress and speed recovery at home.

Use this practical way to grow your collection instead of buying more plants. Keep a short shop list—pots, fresh mix, a small watering can—and add items to your cart before you start.

Quick checklist: best time = spring, gentle root handling, right-size pot, loose soil, drain-through watering, and patient aftercare. Little droop at first is normal; steady care usually brings new leaves soon.

FAQ

When is the best time in the United States to divide a calathea plant?

Early spring and during the active growing season are ideal. Warmer temperatures and longer daylight help roots recover faster and encourage new foliage. Avoid major splits in winter when growth slows.

What signs show a calathea is ready for division?

Look for a rootbound pot, crowded stems, reduced new growth, or roots circling the container. If the plant struggles to hold moisture or displays stunted leaves, those are clear clues it needs separate sections.

Why does timing matter for faster root recovery and leaf growth?

Dividing during active growth reduces stress and speeds healing. Roots establish quicker in warm, humid conditions, which supports leaf development and lowers the risk of prolonged transplant shock.

What pots and drainage features work best for calathea offspring?

Choose pots with reliable drainage holes and a saucer to catch runoff. Porcelain or plastic pots work well; just ensure good airflow around the root ball and no standing water to prevent root rot.

Which potting soil or mix should I use for new plants?

Use a peat-based potting mix blended with perlite or orchid bark for aeration and moisture retention. The medium should stay evenly moist but never turn soggy, so a well-draining mix is essential.

What tools make the process easier and safer?

A sharp sterile knife, a small trowel, and a watering can with a gentle rose help. Use gloves if you prefer and keep a clean workspace to reduce infection risk.

Should I water the parent plant before separating sections?

Yes. Watering the day before softens the soil and helps the root ball hold together, making it simpler to tease apart sections without breaking delicate roots.

How do I remove the plant from its pot without harming roots?

Turn the pot gently on its side, support the crown, and ease the root ball out while tapping the rim if needed. Brush away loose soil carefully to expose root structure for inspection.

Where should I look for natural separation points in the root ball?

Find clusters where stems join the root mass. Natural divisions often appear as distinct root clumps around stem groups. Those are the best places to split for healthy new plants.

Can I separate the sections by hand, or do I need a knife?

Try separating by hand first to protect fragile roots. If roots are densely matted, use a sterile knife for clean cuts. Make smooth incisions and avoid tearing the root ball.

When is it appropriate to trim damaged roots?

Inspect for brown, mushy, or foul-smelling roots and trim them back to healthy tissue with sterilized scissors. Removing rot reduces spread and promotes new healthy root growth.

How deep should I plant each division in its new pot?

Repot each section at the same depth it grew before—crown level even with the soil surface. Planting too deep can suffocate the crown; too shallow may expose roots and dry them out.

How much water should I give immediately after potting?

Water thoroughly until excess drains from the bottom, then allow the top inch of soil to dry slightly before the next watering. Consistent moisture without waterlogging helps roots re-establish.

Where is the best indoor location after repotting?

Bright, indirect light with stable temperatures suits new plants. Avoid direct sun and cold drafts. A spot near an east- or north-facing window often provides gentle, steady light.

How important is humidity for newly potted calathea divisions?

High humidity reduces leaf edge browning and supports recovery. Use a humidifier, pebble tray, or group plants together. Maintain steady moisture in the air, especially in dry homes.

What watering routine prevents soggy soil and root rot?

Water when the top inch feels slightly dry. Use well-draining mix and pots with holes. Empty saucers after 30 minutes and avoid letting plants sit in standing water.

Can covering a division reduce transplant shock?

A loose clear plastic bag can raise humidity and help reduce shock for a short period. Remove daily for air exchange and do not keep the cover on longer than two weeks or leaves may suffer.

What common problems appear after repotting and how do I handle them?

Expect temporary drooping, slight yellowing, or slow growth. Ensure proper light, steady moisture, and humidity. If leaves brown quickly, check for overwatering or root rot and adjust care.

How soon will I see new growth from a successful split?

New leaves often appear within a few weeks during active growth, but full recovery may take a couple of months. Patience and stable conditions speed establishment and encourage healthy expansion.

Comments

No comments yet. Why don’t you start the discussion?

Leave a Reply

Your email address will not be published. Required fields are marked *