Surprising fact: over 70% of hobby growers report new roots within weeks when they use leaf cuttings and simple care.
Cloning a favorite houseplant from one healthy leaf is easier than most people think. This method uses a single leaf to start roots and then a small plantlet.
This short guide is for beginners and intermediate growers who want fewer failures and less rot. You’ll learn to pick the right leaf, make a clean cut, set stem depth, and move plantlets to soil.
Set expectations up front: the process is simple and cheap, but it needs clean containers, weekly water changes, and the leaf blade kept dry to avoid cloudy growth or algae.
Follow these steps and you should see tiny roots in a few weeks and plantlets by four to six weeks. With patient care, blooms can arrive within six to twelve months.
Key Takeaways
- Leaf cuttings let you clone a favorite plant from one healthy leaf.
- Keep the leaf blade dry and change water weekly to prevent mold and algae.
- Expect roots in weeks and plantlets around 4–6 weeks under good light and warmth.
- This method is low-cost and great for sharing small plants with friends.
- Use sterile tools and tidy containers for the best success and fewer failures.
Why propagate african violets in water (and what to expect)
Watching clear roots unfurl from a single leaf makes this method oddly addictive for hobby growers.
Main reasons: it’s low-cost, satisfying to watch, and a smart way to make backups of a favorite plant. Many hobbyists use leaf cuttings because a single blade can yield several new plants over time.

Leaf cuttings vs. pups: which fits your goals
Leaf cuttings produce multiple plantlets but often take longer to reach maturity. Pups (side shoots) establish faster and keep chimeral patterns true to type.
“Most varieties come true from a leaf cutting; chimeras usually need pups for reliable results.”
| Method | Speed | Yield | Best for |
|---|---|---|---|
| Leaf cutting | Slow (weeks → months) | Multiple plantlets | Cloning standard varieties |
| Pup | Faster | Single plant | Keeping striped or chimeral traits |
| Flower peduncle | Variable | Occasional success | Special varieties |
Realistic timeline
Expect roots in a few weeks to about a month at ~72–80°F. Plantlets may appear around 4–6 weeks, with blooms most often after 6–12 months. Temperature, leaf health, and clean containers shift the time frame by several weeks.
Practical tip: label each cutting so you avoid mix-ups when sharing new plants. Be patient and prepared — this method suits gardeners who enjoy watching progress step by step.
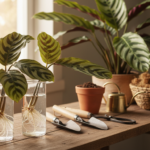
Supplies and setup for clean, low-mold propagation
Prepare a sterile kit and choose containers that hold the leaf stem while keeping the blade dry. A tidy setup cuts failures and keeps stems from turning mushy.
Best containers are narrow-neck bottles, small cups that support the petiole, or propagation tubes that cradle the leaf without submerging the blade. Dark long-neck bottles help discourage algae. Clear plastic works when placed out of direct sun.

Water quality and simple rules
Use relatively pure water and skip fertilizer. Avoid softened tap sources and heavy chlorine. If your local supply leaves residue, use bottled water for better rooting results.
Sterilizing tools and labeling
Wipe scissors or a knife with rubbing alcohol between cuttings to prevent spread of rot. Label each leaf with the variety or a short code and the date. Match the code to the mother pot to avoid mix-ups later.
- Basic kit: a stable opening container, plastic wrap or foil to keep the blade dry, rubbing alcohol, and labels.
- Choose narrow-neck shapes or propagation tubes to reduce rot risk.
- Algae strategy: use darker bottles or keep clear containers out of strong sun.
| Item | Why it helps | Material | Notes |
|---|---|---|---|
| Narrow-neck bottle | Supports leaf stem and keeps blade dry | plastic | Dark colors cut algae |
| Propagation tube | Stable hold for cuttings | clear plastic | Good for single leaf setups |
| Small cup | Easy to change water weekly | plastic or glass | Use foil or wrap to shield blade |
| Labels & alcohol | Prevents mix-ups and infection | paper tape & bottle | Write variety and date |
Clean setup saves time: sterile tools, the right container, and pure water raise your chances of rooting success. With weekly care your roots should appear in a few weeks and your plants will thank you.
Choosing the right leaf for the highest success rate
Picking the right leaf is the single easiest step to boost rooting and cut failures. A good choice balances stored energy with a tender stem so roots form quickly and plantlets develop without excess rot.
Best leaf shortcut:
- Choose a healthy, mature leaf from the middle or third row — it has the energy to form roots yet is not old and woody.
- Avoid the youngest leaves: they are small and still developing, so they rarely support fast rooting.
- Skip old or stressed leaves; they rot more easily during the first months and take longer to produce roots.
Quick visual checklist: firm leaf, even color, no limp spots, no insect damage, and a petiole that is soft but not woody.
If your plants show variegation, pick leaves that are mostly green. These root more reliably while young plantlets still inherit the pattern.
Take several cuttings at once. Success varies by leaf, so using a few leaves raises your odds and saves time.

| Leaf Type | Why it works | When to avoid |
|---|---|---|
| Middle/third row | Good energy reserve and tender petiole | Never if damaged or diseased |
| Young leaf | Too small; underdeveloped | When aiming for fast roots |
| Old leaf | Contains energy but often woody | First months; prone to rot |
| Mostly green variegated leaf | Balances rooting reliability and pattern | Heavily variegated, thin leaves |
Keep variety identity by labeling each leaf and matching it to the parent plant. Once you’ve picked the best leaves, the way you cut and handle them decides how fast they root and how cleanly they avoid rot.
How to prep leaf cuttings for fast rooting
A clean, careful start makes the fastest roots. Work on a packed surface with sharp, sterilized tools. Handle the fuzzy leaf surface gently to avoid bruises that invite rot.
Detach the leaf without damage
Toggle the leaf side to side and pull steadily to free it from the crown. Do not pinch or twist the blade. Damaged tissue is a common spot for infections.
Where to trim and why the 45-degree angle matters
Trim the leaf stem to about 1–2 inches. Recut the tip at a clean 45-degree angle. That angle increases rooting surface area and helps roots and plantlets form forward of the blade, not trapped behind it.
Optional split and hormone advice
Advanced: gently split the base about a quarter inch to encourage extra clones from one leaf cutting. Only do this with healthy stems.
Rooting hormone is usually unnecessary for these plants. Overuse can burn new roots. If you insist, use a tiny dusting with a brush and keep it light.

- Sterilize scissors with rubbing alcohol between cuttings.
- Batch several leaves but avoid over-handling.
- After the cut, place the stem into the container promptly so it does not dry and seal shut.
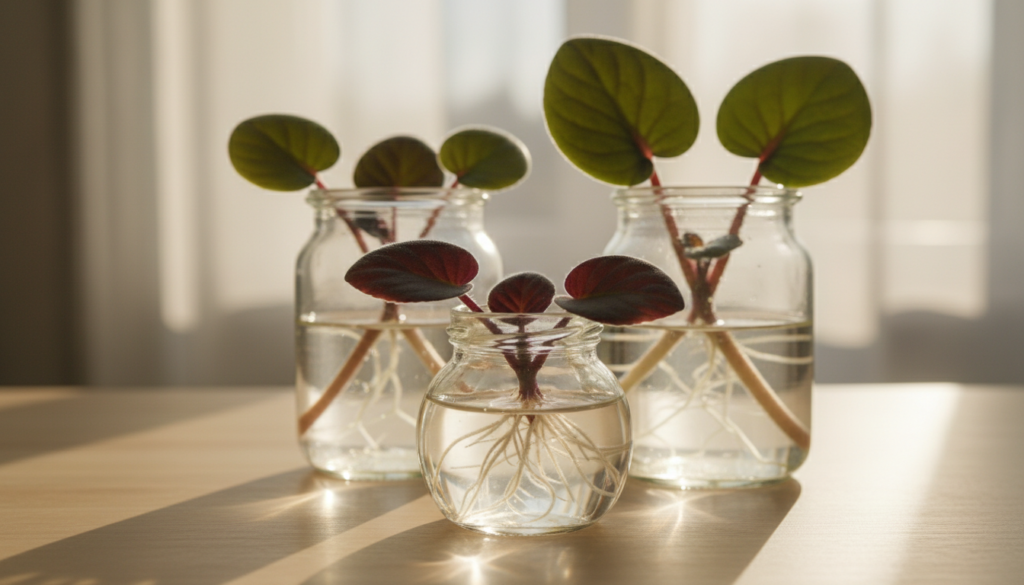
african violet propagation in water: step-by-step method
Start with a simple setup that keeps the fuzzy leaf dry while the stem develops roots. Gather a small cup or narrow-neck bottle and fairly pure water. Fill to a level that will just cover the lower petiole.
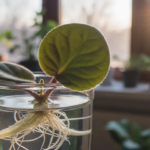
Keep the leaf blade dry
Core rule: cover the container mouth with plastic wrap, foil, or wax paper, poke a snug hole, and insert the cutting so the blade stays above the surface. The fuzzy leaf must not touch the liquid to avoid mushy tissue and rot.
Set stem depth correctly
Submerge only the bottom of the petiole — not the bottom leaf edge. A clear visual: the stem base should sit in the liquid while the leaf plate remains dry.
Light, warmth, and weekly care
Place containers in bright, indirect light and keep temps in the low-to-mid 70s°F for faster rooting. Change the water completely each week to cut bacteria, algae, and funky buildup.
- Step: fill cup, cover, poke hole, insert stem, secure so leaf stays dry.
- Mid-week: check clarity and top off if needed; do a full refresh weekly.
- Placement: bright, indirect light; avoid hot sun on clear plastic containers.
Root and plantlet milestones
After a few weeks you should see thick, white roots forming at the cut end. If you spot dark mush or slimy threads, troubleshoot immediately.
Plantlets usually appear around 4–6 weeks with consistent care, though timing varies by variety, leaf health, and light. Label each cutting and be patient — growth is steady once roots establish.
No-mold tips: prevent algae, rot, and cloudy water
Simple container choices and a tidy routine make a huge difference for healthy rooting. These habits stop algae and keep leaves and stems firm while roots form. Use clean tools and check containers often.
Top causes and quick fixes
Common failures come from dirty scissors, stagnant water, bright sun on the cup, warm stale air, and leaf tissue sitting wet at the bottom.
Containers that limit algae
Choose darker bottles or opaque cups when possible. Keep clear plastic jars out of direct sun and refresh the water on a weekly schedule or sooner if it clouds.
Humidity control without soggy leaves
Raise local humidity with a nearby tray, but prevent drip or condensation on the leaf surface. Fuzz that stays wet invites disease faster than most growers expect.
When to trim, salvage, or restart
If the stem turns brown or mushy, cut back to firm green tissue with a sterilized blade and restart in clean water. If rot reaches the blade or the leaf collapses, discard it and try a fresh leaf.
Upgrade path: if the water keeps clouding, move rooted cuttings to a very light potting mix early to protect progress. Small losses are normal; these tweaks raise your success over the next weeks and months.
When and how to pot up rooted cuttings and plantlets
When roots peek out, it’s time to move tiny plantlets from clear jars to small pots. Transfer once roots reach about a quarter-inch. That length lets roots adapt to soil instead of staying water-only.
Timing and pot choice
Use a small 2-inch pot at first. A small pot keeps the soil from staying soggy and lowers rot risk.
Best mix and planting depth
Choose a loose potting mix made for delicate houseplants and amend with perlite or vermiculite. The blend should be airy, drain fast, and hold light moisture.
Set the baby crown just above the soil line. Cover roots gently but do not pack the soil.
Mini greenhouse and moisture rules
Cover newly potted cuttings with a sandwich baggie, clamshell, or clear plastic dome for a week or two to reduce stress. Keep bright, indirect light and warm temps.
Keep soil evenly moist but never water-logged. Ensure excess drains away freely to protect crowns and roots.
| Step | Why it matters | Recommended item |
|---|---|---|
| Transfer at ~1/4 inch roots | Aids quick adaptation to soil | 2-inch pot |
| Loose potting mix with perlite | Airy, drains, holds light moisture | Violet potting mix + perlite |
| Crown just above soil | Prevents crown rot | Gentle firming only |
| Short mini-greenhouse | Prevents dehydration, eases shock | Clear plastic bag or dome |
Potting at this stage turns jar-grown starts into strong new plants. For extra tips on compact choices and desktop-friendly pots, see compact flowering houseplants.
Aftercare for strong new plants (weeks to months)
The weeks after potting are a critical window for steady growth and future blooms. Aim for steady warmth (roughly 72–80°F), bright indirect light, and moderate humidity so new plants grow without stress.
Light, temperature, and humidity targets
Keep pots in bright, indirect light and avoid hot sun. Stable temps near 75°F speed leaf and crown development.
Watering habits that protect fuzzy leaves
Do not wet fuzzy leaves. Use bottom watering or pour at the pot edge. Always empty any saucer so roots do not sit wet.
When to remove the parent leaf
Wait until the young rosette has about 8–10 leaves. Removing the old leaf too soon can slow growth.
Fertilizing timing
Hold off on feedings while plants adapt. Start a light, balanced feed only after steady new leaf production and firm roots appear.
Separating a clump of plantlets
- Wait until plantlets have 4–6 dime-sized leaves.
- Slide the root ball out, gently tease away mix, find each crown.
- Separate without tearing centers; pot individually and cover briefly to recover.
Common mistakes: burying crowns too deep, crowding multiple crowns in one pot, or treating every tiny leaf as a separate plant. Patient care now leads to buds and flowers in the months ahead.
Conclusion
Use this compact summary to lock in clean technique and steady progress.
Quick recap: choose a healthy leaf, make a sharp angled cut, place only the petiole in fresh liquid, and refresh weekly. Keep the fuzzy blade dry and use sterile tools to prevent mold and slimy stems.
Watch for milestones: roots in a few weeks, small plantlets after 4–6 weeks, then potting into an airy potting mix. Move to a small pot when roots are ready and protect crowns from too much moisture.
Try several cuttings at once and label each one. Check tags before you propagate to respect any patents. Once you master this method, you can share leaves, trade starts, and grow your collection responsibly over the next months.