Surprising fact: most aroid houseplants, including Monstera, need a node to make new growth. That means a rooted leaf often stays a single “vase leaf” and never becomes a full plant.
When people ask “can you propagate without nodes,” they usually mean whether a stemless leaf will turn into a new shoot. The short answer depends on biology: some species regenerate from leaf tissue, but many common houseplants cannot.
For Monstera and similar plants, roots on a leaf do not equal a new trunk or aerial shoot. A true new growth point forms only where a node exists. A cutting that lacks a node will not form one later.
What works: take a stem cutting that includes at least one node, or use a wet stick with a visible node. What fails: a lone leaf or petiole with no node.
Key Takeaways
- Most aroids need a node to create new shoots.
- Roots on a leaf may appear, but won’t make a full plant.
- Include at least one node in a stem cutting for success.
- A cutting won’t grow a node later if it started without one.
- Nodeless cuttings still have decorative uses while learning proper technique.
What a Node Is and Why It’s the Make-or-Break for Propagation
A node is the little power center on a stem that holds the plant’s ability to make new shoots. It contains the cells and tiny buds that start new growth. The area between nodes is the internode; that smooth stretch links the hardware but rarely creates shoots on its own.

Nodes vs. internodes: where new growth actually comes from
Think of the node as the hardware and the internode as the cable. Nodes hold axillary buds and vascular tissue that support root and shoot formation. Internodes are smooth and thin; they rarely produce new growth in common aroid cuttings.
How to spot a node on a monstera stem
On a monstera, look along the vine where a leaf or petiole joins the stem. Nodes are slightly thicker, knobby bumps. They sit on the vine itself, not on the leaf blade or the petiole alone.
Axillary buds: the hidden growth point
Axillary buds are tiny green points in the leaf axil that become shoots and new leaves. A visible bud boosts success for wet‑stick or leafless attempts.
“Make sure your cutting includes at least one stem section with a visible node or bud before committing weeks of care.”
- Checklist: include stem tissue, at least one node, and ideally a bud.
- When in doubt, choose a section with the knobby bump near a leaf attachment.
can you propagate without nodes? The Straight Answer for Most Houseplants
Most houseplant cuttings need an existing growth point to make new stems and leaves.
Why a cutting can’t “create a node” later
A node is built into the stem’s structure. That tiny bump holds axillary buds and the vascular tissue needed to form shoots. If a cutting lacks that anatomy, it has no location to start a new stem.
What happens instead: short-term survival vs. true propagation
Some cuttings survive on stored energy and may even grow roots. That visual of roots can mislead gardeners into thinking a new plant will follow.
In reality, roots alone rarely lead to new leaves or vines when the growth point is missing. Expect slow decline, no new shoots, or a single rooted leaf that never becomes a full specimen.
- Direct takeaway: for a new plant, start with a cutting that includes at least one node and, ideally, a visible bud.
- Start right to save months of waiting on an impossible result.

| Outcome | Likely if no node | Signs | Best action |
|---|---|---|---|
| Short-term survival | Yes | Leaves stay green; roots form | Use as decorative rooted leaf, not a new plant |
| New stems or leaves | No | No bud or shoot emergence | Retake a cutting that includes a node |
| Successful propagation | Only with node | New shoots, multiple leaves, true growth | Prioritize nodeful cuttings; learn wet-stick methods |
“If the goal is a new plant, anatomy matters more than patience.”
For more on common causes of leggy growth and how that affects cuttings, see this short guide on reversing leggy stems.
What Happens If a Leaf Lacks a Growth Point (Including Monstera)
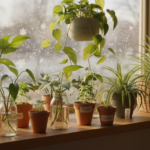
A lone Monstera leaf often roots in water but rarely becomes a full vine.

Scenario: many keep one leaf, often with a petiole, hoping that single piece will turn into a new plant.
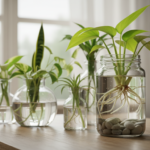
Leaf in water: roots may appear
A leaf without node placed in water frequently will grow roots over time. That visible rooting feels like success.
Roots may form slowly and look healthy, yet growth usually stops there. The leaf stays as a single rooted leaf, not a restarting stem.
Why new leaves and stems won’t form
Key limitation: the axillary growth point lives on the stem. A leaf without node lacks that bud, so no new leaves, no new stems, and no full new plant will emerge.
The “vase leaf” reality and care
Keep a rooted leaf as a decorative piece. Change the water often, use a clean container, and give bright indirect light.
Expect months of display, not multiplication. For a true cutting that will sprout a vine, select a piece that includes a node. In short, roots alone do not equal a clonable plant.
“A rooted leaf makes a lovely display, but anatomy decides whether a new plant will follow.”
The Exception That Works: Propagating Leafless Nodes (“Wet Sticks”)
A single stem segment with a live bud can restart growth even when no leaf is present.

Wet sticks are the main exception to the rule that a cutting needs foliage. These leafless nodes may root and later push new leaves, but success rates lag behind leafed cuttings.
Why success rates vary
Without a leaf, a cutting has less stored energy. It must make roots and then produce a new shoot, which takes time and warmth. A visible axillary bud improves odds because it indicates active growth tissue.
What to check before starting
- Pick a true node cutting: include stem tissue, not just a petiole.
- Look for a bud: a small raised green point beats a flat scar.
- Assess firmness: firm stem, no soft rot, and not bone-dry.
| Feature | Viable sign | Early sign of success | Best setup |
|---|---|---|---|
| Node cutting | knobby stem segment | tiny root nubs | warm, humid moss or clear box |
| Visible bud | small green point | bud swelling | stable upright placement |
| Stem health | firm, unblemished | new shoot emergence | consistent warmth and indirect light |
Wet sticks work best when anatomy is right and conditions stay warm and humid.
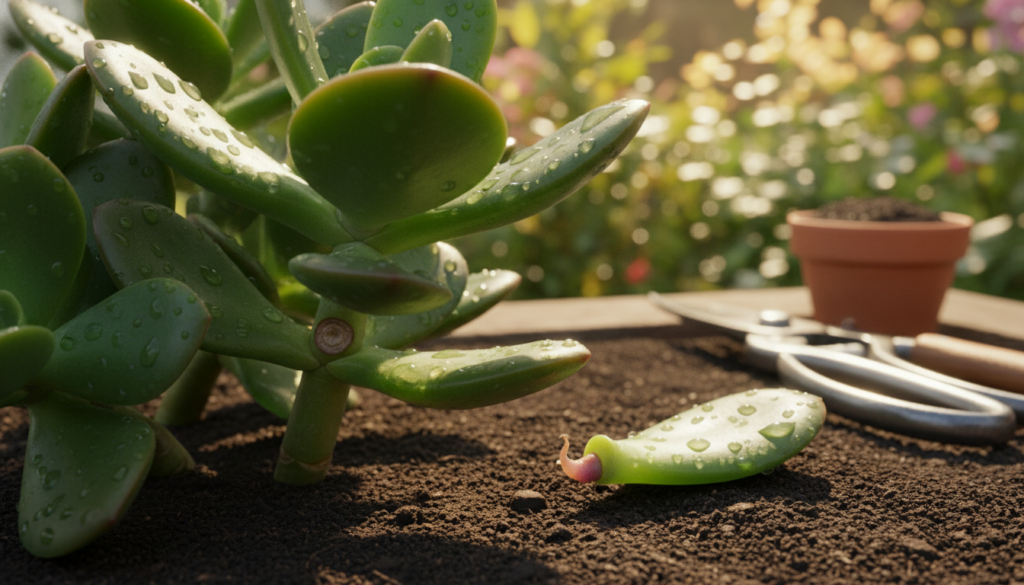
How to Take a Viable Monstera Cutting (So It Can Grow Roots and New Leaves)
Taking the right cutting is the single best step toward quick rooting and healthy new leaves on a Monstera. Follow simple timing and cut placement to boost successful propagation.
Best time to take cuttings
Choose spring or summer. Active growth gives a cutting stored energy and faster root formation.
Where to make the cut
Cut about 0.5–1 inch below a visible node so the stem includes the growth point and a short tail for stability.
Common mistake: removing only the leaf and petiole yields a decorative rooted leaf, not a new monstera plant.
Tools and sanitation
Make sure shears are clean. Wipe blades with rubbing alcohol or wash in hot, soapy water before cutting.
Choosing the right piece
Pick a young, healthy leaf attached to a firm stem segment. Fresh growth offers more energy than old, damaged leaves.
“Cut 0.5–1 inch below the node and keep tools sterile for the best odds of roots and new growth.”
- Step-by-step: select spring/summer growth → sterilize shears → cut below a node → include short stem tail → place in water, soil, or moss.
- Avoid: taking only a leaf or a too-old stem that lacks vigor.
- Tip: label cuttings with the date to track time and progress.
| Step | Why it matters | Quick check |
|---|---|---|
| Timing | Warm growth speeds rooting | Spring/summer |
| Cut placement | Includes growth point and stability | 0.5–1 inch below node |
| Sanitation | Reduces rot and infection | Alcohol wipe or hot soap |
Rooting Methods That Actually Work (Water, Soil, and Moss)
Choose a rooting method that matches the type of cutting you have. Leafy cuttings, wet sticks, and leafless node cutting do best in different media. Match the setup to your piece to encourage steady root grow and healthy shoots.
Propagation in soil
Best for cuttings with a leaf. Use a small pot with drainage and an airy, fast‑draining mix. Keep the node area lightly moist, not soggy.
Position the node just under the surface so roots reach into the mix. This is the easiest long‑term way to transition a rooted cutting into potting soil.
Propagation in water
Only for cuttings that include a leaf. Leaves give energy while roots form. Submerge the node and keep leaves out of the water to avoid rot.
Change water weekly to keep it fresh. Water rooting shows roots fast, but move the cutting to soil once a good root system appears.
Sphagnum moss method
Go‑to for leafless nodes. Soak sphagnum, wring it to damp, and lay the node cutting on top. Keep the moss humid so roots and a bud can swell.
Humidity setups that help
Use a clear propagation box, loose plastic wrap, or a small terrarium. Hold moisture but allow airflow. Stagnant sealed air invites fungal issues, so open the cover briefly each day.
Quick decision guide: if a cutting without leaf stalls, switch to moss + humidity. If the cutting has a leaf and node, soil is usually the easiest way forward.
Aftercare While You Wait: Light, Heat, Humidity, and Timeframes
Patience wins—early root nubs can show up in weeks while plantable roots may take months. Expect stages: tiny root buds, visible root threads, then thick roots long enough to plant.
How long it takes
Root buds may appear within a few weeks. For sturdy, plantable roots, plan for up to three months or longer.
Temperature targets
Keep cuttings warm in typical U.S. homes—about 70–80°F. Cold windowsills slow progress.
Light and humidity
Give bright, indirect light roughly nine hours per day. That feeds root grow and supports new leaves without burning tender tissue.
Aim for humidity above 60% for leafless node cutting and wet sticks. High humidity prevents dehydration while tissue forms roots.
Airflow and support
Balance humidity with daily vents. Open covers briefly to reduce fungal risk.
Use small stakes, clips, or a node holder to keep a cutting upright so roots develop without bending or burying the growth point.
“Set realistic timeframes and protect warmth, light, and airflow; most failure is from impatience or poor microclimate.”
| Stage | Typical time | Action |
|---|---|---|
| Root buds | 2–6 weeks | Maintain warmth and humidity |
| Visible roots | 6–12 weeks | Keep bright, indirect light; vent daily |
| Plantable roots | ~3 months | Pot into soil or moss; reduce humidity gradually |
Why Your Cutting Isn’t Rooting (and What to Change)
When roots fail to appear, a few simple checks expose the most common problems. Start by separating environment issues from cutting quality so fixes are targeted and quick.
Too cold
Slow growth and stalled root development
Chilly air slows cell activity. A cutting in cooler rooms will show no root bumps and may yellow slowly. Move the piece to a warmer spot near household warmth, but avoid direct heater blasts.
Not enough light
Weak energy for rooting and new growth
Insufficient bright, indirect light causes slow growth and no bud activity. Offer roughly nine hours of gentle light or shift to a brighter window to help roots form.
Cutting quality issues
Too old, unhealthy, or missing a strong growth point
If the stem is old, soft, or lacks a viable node/bud, chances drop sharply. A rooted piece without a node will not become a new plant. The fix is a fresh piece that includes a clear node or bud.
- Recut above healthy tissue if possible.
- Switch medium: water → moss or soil for leafless pieces.
- Increase warmth and humidity; use a clear cover and vent daily.
- Start over with a node‑containing cutting when anatomy is wrong.
| Issue | Signs | Quick fix |
|---|---|---|
| Too cold | No root nubs; slow decline | Move to warmer room (70–80°F) |
| Low light | Pale leaves; no bud activity | Bright indirect light ~9 hours/day |
| Poor cutting quality | Old stem; no bud or damaged node | Take new cutting that includes a node |
“If the goal is a true new plant, anatomy beats any treatment; correct the piece or begin again.”
Conclusion
The simplest way to succeed with a Monstera cutting is to start with a piece that carries a true growth zone.
No node, no new plant. A lone leaf may root and look nice, yet it rarely becomes a full specimen. Treat leaf-only pieces as decorative, not a replacement for a real start.
To reliably propagate monstera, select a stem segment that includes at least one node and, when possible, a tiny axillary bud. Wet sticks (leafless node sections) work too, but they need warmth, humidity, and patience.
Use the knobby bump and bud tips as visual checks before any cut or purchase. Adjust light, heat, and humidity, track timelines, and try again with a better cutting if an attempt fails.