calathea propagation

Calathea Propagation: Why Cuttings Fail and What to Do Instead

Surprising fact: more than half of DIY attempts to root tropical stems in water end in rot or collapse, even for experienced plant parents.

Set expectations: you can expand your houseplant collection at home, but the “stick a cutting in water” trick that works for many plants often disappoints with this species.

This intro explains why cuttings fail, which methods fit the plant’s biology, and a dependable step-by-step division approach that gives each new plant real roots. The key point up front: division is the most dependable way to grow new plants because each division already has an established root system.

We’ll cover common failure causes—rot in water or soil, rootless shoots collapsing, and stress from low light or humidity—and give clear decision points like, “Does this shoot already have roots?”

If you want to expand a plant collection, free up an overgrown pot, or make giftable plants, this guide is for you. Friendly, practical, and honest: this plant can be picky, but the right methods make success much more likely.

Key Takeaways

  • Division is the most reliable method to produce healthy new plants.
  • Simple water rooting often fails due to rot or weak, rootless shoots.
  • Watch for established roots before separating shoots.
  • Low light and low humidity increase stress and failure risk.
  • This guide helps hobbyists expand a home collection or split crowded pots.

Why Calathea Cuttings Fail So Often

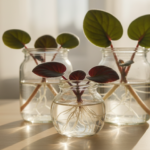
A neat stem in a glass of water looks hopeful, yet without an established root system most shoots will fail to thrive.

True divisions are sections with roots and stem clusters. A simple cutting is often just a leaf and a stem. That piece rarely builds a reliable root system like a division does.

A close-up view of a healthy Calathea plant with vibrant green, intricately patterned leaves, highlighting several cuttings in the process of propagation in a clear glass jar filled with water. The foreground focuses on the delicate details of the leaves, showing subtle variations in colors and textures. In the middle background, softly blurred, there are additional Calathea plants, showcasing their lush foliage. The lighting is warm and natural, creating a serene atmosphere, reminiscent of a sunlit indoor garden. Soft shadows play against a wooden table surface, enhancing the organic feel of the scene. The angle is slightly above eye level, emphasizing the graceful curves and movement of the leaves, inviting viewers to reflect on the beauty and challenges of Calathea propagation.

What goes wrong

Without existing roots a cutting cannot take up steady moisture. Leaves curl, yellow, or collapse even if the water level seems fine.

Water rooting can work for some varieties, but results vary. Treat water methods as experimental rather than guaranteed.

Common rot triggers

  • In water: stagnant liquid, submerged leaf bases, dirty jars, and rare water changes cause mushy stems and odor.
  • In soil: overwet potting soil, a pot without drainage, compacted mix, or planting too deep keep the base soggy.
  • Tools: a dull or dirty knife spreads disease and damages tissue, raising failure odds.

Bad conditions — low humidity, cold drafts, or harsh sun — stress cuttings and reduce rooting chances. If you want a repeatable method, start with divisions that already have roots. For more on avoiding rot in containers and soil, see root rot prevention.

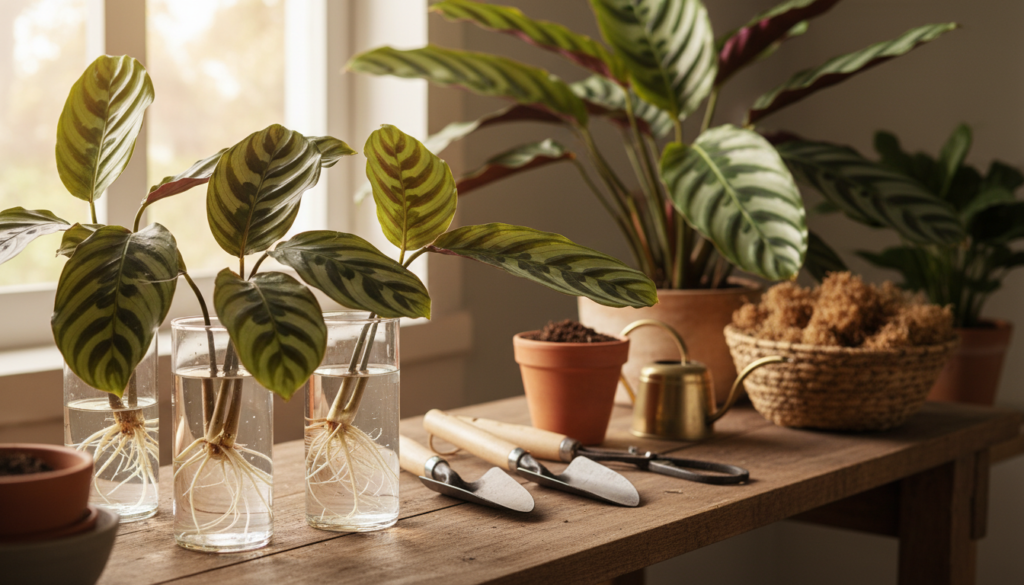
Calathea Propagation by Division: The Method That Actually Works

Splitting a crowded pot is the fastest way to create new, resilient houseplants with far less risk than water methods. Aim for early spring through early summer in the United States so divisions enter active growth and establish roots fast.

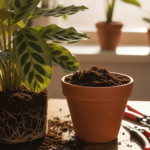
Readiness checklist: choose a healthy mother plant with multiple stem clusters or a rootbound pot. Gather clean pots with drainage, fresh potting soil, a sharp sterile knife, disinfectant, and a watering can with room-temperature water.

A lush, vibrant Calathea plant is positioned in the foreground, showcasing its distinctive broad, oval leaves with striking patterns of deep green and light green stripes. The scene captures the process of propagation by division, featuring a skilled gardener's hands gently separating the root clumps, revealing healthy roots and new growth. In the middle ground, a clean pot stands ready, filled with rich, dark potting soil and ready for planting. Surrounding elements include small gardening tools, such as scissors and a trowel, artfully arranged to convey the theme of propagation. The background is softly blurred with hints of a sunny indoor garden, infused with warm, natural light that creates a peaceful and nurturing atmosphere. The overall mood is inviting and educational, reflecting care and dedication to plant care.

  1. Water the day before so the root ball holds together and slips free.
  2. Tip the plant out gently, support the base, and brush soil away to reveal natural clumps.
  3. Tease roots apart with fingers; only use a clean knife if roots are tightly fused.
  4. Trim damaged roots, then pot using the mound method: fill pot one-third, make a small mound, drape roots, backfill and firm gently.
  5. Water until it drains, avoid pooling, and optionally cover lightly with clear plastic until new growth appears.

“Division reduces shock because each section already has roots — it’s the single most dependable step to grow new plants at home.”

Step Why it matters Tools Timing
Prep (water day before) Prevents root breakage and eases removal Watering can 1 day before
Find natural divisions Ensures each piece has roots Hands, brush Spring–early summer
Use sterile cuts if needed Reduces disease risk Sharp knife, alcohol Only when fused
Pot & water Settles soil and prevents air pockets Pots, potting soil Immediately after division

Aftercare for New Plants: Light, Water, and Conditions That Support Rooting

What you do in the weeks after splitting a pot matters more than the splitting itself. The goal is simple: reduce stress while roots re-establish and the plant balances water uptake.

Light guidance

Place new plants in bright, indirect light near an east or filtered south window. This supports growth without scorching leaves or drying the pot too fast.

Watering rhythm

Keep soil lightly moist, not soggy. Use the finger test and water when the top inch feels dry. Water slowly until a little runoff appears, then empty the saucer.

Humidity and temperature

Aim for warm, stable indoor conditions and higher humidity. Use a humidifier, group plants, or a temporary clear cover if home air is dry.

Early warning signs

Yellowing leaves often mean overwatering or root stress. Limp petioles can signal dehydration or damaged roots. A sour smell usually points to rot. If symptoms appear, adjust watering, move to better light, and check the roots.

Stability first: avoid fertilizing right after division and limit moving the pot for a few weeks.

A serene indoor garden scene featuring vibrant young Calathea plants thriving under gentle, diffused sunlight. In the foreground, several cuttings are neatly arranged in clear glass jars filled with water, showcasing their roots beginning to form. The middle layer includes healthy Calathea plants in decorative ceramic pots, their striking green and purple leaves expanding beautifully. The background reveals a bright and airy window with sheer curtains, allowing soft golden light to filter through, enhancing the fresh, nurturing atmosphere. A small moisture meter is subtly placed beside the plants, symbolizing care and attention to their aftercare needs. The overall mood is calm and encouraging, inviting viewers to appreciate the delicate process of plant propagation.

Aftercare Step What to do Why it matters Quick fix
Light Bright, indirect (east or filtered south) Supports photosynthesis without stress Move away from direct sun
Watering Finger test; water when top inch dries Prevents rot and dehydration Water slowly, empty saucer
Humidity & Temp Keep warm; raise humidity with humidifier/grouping Mimics rainforest conditions for root growth Cover briefly or use pebble tray
Monitoring Watch leaves and smell; inspect roots if needed Early detection prevents failure Adjust water, soil, or pot promptly

Conclusion

Division gives you baby plants with real roots, not hopeful stems that often wither.

When you want to propagate calathea, divide healthy stem clusters in spring for the smoothest recovery. This one clear step improves success because each new plant already has a root system.

High-level steps: prep the potting soil and water the parent the day before, separate natural clumps, use a sterile cut only if needed, pot into well-draining pots, and keep light and humidity steady.

Success looks like stable leaves, no ongoing yellowing, and new growth after a few weeks. If you try propagating calathea in water, treat it as variety-dependent and experimental rather than the go-to method.

With proper timing, clean tools, and consistent care, you can turn one mature plant into several healthy new plants without guesswork.

FAQ

Why do so many cuttings fail when trying to make new plants?

Most varieties won’t root reliably from stem cuttings the way pothos or philodendron do. A shoot without roots often lacks the stored energy and nodal tissue needed to form a healthy root system, so it wilts or rots before establishing. Instead, use division or plantlets from the base for better success.

Can I root a shoot in water to make it easier?

Water rooting can work for some species, but results are inconsistent across varieties. Water weakens fine root hairs and increases rot risk, especially if light, temperature, or water cleanliness aren’t ideal. For dependable results, try dividing established clumps and potting them in a fast-draining mix.

What common setup mistakes cause rot in soil or water?

Overwatering, poor drainage, contaminated tools, and low light are the usual culprits. Heavy, compacted potting soil holds too much moisture, while standing water or dirty containers promote pathogens. Use fresh, loose mix, clean tools with isopropyl alcohol, and provide bright indirect light to reduce rot risk.

When is the best time of year to divide and create new plants in the U.S.?

Spring and early summer are ideal. Plants are entering active growth, so divisions root faster and recover more quickly. Avoid dividing during dormancy or in the heat of summer when stress and transplant shock are harder to manage.

What should I gather before dividing a mature plant?

Prepare fresh pots with good drainage, a well-draining potting mix, a sharp sterile knife or shears, disinfectant wipes or isopropyl alcohol, and a watering can. Having everything ready shortens the time roots are exposed and lowers stress on the plant.

How should I prep the plant the day before dividing?

Water the plant lightly the day before to hydrate roots without making the soil soggy. This helps soil hold together for easier removal and reduces the chance of root damage. Also set up your potting area with clean surfaces and supplies.

What’s the safest way to remove the plant from its pot?

Gently tip the pot and squeeze the sides if it’s plastic to loosen the root ball. Slide the root ball out while supporting the base and lift carefully to avoid bending or snapping stems and fragile roots. If stuck, run a knife around the inner edge of the pot.

How do I identify natural divisions to separate stem clusters safely?

Look for discrete clumps with their own stems and root clusters. Each division should have several healthy leaves and an obvious root mass. Work the root ball apart gently with your fingers, teasing roots free rather than cutting whenever possible.

When is a clean cut necessary and how do I do it properly?

If roots are tightly intertwined or a division won’t separate by hand, use a sharp, sterile knife. Make clean cuts through the root mass to preserve as many roots per division as possible. Disinfect the blade between cuts to prevent disease spread.

How should I pot each division to encourage quick rooting?

Use well-draining potting soil and a pot with drainage holes. Mound fresh mix in the center, position the division so roots spread naturally, then backfill gently while keeping the crown at the same soil level it had before. Press lightly to remove air pockets without compacting.

How much should I water right after potting new plants?

Water thoroughly until excess drains from the bottom, then allow the top inch of soil to dry slightly. Aim for even moisture—avoid both bone dry and waterlogged conditions. Overwatering is the fastest way to cause root rot in newly potted divisions.

Is it helpful to cover new pots for humidity? For how long?

A clear plastic cover or mini greenhouse can raise humidity and reduce transplant stress. Keep it on for one to three weeks, checking daily for condensation and ventilation. Remove the cover gradually as new growth appears to prevent fungal issues.

How do I repot the original, or mother, plant after taking divisions?

Choose a pot that gives the remaining root mass room to grow but isn’t excessively large. Refresh the potting mix and position the plant at its previous soil depth. Water to settle the soil, then return it to bright, indirect light and normal care routine.

What light level helps new divisions thrive without stressing leaves?

Bright, indirect light is best. Direct sun can scorch thin leaves, while low light slows root development. A north- or east-facing window or filtered light from sheer curtains provides consistent, gentle illumination.

What watering rhythm supports root development in newly potted plants?

Keep the soil lightly moist but never soggy. Check the top inch daily; water when it begins to dry. Use room-temperature water and maintain good drainage to prevent excess moisture that invites root disease.

How can I mimic rainforest humidity and temperature at home?

Place a humidity tray with pebbles and water beneath the pot, group plants together, or run a humidifier nearby. Maintain indoor temps between 65–80°F and avoid cold drafts that shock roots and leaves.

What early warning signs show a division is struggling?

Yellowing or drooping leaves, brown leaf edges, and slow or stalled new growth are common signs. Soft, mushy roots or a sour smell indicate rot. Respond quickly by checking drainage, reducing water, and trimming any dead roots.

Can I use regular garden soil, or should I buy a specific mix?

Use a high-quality indoor potting mix with added perlite, orchid bark, or coconut coir for aeration and drainage. Garden soil is too dense and retains too much water, raising rot risk and limiting oxygen to roots.

Comments

No comments yet. Why don’t you start the discussion?

Leave a Reply

Your email address will not be published. Required fields are marked *