Surprising fact: one single leaf can yield three or more identical houseplants when handled correctly — a tiny budget change that scales fast.
Cloning through cuttings keeps hybrid DNA intact, so your favorite patterned foliage returns exactly the same. This method is simple and ideal for indoor gardeners in the United States who can control warmth, light, and humidity.
We’ll cover why leaf cuttings work, what you need, the easiest step-by-step approach, and how to pot up baby plants. The core method is straightforward: lay a leaf flat on moist mix, slice veins, pin it down, and cover for humidity.
Success hinges on balance: consistent moisture, good airflow, and clean tools to prevent rot. Be patient — plantlets form from veins over weeks, not overnight. One treated leaf can produce several new plants, making this a cost-effective way to expand a collection.
Key Takeaways
- Leaf-based cloning keeps hybrids true to type.
- Ideal for indoor US gardeners with stable conditions.
- Core steps: flat leaf, slice veins, pin, and cover.
- Maintain moisture, airflow, and tool hygiene to avoid rot.
- Patience pays off — expect weeks for visible plantlets.
Why Leaf Cuttings Work for Indoor Begonias
This method uses a mature section of foliage to make new plants by encouraging healing and new growth from living tissue. It works especially well for rex, rhizomatous, and tuberous varieties because their leaves hold the energy and meristematic cells needed to form roots and shoots.
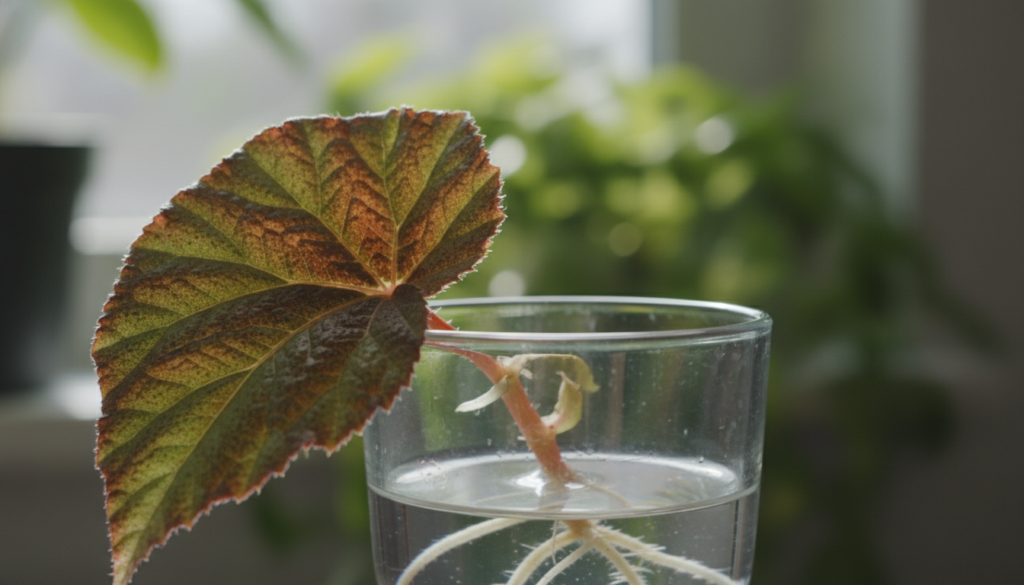
How plantlets form: tiny baby plantlets appear where you nick major veins or near the petiole—the short stem that connects a leaf to the parent plant. The cut area calluses, then develops roots, and finally shoots pop up from those spots.
Compared with stem cuttings, this way can make multiple plants from a single mature piece. Stem cuttings often root faster, but not every variety will produce whole new plants from one stem.

Indoor timing and care
Expect slow but steady progress. First a callus forms, then roots show, and plantlets appear. In typical indoor conditions, that sequence can take up to six weeks. Stable warmth, steady humidity, and bright indirect light are the most important factors.
| Method | Speed | Number of new plants | Best for |
|---|---|---|---|
| Leaf sections | Slow (weeks) | Multiple from one piece | Rex, rhizomatous, tuberous |
| Stem cuttings | Faster (days–weeks) | Usually one per cutting | Stems and cane types |
| Whole-plant division | Fast | Depends on division | Clumping types |
Supplies and Setup for Successful Leaf Cuttings
Gathering the right supplies and a tidy setup makes success with leaf cuttings much more likely. Start with clean tools and a shallow, clear container to hold moisture without trapping pathogens.

Rooting media choices
Perlite stays sterile and keeps air pockets. Vermiculite holds water well. A seed-starting mix is convenient but watch moisture. Sterile combos lower rot risk.
Humidity containers and sizing
Use clear trays with lids, recycled takeout containers, a small dome, or plastic wrap over a shallow tray. About 3–4 inches depth is enough and the lid should clear the leaf as it lies flat.
Tools and sterilization
A sharp razor blade or knife gives clean cuts. Use T-pins or hairpins and small stones to keep cuts on the surface. Rinse tools, hands, and containers in a mild sterile solution—try 1 tsp bleach per quart of water—or use peroxide, then air-dry.
Light, warmth, and watering
Place trays in bright, indirect light or under fluorescent fixtures 12–14 hours daily. Keep room temps near 70°F. Moisten the mix so it is damp, not muddy; perlite may need more frequent water checks.
| Item | Why | Tip |
|---|---|---|
| Perlite | Sterile, airy | Drains fast; rewet often |
| Vermiculite | Holds moisture | Good for slow-drying setups |
| Clear container | Maintains humidity | 3–4 inches deep; lid clears surface |
| Sharp blade/knife | Clean cuts reduce rot | Sterilize before each use |
For extra reading on preventing decay in indoor setups, see prevent root rot.
Begonia Leaf Propagation: The Easiest Indoor Method (Vein-Cut Leaf on Mix)
This vein-cut technique makes it easy to coax new plantlets from mature foliage with common household supplies. Below is a compact, step-by-step walkthrough to help indoor gardeners get reliable results.
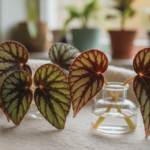
Choose the right piece
Select a healthy, full-grown leaf with firm texture and strong veins on the underside. Even an older or slightly tattered leaf can work if the veins are plump and undamaged. Trim the petiole close to the base if needed.
Positioning and surface contact
Lay the leaf underside down on a moist, well-drained potting mix in a shallow tray or wide container. Press gently so the cut areas touch the surface but avoid forcing the main veins flat.

Make activation cuts and anchor
Using a clean blade or knife, make about 5–6 half-inch cuts across large veins about 1 inch from the central vein. These act as activation points for plantlets.
Pin each cut to the mix with T-pins, hairpins, or small stones. Do not pin through main veins; anchor only near the sliced spots so each cut stays in firm contact with the surface.
Cover, moisture, and placement
Cover with a dome, loosely tented plastic, or an open plastic bag—avoid letting plastic touch the foliage to cut fungal risk. Keep the mix evenly moist with tepid water; do not let it become soggy.
Place the tray in bright, indirect light or under fluorescent lamps at about 70°F. Check water more often if the mix has a high perlite content.
Tip:Consistent humidity, clean tools, and gentle anchoring give the best chance that plantlets will form at the cut sites.
Rooting, Plantlet Care, and Transplanting to Pots
Watch closely during weeks one to six: the cut surface will seal, tiny roots appear, and small plantlets push up at the activation cuts.

What to expect and when to act
First a callus forms at each cut. Then fine roots show along the surface where you made the cut.
Little new plants appear at the vein cuts and sometimes near the petiole or leaf stem area. This is normal.
When to separate and how to pot up
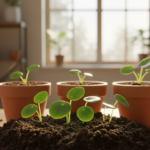
Transplant once plantlets are about 2–3 inches tall with several true leaves and firm roots. Gently loosen the tray surface and lift each plantlet with some attached roots.
Place them into small starter containers—3-inch pots—with fresh potting mix. Keep root balls intact and handle plants minimally.
Hardening off and aftercare
Keep young plants in bright, indirect light and mild humidity after potting. Water lightly and consistently. Over 5–7 days, gradually reduce humidity by cracking the lid or opening the plastic more each day.
Common mistakes to avoid
- Do not let covered trays bake in direct sun; that causes overheating.
- Sterilize your blade before each cut to prevent contamination.
- Avoid an overly wet mix and never let plastic touch growing tissue.
Conclusion
Summary: one healthy leaf, a few clean cuts across veins, firm contact with a damp sterile mix, and a covered container with steady humidity form the easiest indoor way to make new plants.
Remember the big four: warmth, bright indirect light, clean tools, and evenly moist — not soggy — media. Perlite or vermiculite work well as sterile options in a potting mix or soil blend.
If rot appears, switch to a more sterile mix and double-check tool disinfection. If trays dry out, improve the seal or mist gently so water reaches activation points.
Start with reliable begonias and use multiple leaves to raise success odds. Be patient: cuttings take weeks to show plantlets. Try the method, label varieties if you use several, and enjoy expanding your collection at low cost.